Arduino Hand Wash Timer
Background
ผมสร้างโปรเจกต์นี้ขึ้นมาเพื่อให้แน่ใจว่าครอบครัวของผมได้รับการปกป้อง และพวกเขาล้างมือเป็นเวลาที่เหมาะสม โดยใช้ Ultrasonic Sensor ในการตรวจจับมือ และ LCD ขนาด 16x2 เพื่อแสดงเวลาที่เหลืออยู่ โปรเจกต์ทั้งหมดนี้ใช้ Arduino Pro Micro เป็นหัวใจหลัก
How does it work?
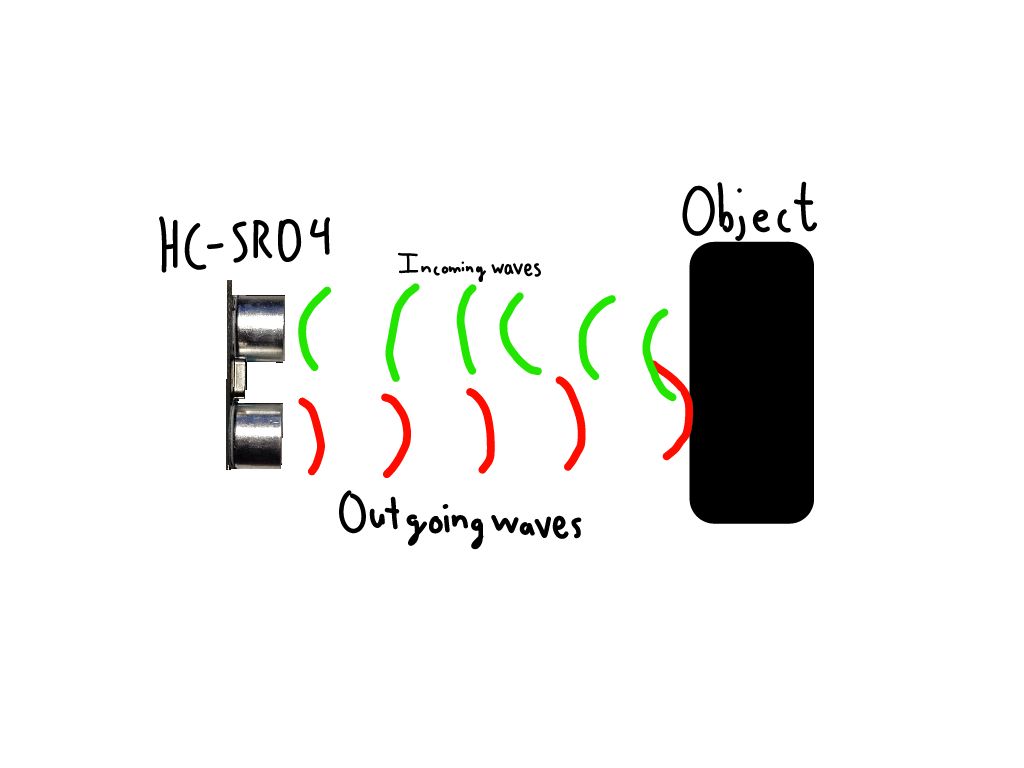
โปรเจกต์นี้ใช้ HC-SR04 Ultrasonic Sensor ในการตรวจจับมือของผู้ใช้ เซ็นเซอร์จะทำงานโดยการส่งคลื่นเสียงที่ความถี่ 40kHz และรอว่ามีคลื่นเสียงสะท้อนกลับมาหรือไม่ หากมีคลื่นเสียงสะท้อนกลับมา เซ็นเซอร์ก็จะส่งสัญญาณไปยัง Arduino (ดูภาพประกอบด้านล่าง)
Arduino จะรับข้อมูลจาก Ultrasonic Sensor และคำนวณว่าวัตถุอยู่ห่างออกไปเท่าไร หากวัตถุอยู่ในระยะ 35 เซนติเมตร Arduino ก็จะตั้งค่า Pin Backlight ของ LCD (ซึ่งปกติจะเชื่อมต่อกับสาย 5v) ให้เป็น HIGH เพื่อให้ Backlight เปิดขึ้น (ดูวิดีโอข้างล่าง)
How does it go together?
ดู Schematic สำหรับรายละเอียดเพิ่มเติม
Pinout ของ Ultrasonic Sensor:
Vcc: 5V
Trig: Pin D9
Echo: Pin D10
Gnd: Gnd
Pinout ของ LCD:
VSS: Gnd
VDD: 5V
VO: Gnd พร้อม Resistor 1k (จริง ๆ แล้วควรใช้ Potentiometer ตรงนี้เพื่อปรับ Contrast ให้ดีขึ้น Resistor นี้มีไว้เพื่อให้กระทัดรัดเท่านั้น)
RS: Pin D13
RW: Gnd
E: Pin D12
(ข้าม D0-D3)
D4: Pin D5
D5: Pin D4
D6: Pin D3
D7: Pin D2
A: Pin D7 (สำหรับเปิดและปิด Backlight)
K: Gnd
How the code works
โค้ดนี้รวม Library ที่จำเป็นทั้งหมด
#include <LiquidCrystal.h>
#include "pitches.h"
โค้ดนี้ตั้งค่าตัวแปรและ Array โทนเสียงทั้งหมด
#define screenPower 7 //กำหนด Pin จอภาพ (เพื่อเปิดและปิด backlight ของ lcd โดยอัตโนมัติ)
// กำหนดหมายเลข Pin ของ HC-SR04
const int trigPin = 9;
const int echoPin = 10;
//ตัวแปรสำหรับ HC-SR04
long duration;
int distance;
// สร้าง Object LCD พารามิเตอร์: (RS, E, D4, D5, D6, D7):
LiquidCrystal lcd = LiquidCrystal(13, 12, 5, 4, 3, 2);
int timeLeft = 20; //ตัวแปรสำหรับแสดงเวลาที่เหลือ
int speakerPin = 11;
int toneDuration = 100;
int tickDuration = 25;
//Array ของโน้ตสำหรับโทนเสียงเมื่อเสร็จสิ้น
int doneTone[] = {
 NOTE_C4, NOTE_D4, NOTE_E4, NOTE_F4, NOTE_G4, NOTE_A4, NOTE_B4, NOTE_C5
};
//โน้ตของเสียงติ๊ก
int tick[] = {
 NOTE_C5
};
โค้ดนี้ตั้งค่า LCD และเริ่มการทำงานของ Ultrasonic Sensor
void setup() {
 pinMode(trigPin, OUTPUT); // กำหนด trigPin เป็น Output
 pinMode(echoPin, INPUT); // กำหนด echoPin เป็น Input
 Serial.begin(9600); // เริ่มการสื่อสารแบบ Serial
 //ตั้งค่าแถวและคอลัมน์ของ LCD:
 pinMode(screenPower, OUTPUT);
 digitalWrite(screenPower, HIGH);
 delay(200);
 lcd.begin(16, 2);
 lcd.setCursor(0, 0);
 lcd.print("Hand Wash Timer");
 lcd.setCursor(0, 1);
 lcd.print("By:Danny Pashkow");
 delay(3000);
 lcd.clear();
 lcd.setCursor(0, 0);
 digitalWrite(screenPower, LOW);
}
นี่คือส่วนที่วนลูปทุก ๆ วินาทีเพื่อตรวจสอบวัตถุ
void loop() {
 // ล้าง trigPin
 digitalWrite(trigPin, LOW);
 delayMicroseconds(2);
 // ตั้งค่า trigPin เป็น HIGH เป็นเวลา 10 microsecond
 digitalWrite(trigPin, HIGH);
 delayMicroseconds(10);
 digitalWrite(trigPin, LOW);
 // อ่าน echoPin ส่งกลับเวลาที่คลื่นเสียงเดินทางใน microsecond
 duration = pulseIn(echoPin, HIGH);
 // คำนวณระยะทาง
 distance = duration * 0.034 / 2;
 // พิมพ์ระยะทางบน Serial Monitor
 Serial.print("Distance: ");
 Serial.println(distance);
 if (distance < 10) {
   Serial.println("Hand detected");
   isHand = true;
 }
 if (isHand == true) {
   handDetected();
 }
 if (timeLeft < 0) {
   noTimeLeft();
 }
}
โค้ดนี้จะทำงานเมื่อเวลา 20 วินาทีหมดลง
void noTimeLeft() {
 lcd.clear();
 lcd.setCursor(6, 0);
 lcd.print("Done!");
 for (int thisNote = 0; thisNote < 8; thisNote++) {
   tone(11, doneTone[thisNote], toneDuration);
   delay(100);
 }
 delay(5000);
 lcd.clear();
 digitalWrite(screenPower, LOW);
 timeLeft = 20;
 isHand = false;
 lcd.setCursor(0, 0);
}
และโค้ดนี้จะทำงานเมื่อ Ultrasonic Sensor ตรวจจับวัตถุได้
void handDetected() {
 digitalWrite(screenPower, HIGH);
 lcd.clear();
 lcd.setCursor(0, 0);
 lcd.print("Time Remaining: ");
 lcd.setCursor(0, 1);
 lcd.print(timeLeft);
 lcd.print(" seconds");
 timeLeft -= 1;
 for (int thisTick = 0; thisTick < 3; thisTick++) {
   tone(speakerPin, tick[thisTick], tickDuration);
 }
 delay(1000);
}
STL Files
เพื่อให้โปรเจกต์นี้สมบูรณ์และช่วยเรื่องการกันน้ำได้เล็กน้อย คุณสามารถใช้ 3D Printer (หรือสั่งซื้อจากเว็บไซต์เช่น Protolabs) แม้ว่าเคสจะช่วยเรื่องน้ำได้บ้าง แต่ก็ควรระมัดระวังอย่างยิ่งไม่ให้น้ำโดนอุปกรณ์อิเล็กทรอนิกส์ที่อยู่ข้างอ่างล้างมือ ปัญหานี้ไม่สามารถแก้ไขได้จริง ๆ เว้นแต่จะมีเวอร์ชันกันน้ำโดยสมบูรณ์ (ซึ่งจะต้องใช้ PCB, ทักษะการบัดกรี และเคสกันน้ำ) ดังนั้นจึงควรระมัดระวังให้มาก
ไฟล์ STL:
https://www.thingiverse.com/thing:4365811
ไฟล์เหล่านี้จะถูกรวมไว้ที่ด้านบนของโปรเจกต์ด้วย
Price
ราคาสำหรับโปรเจกต์นี้ (ไม่รวมสาย Jumper และราคา 3D Printer และ Filament) อยู่ที่ประมาณ 30 USD
Final Video!
ข้อมูล Frontmatter ดั้งเดิม
title: "Arduino Hand Wash Timer"
description: "This timer operates completely hands free and provides an accurate amount of time needed to wash your hands."
author: "dlpashkow"
category: "Wearables, Health & Fitness"
tags:
  - "sensor"
  - "human welfare"
  - "covid19"
views: 7513
likes: 0
price: 1499
difficulty: "Intermediate"
components:
  - "1x Ultrasonic Sensor - HC-SR04 (Generic)"
  - "1x Arduino Nano R3"
  - "1x Alphanumeric LCD, 16 x 2"
  - "1x Passive Buzzer"
  - "1x 170 Point Breadboard"
tools: []
apps:
  - "1x Arduino IDE"
  - "1x Ultimaker Cura"
downloadableFiles: []
documentationLinks: []
passwordHash: "c9a7f80401e7e257fa2aa8cd4e511935e9350271185c667c534cea2ee7e1723a"
encryptedPayload: "U2FsdGVkX1/bVy5ObY5QliOPzYCrqzvQt3Ge7HzgSEVUCedIInwEUJYbsAl1GpDnxTwTbu1ZeQhF79mbWRLRs+yo4fCbH39JpZj2YhKED9NFeLWk87P5wHFgghFVIVxN"
seoDescription: "Build a hands-free Arduino Hand Wash Timer for accurate and hygienic hand washing timing."
videoLinks:
  - "https://www.youtube.com/embed/U72lUYjGlHs"
  - "https://www.youtube.com/embed/SPIW2leynAc"
heroImage: "https://cdn.jsdelivr.net/gh/bigboxthailand/arduino-assets@main/images/projects/arduino-hand-wash-timer-2b5db3_cover.jpg"
lang: "th"