ชื่อโปรเจกต์: Arduino - การสื่อสารแบบ Serial กับ Visual Studio
บทความนี้จะแสดงวิธีสื่อสารระหว่าง Arduino และ Visual Studio ผ่านพอร์ต COM (UART)
(1) Arduino จะส่งข้อมูลไปยังโปรแกรม Visual Studio:

(2) โปรแกรม Visual Studio จะส่งข้อมูลไปยัง Arduino โดย Arduino จะรับข้อมูลนั้นแล้วส่งกลับไปยังโปรแกรม Visual Studio

ภาพรวมขั้นตอน:
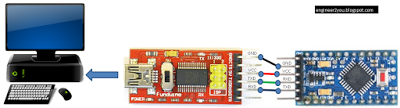
1. การเชื่อมต่อ Hardware
2. โปรแกรม Arduino
3. โปรแกรม Visual Studio
1. การเชื่อมต่อ Hardware
2. โปรแกรม Arduino
สร้างโปรแกรมสำหรับ Arduino เมื่อเริ่มต้น Arduino จะส่ง string (ข้อความ) ทุก 0.5 วินาที การส่งนี้จะหยุดเมื่อ User ส่งข้อมูล (string) ไปยัง Arduino จากนั้น Arduino จะส่งกลับไปยัง User ในกรณีนี้ User คือโปรแกรม Visual Studio (ในส่วนที่ 3)
สามารถดาวน์โหลดโค้ดได้ ที่นี่ - Google share
String mySt;
 char myChar = 0;
 int i=0;
void setup() {
   // start serial port at 9600 bps:
   Serial.begin(9600);
   while (!Serial) {
     ; // wait for serial port to connect. Needed for native USB port only
   }
  establishContact();  // send a byte to establish contact until receiver responds
 }
void loop() {
   if (Serial.available() > 0) {
     myChar = Serial.read();
     mySt +=myChar;  //receive string from Computer
   }
   if ((mySt.length() >0)&(!Serial.available())) {
     Serial.print(mySt); //Print received string to Computer
     mySt="";
   }
 }
 void establishContact() {
   while (Serial.available() <= 0) {
     Serial.print("Arduino send: ");
     Serial.println(i);  //Print increasing value to Computer
     i+=1;
     delay(500);
   }
 }
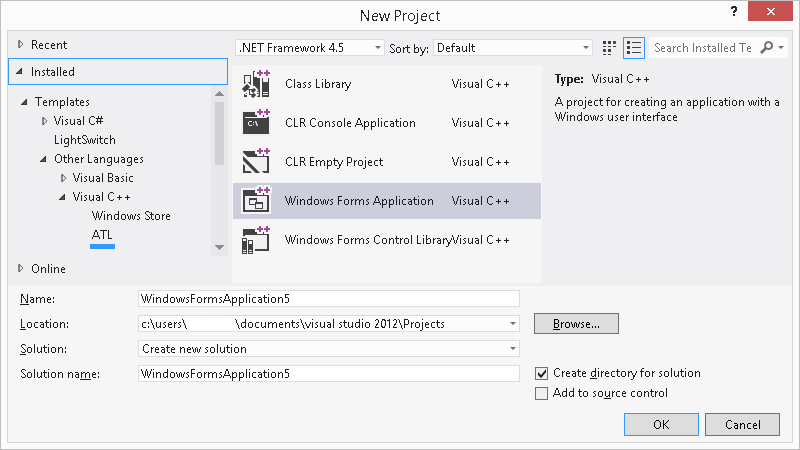
3. โปรแกรม Visual Studio
สร้าง Windows application 🠚 บันทึกไว้
เพิ่ม button, textbox และ label ลงใน Form (นำมาจาก Toolbox ทางด้านซ้าย):
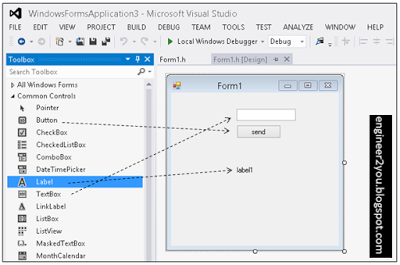
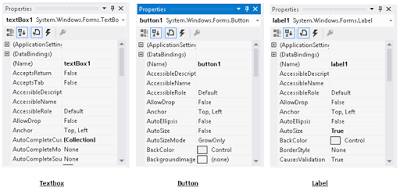
คลิกที่ button, textbox และ label เพื่อดู Properties ใน Toolbox ทางด้านขวา จดจำชื่อของแต่ละรายการเพื่อใช้ในการเขียนโปรแกรมในส่วนถัดไป
เพิ่ม component "serial Port" และ "timer":
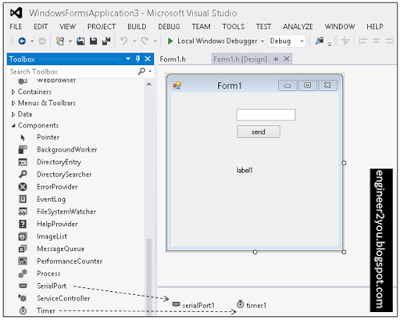
นอกจากนี้ ให้ดู Properties เพื่อทราบชื่อแต่ละรายการ อย่าลืมเปลี่ยนชื่อ "serialPort1" 🠚 "Portname" เป็น COM-Port ของ Arduino (ในกรณีนี้คือ COM4)

การเขียนโปรแกรม: โค้ดโปรแกรม Visual Studio ทั้งหมดสามารถดาวน์โหลดได้ที่นี่ - Google share
(1) ดับเบิลคลิกที่ Form1 🠚 ป้อนโค้ดต่อไปนี้
ความหมาย: เปิด (Arduino) COM-Port และเริ่ม timer1
private: System::Void Form1_Load(System::Object^  sender, System::EventArgs^  e) {
 serialPort1->Open();
 timer1->Start();
 }
(2) ดับเบิลคลิกที่ Button1 🠚 ป้อนโค้ดต่อไปนี้
ความหมาย: ส่ง string จาก textBox1 ไปยัง (Arduino) COM-Port
private: System::Void button1_Click(System::Object^  sender, System::EventArgs^  e) {
 serialPort1->WriteLine(textBox1->Text);
 }
(3) ดับเบิลคลิกที่ timer1 🠚 ป้อนโค้ดต่อไปนี้
ความหมาย: ทุกครั้งที่ timer1 ทำงาน (จะทำงานทุก 0.1 วินาที 🠚 ตั้งค่าใน "Interval" ของ Properties ของ timer1) label1 จะอัปเดตข้อมูล
private: System::Void timer1_Tick(System::Object^  sender, System::EventArgs^  e) {
 label1->Text=mStr;
 }
(4) คลิกที่ serialPort1 🠚 ดูที่ Properties toolbox 🠚 คลิกที่ไอคอน "Event" 🠚 ดับเบิลคลิกที่ "DataReceived"
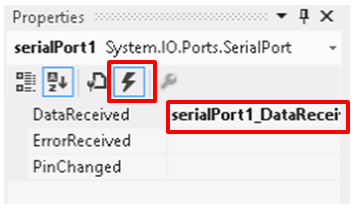
จากนั้นป้อนโค้ดต่อไปนี้
ความหมาย: อ่านข้อมูล COM-Port ทุกครั้งที่ได้รับ 🠚 บันทึกไปยัง "mStr"
private: System::Void serialPort1_DataReceived(System::Object^  sender, System::IO::Ports::SerialDataReceivedEventArgs^  e) {
 mStr=serialPort1->ReadLine();
 }
โค้ดเสริม:
(1) ความหมาย: เมื่อ Form1 ถูกปิด 🠚 ปิด COM-Port และหยุด timer1
~Form1()
 {
 if (components)
 {
 delete components;
 }
 serialPort1->Close();
 timer1->Stop();
 }
(2) ความหมาย: สร้าง global variable "mStr"
private:
 /// <summary>
 /// Required designer variable.
 String^ mStr;
 /// </summary>
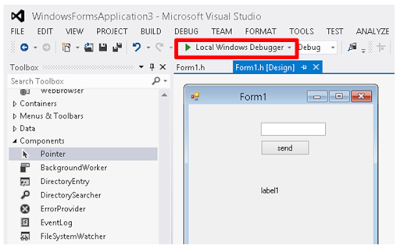
หลังจากนั้น ให้คลิกไอคอน "Local Window Debugger" เพื่อ build และ run โปรแกรม
หากทุกอย่างทำงานได้ราบรื่น window form จะปรากฏขึ้น (หมายเหตุ: Arduino ควรเชื่อมต่อกับคอมพิวเตอร์ผ่าน COM4 ด้วยโปรแกรมตามขั้นตอนที่ 2)
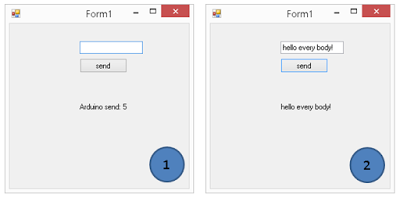
ที่ผลลัพธ์ (1): Form1 จะแสดงผลลัพธ์จาก Arduino
ที่ผลลัพธ์ (2): Form1 จะส่งข้อมูลไปยัง Arduino จากนั้นจะรับข้อมูลหลังจากที่ Arduino ส่งกลับมา
รายละเอียดทางเทคนิคเพิ่มเติม
การรวมระบบ Embedded แบบ Full-Stack
โปรเจกต์นี้เชื่อมช่องว่างระหว่าง Hardware ระดับต่ำและการพัฒนา Windows application ระดับสูง
- Serial Protocol: Arduino ทำหน้าที่เป็นโหนดสำหรับการเก็บข้อมูล โดยส่งค่าที่อ่านได้จาก sensor หรือ status flag ผ่าน USB โดยใช้โปรโตคอล Universal Asynchronous Receiver-Transmitter (UART)
- C# / .NET Interface: แอปพลิเคชันที่สร้างขึ้นเองใน Visual Studio 2015 โดยใช้ namespace
System.IO.Portsจะคอยฟังพอร์ต COM ที่ระบุ มันจะ parse string ที่เข้ามาและอัปเดต Graphical User Interface (GUI) แบบ real-time
การควบคุมแบบสองทิศทาง
ระบบนี้ไม่ได้มีไว้แค่สำหรับการ monitor เท่านั้น แต่ยังช่วยให้สามารถควบคุม Hardware ได้จากระยะไกลด้วย
- Command Parsing: ผู้ใช้สามารถคลิก button ใน Windows app เพื่อส่ง bytes กลับไปยัง Arduino ได้
Serial.read()loop ของ Arduino จะตีความ bytes เหล่านี้เพื่อเปิด/ปิด LED, ควบคุม motor หรือปรับค่า parameters ของระบบ ซึ่งแสดงให้เห็นถึง loop การควบคุมจาก PC ไปยัง embedded ที่แข็งแกร่ง