title: DIY Home Automation: เปลี่ยนบ้านธรรมดาให้เป็น Smart Home ด้วยระบบควบคุมเสียงคล้าย JARVIS description: โปรเจกต์สร้างระบบควบคุมเครื่องใช้ไฟฟ้าในบ้านด้วยคำสั่งเสียงผ่าน Arduino และ Bluetooth ในงบประมาณที่เข้าถึงได้
แรงบันดาลใจ
ในฐานะแฟนตัวยงของ Iron Man ผมใฝ่ฝันมาโดยตลอดที่จะมีระบบผู้ช่วยส่วนตัวเหมือน JARVIS อยู่ที่บ้าน ความรู้สึกที่สามารถควบคุมสภาพแวดล้อมของคุณได้เพียงแค่พูดคำสั่งนั้นน่าทึ่งจริงๆ แม้ว่าปัจจุบันจะมีระบบ Home Automation สำเร็จรูปมากมาย แต่เสน่ห์ของการสร้างด้วยตัวเอง (DIY) อยู่ที่การได้เข้าใจกลไกการทำงานทุกส่วน และสามารถปรับแต่งให้เข้ากับความต้องการที่แท้จริงของคุณได้ ดังนั้น ผมจึงตัดสินใจออกแบบและสร้างระบบควบคุมบ้านอัจฉริยะนี้ด้วย Arduino
หลักการทำงาน
หัวใจหลักของโปรเจกต์นี้คือการแปลง "คำพูด" ให้เป็น "การกระทำทางไฟฟ้า" ระบบจะทำงานประสานกันในสามส่วนหลัก:
- Interface Layer (ส่วนติดต่อผู้ใช้): เราจะใช้ smartphone เพื่อรับและประมวลผลเสียงผ่านแอปพลิเคชัน จากนั้นส่งสตริงคำสั่งผ่านสัญญาณ Bluetooth
- Processing Layer: Arduino จะรับข้อมูลจากโมดูล Bluetooth (HC-05) ผ่านพอร์ต Serial แล้วนำข้อความที่ได้รับไปเปรียบเทียบกับเงื่อนไขในโปรแกรม
- Control Layer: เมื่อเงื่อนไขตรงกับคำสั่ง Arduino จะส่งสัญญาณ Digital ไปยังโมดูล Relay ซึ่งทำหน้าที่เป็น "สวิตช์อิเล็กทรอนิกส์" เพื่อเชื่อมต่อหรือตัดการเชื่อมต่อวงจรไฟฟ้าของอุปกรณ์ต่างๆ เช่น ไฟ, พัดลม หรือ TV
การสร้างฮาร์ดแวร์
โครงสร้างวงจรของโปรเจกต์นี้เน้นความเรียบง่ายแต่มีประสิทธิภาพสูง งบประมาณรวมทั้งหมดไม่เกิน 700 บาท ($20) ซึ่งถือว่าคุ้มค่ามากเมื่อเทียบกับความสามารถที่ได้รับ
Step 1: อุปกรณ์และวัสดุ
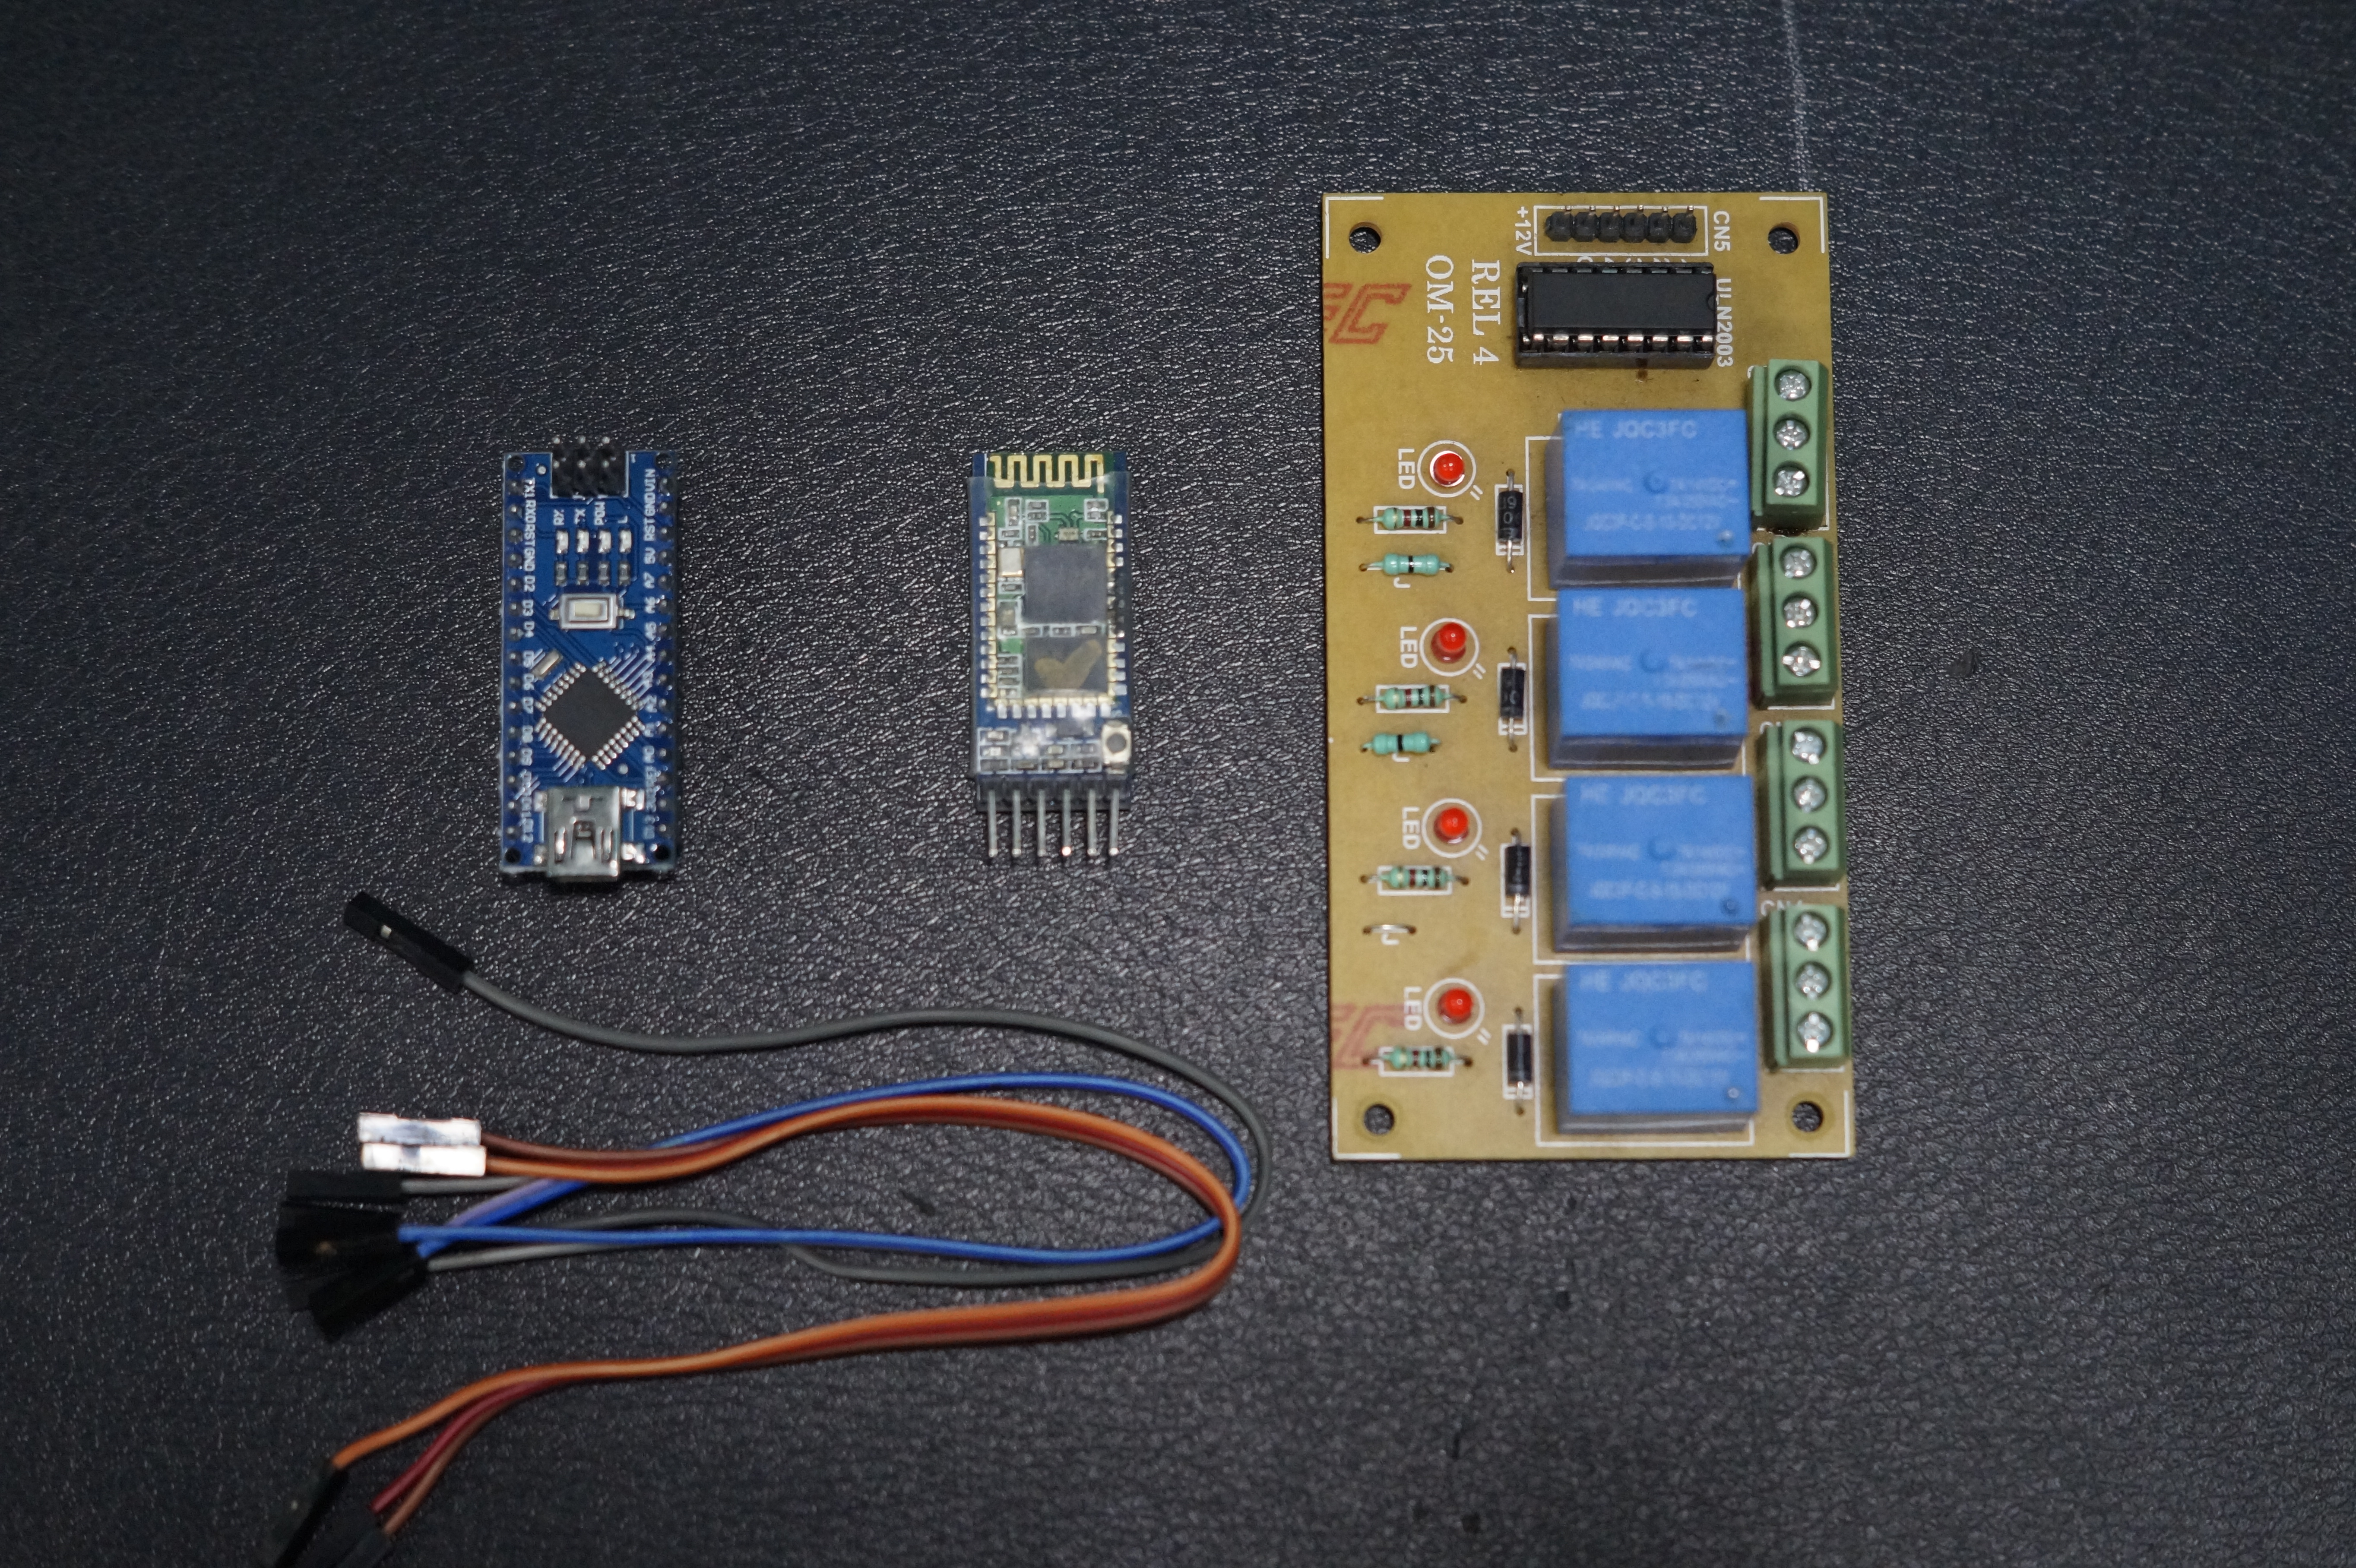
- Arduino Uno/Nano: แผงไมโครคอนโทรลเลอร์หลักสำหรับประมวลผลตรรกะ
- Relay Breakout Board (4-Channel): แผงวงจร Relay ที่ออกแบบมาเพื่อแยกกราวด์และป้องกันแรงดันย้อนกลับ (Opto-isolated) ทำให้ Arduino สามารถควบคุมกระแสไฟฟ้าในบ้านได้อย่างปลอดภัย
- Bluetooth Module HC-05: โมดูลรับส่งข้อมูลไร้สาย มาตรฐานความถี่ 2.4GHz
- Jumper Cables: สาย Jumper สำหรับเชื่อมต่อวงจรบน Breadboard หรือการเชื่อมต่อโดยตรง
Step 2: การเชื่อมต่อ
การเชื่อมต่อในโปรเจกต์นี้ใช้การสื่อสารแบบ Serial (UART) และสัญญาณ Digital Output ในตัวอย่างนี้ เราจะใช้ Relay 4-channel เพื่อควบคุมอุปกรณ์สี่ชิ้นที่แตกต่างกันพร้อมกัน

การเชื่อมต่อระหว่าง Arduino -> Bluetooth Module (HC-05)
- TX (Arduino) -> RX (BT Module) (หมายเหตุ: การสื่อสาร Serial ต้องเชื่อมต่อแบบไขว้เสมอ)
- RX (Arduino) -> TX (BT Module)
- VCC -> 3.3V (หรือ 5V ขึ้นอยู่กับสเปกของโมดูล)
- GND -> GND
การเชื่อมต่อระหว่าง Arduino -> Relay Module
- D2 -> IN1 (ควบคุมอุปกรณ์ 1 เช่น TV)
- D3 -> IN2 (ควบคุมอุปกรณ์ 2 เช่น พัดลม)
- D4 -> IN3 (ควบคุมอุปกรณ์ 3 เช่น คอมพิวเตอร์)
- D5 -> IN4 (ควบคุมอุปกรณ์ 4 เช่น ไฟห้องนอน)
- VCC -> VCC (5V)
- GND -> GND
Step 3: การเขียนโปรแกรมและการวิเคราะห์โค้ด
โค้ดด้านล่างนี้ออกแบบมาเพื่อจัดการข้อมูล String ที่ได้รับจาก smartphone โดยใช้สัญลักษณ์ # เพื่อระบุจุดสิ้นสุดของข้อความเพื่อให้รับข้อมูลได้อย่างถูกต้อง
String voice;
int
led1 = 2, // Connect device 1 to Pin #2
led2 = 3, // Connect device 2 to Pin #3
led3 = 4, // Connect device 3 to Pin #4
led4 = 5, // Connect device 4 to Pin #5
led5 = 6; // Connect device 5 to Pin #6

// Function to turn on all devices simultaneously
void allon(){
     digitalWrite(led1, HIGH);
     digitalWrite(led2, HIGH);
     digitalWrite(led3, HIGH);
     digitalWrite(led4, HIGH);
     digitalWrite(led5, HIGH);
}

// Function to turn off all devices simultaneously
void alloff(){
     digitalWrite(led1, LOW);
     digitalWrite(led2, LOW);
     digitalWrite(led3, LOW);
     digitalWrite(led4, LOW);
     digitalWrite(led5, LOW);
}

void setup() {
  Serial.begin(9600); // Start Serial communication at Baud rate 9600
  pinMode(led1, OUTPUT);
  pinMode(led2, OUTPUT);
  pinMode(led3, OUTPUT);
  pinMode(led4, OUTPUT);
  pinMode(led5, OUTPUT);
}

void loop() {
  // Check if data is being sent via Bluetooth
  while (Serial.available()){
    delay(10); // Short delay to stabilize data in Buffer before reading
    char c = Serial.read();
    if (c == '#') {break;} // If '#' is found, stop reading (end of command)
    voice += c; // Append the read character to form a sentence
  }

  if (voice.length() > 0) {
    Serial.println(voice); // Display the received command on Serial Monitor for Debugging

    // Check voice command conditions
    if(voice == "*all on") {allon();}
    else if(voice == "*all off"){alloff();}

    // Individual device control (ON)
    else if(voice == "*TV on") {digitalWrite(led1, HIGH);}
    else if(voice == "*fan on") {digitalWrite(led2, HIGH);}
    else if(voice == "*computer on") {digitalWrite(led3, HIGH);}
    else if(voice == "*bedroom lights on") {digitalWrite(led4, HIGH);}
    else if(voice == "*bathroom lights on") {digitalWrite(led5, HIGH);}

    // Individual device control (OFF)
    else if(voice == "*TV off") {digitalWrite(led1, LOW);}
    else if(voice == "*fan off") {digitalWrite(led2, LOW);}
    else if(voice == "*computer off") {digitalWrite(led3, LOW);}
    else if(voice == "*bedroom lights off") {digitalWrite(led4, LOW);}
    else if(voice == "*bathroom lights off") {digitalWrite(led5, LOW);}

    voice=""; // Clear the variable to await new commands
  }
}
การวิเคราะห์ทางเทคนิค:
- Serial Buffer: การใช้
delay(10)ภายในwhile(Serial.available())มีความสำคัญมากสำหรับการสื่อสาร Bluetooth เนื่องจากสัญญาณอาจไม่มาถึงพร้อมกันทุก Byte การหน่วงเวลานี้ช่วยให้บอร์ดรอรับประโยคที่สมบูรณ์ - Memory Management: หลังจากการประมวลผลทุกรอบ ตัวแปร
voice = ""จะต้องถูกล้างเพื่อป้องกันไม่ให้ข้อมูลเก่าปะปนกับคำสั่งใหม่
Step 4: แอปพลิเคชันและการใช้งาน
ปัจจุบัน เราสามารถใช้แอปพลิเคชันที่มีอยู่แล้วจาก Store เพื่อส่งคำสั่งเสียงได้ทันที ซึ่งเป็นเรื่องง่ายสำหรับผู้เริ่มต้นที่ยังไม่เชี่ยวชาญในการพัฒนาแอปพลิเคชันมือถือ
แอปที่แนะนำ: BT Voice Control for Arduino พัฒนาโดย SimpleLabsIN: ดาวน์โหลดที่นี่
วิดีโอการทำงาน:
สัมผัสประสบการณ์การตอบสนองที่รวดเร็วของระบบนี้ต่อคำสั่งเสียงด้วยตัวคุณเองผ่านวิดีโอด้านล่าง:
บทสรุปและขั้นตอนต่อไป
ปัจจุบัน ระบบนี้สามารถทำงาน ON/OFF อุปกรณ์ได้อย่างถูกต้อง แต่ศักยภาพที่แท้จริงของมันไม่ได้หยุดอยู่แค่นี้ คุณสามารถนำหลักการนี้ไปประยุกต์ใช้กับระบบ Natural Language Processing ที่ซับซ้อนมากขึ้น หรือเชื่อมต่อกับระบบ Cloud เพื่อควบคุมอุปกรณ์จากนอกบ้านได้
ขอขอบคุณเป็นพิเศษ:
- Hackster.io ที่เป็นแพลตฟอร์มในการแบ่งปันไอเดียและสร้างแรงบันดาลใจให้นักประดิษฐ์หน้าใหม่
- หากโปรเจกต์นี้มีประโยชน์ อย่าลืมกดไลก์และกดติดตามช่องของผมสำหรับโปรเจกต์วิศวกรรมที่น่าสนใจอีกมากมายในอนาคต!
ติดตามโปรเจกต์เพิ่มเติมได้ที่: Rahul Khanna - YouTube Channel