BLUETOOTH CONTROL LEDs
คุณคงจะรู้แล้วว่าเราจะทำอะไรกันวันนี้…งั้นเรามาเริ่มกันเลย!
สิ่งที่คุณต้องมี :-
- บอร์ด Arduino
- Breadboard
- โมดูล/เซ็นเซอร์ Bluetooth – HC05
- สาย Jumper หรือสายเดี่ยวไม่กี่เส้น
- LEDs
- สมาร์ทโฟน ANDROID (แน่นอนอยู่แล้ว 😛 )
วิดีโอสอนการใช้งานอยู่ด้านล่างนี้↓
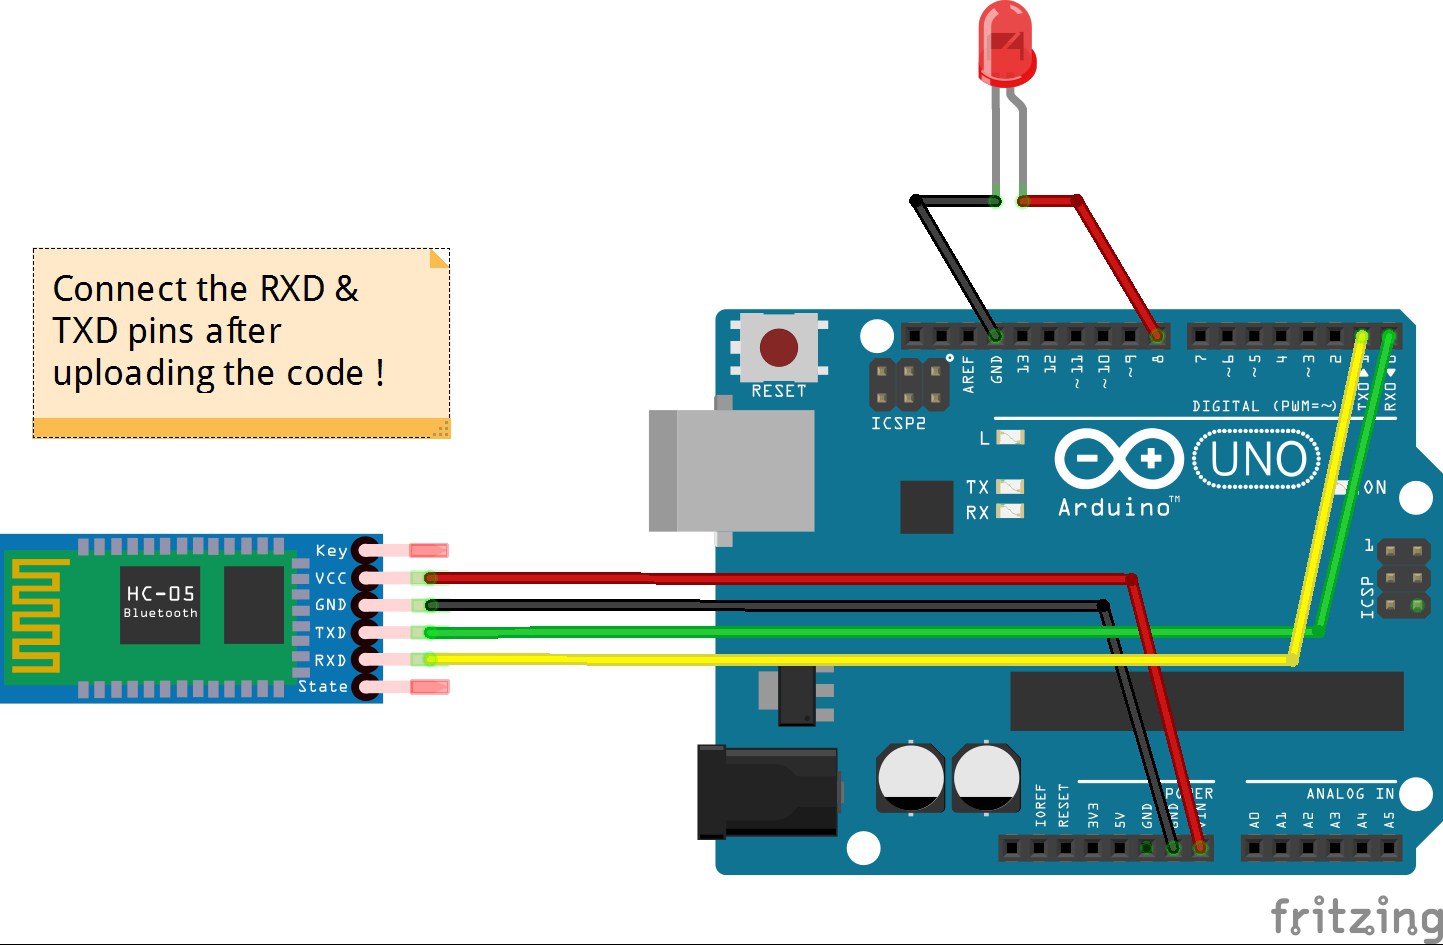
การเชื่อมต่อของโมดูล Bluetooth HC05 :-
VCC – เชื่อมต่อกับ VCC ของ Arduino.
GND – เชื่อมต่อกับ GND ของ Arduino.
RX – เชื่อมต่อกับขา Digital pin 0 (ขา TX) ของ Arduino.
TX – เชื่อมต่อกับขา Digital pin 1 (ขา RX) ของ Arduino. (เชื่อมต่อขา RX & TX หลังจากอัปโหลดโค้ดแล้ว)
ของ LED – ขาบวก – เชื่อมต่อกับ Pin 8 ของ Arduino.
ขาลบ – เชื่อมต่อกับ GND ของ Arduino.
ขั้นตอนการทำ :-
ดาวน์โหลดแอปชื่อ BlueControl (ฟรี). นี่คือ ลิงก์เปิดแอป BlueControl (มันจะเปิด Bluetooth ของอุปกรณ์โดยอัตโนมัติ). ไปที่ Options. คลิกที่ “Connect to Robot”. เลือกอุปกรณ์ – HC 05.
- ทำการเชื่อมต่อตามที่แสดงในรูปภาพด้านบน. ห้ามเชื่อมต่อขา RX & TX ในขณะ/ก่อน การอัปโหลดโค้ด!
- คัดลอกโค้ดที่ให้ไว้ด้านล่างนี้.
- เมื่อคุณเชื่อมต่อกับโมดูล Bluetooth เป็นครั้งแรก มันจะถามรหัสผ่าน. ให้ป้อน 0000 หรือ 1234.
- เมื่ออุปกรณ์จับคู่กับเซ็นเซอร์สำเร็จ ไฟ LED บนเซ็นเซอร์จะเริ่มกะพริบช้าลงกว่าปกติ.
- เสร็จแล้ว. คัดลอกโค้ดที่ให้ไว้ด้านล่างแล้วทดสอบได้เลย !
โค้ด :-
โค้ดสำหรับเซ็นเซอร์ Bluetooth HC-05:
void setup() {
Serial.begin(9600);
 pinMode(8, OUTPUT); // put your setup code here, to run once:
 }

void loop() {
  // put your main code here, to run repeatedly:
 if(Serial.available()>0)
   {
      char data= Serial.read(); // reading the data received from the bluetooth module
      switch(data)
      {
        case 'a': digitalWrite(8, HIGH);break; // when a is pressed on the app on your smart phone
        case 'd': digitalWrite(8, LOW);break; // when d is pressed on the app on your smart phone
        default : break;
      }
      Serial.println(data);
   }
   delay(50);
}
คุณอาจจะสนใจ –
ควบคุม LEDs ด้วยคำสั่งเสียง (ใน 2 นาที แค่เปลี่ยนโค้ด)
นี่คือวิดีโอสอนการใช้งานที่จะทำให้งานของคุณง่ายขึ้นอย่างแน่นอน… 🙂
คุณอาจจะสนใจ –
สร้างหุ่นยนต์หลีกเลี่ยงสิ่งกีดขวางโดยใช้ Ultrasonic sensor (ใน 10 นาที)
คอมเมนต์ด้านล่างหากคุณพบปัญหาใดๆ. ผมจะช่วยแก้ไขให้คุณโดยเร็วที่สุด
บทเรียนandroid, Arduino, bluetooth module, code, connections, diy, how to, philips hue, program, sensor, smartphone, testing
EXPANDED TECHNICAL DETAILS
การทำงานร่วมกันของ Bluetooth Low Energy (BLE)
โปรเจกต์นี้เน้นที่การจับคู่แบบใช้พลังงานต่ำระหว่างสมาร์ทโฟนสมัยใหม่กับระบบไฟที่ควบคุมด้วย Arduino.
- สถาปัตยกรรม BLE Service/Characteristic: (หากใช้ HM-10 หรือ Nano 33 BLE) Arduino จะประกาศ "Lighting Service" ที่กำหนดเอง. โทรศัพท์จะอัปเดต "Characteristic" เฉพาะเพื่อส่งค่า RGB ใหม่.
- การปรับสัญญาณ PWM Duty Cycle: Arduino จะแปลงค่าความสว่าง 0-255 ที่ได้รับผ่าน Bluetooth ให้เป็นสัญญาณ PWM ซึ่งช่วยให้ได้ประสบการณ์แสงบรรยากาศที่นุ่มนวลและหรี่แสงได้.
การผสานรวมแอป
- Custom UI: แสดงวิธีการใช้แอปเช่น Blynk หรือ LightBlue เพื่อสร้างรีโมตคอนโทรลส่วนตัวสำหรับสภาพแวดล้อม LED ในห้องของคุณ.