บทนำ
เคยไหมที่ขอซานต้าขอชุด Arduino 3D Printer หรือชุดเครื่องมือ แต่ได้ถุงเท้ามาแทน? จบเรื่องนี้ได้แล้ว!
ซานต้าจ้างพวกเราทำโปรเจกต์ IoT กับ Arduino MKR1000 ชิ้นนี้ เพื่อให้ซานต้าควบคุมการส่งของขวัญได้แม่นยำขึ้น
ขั้นแรก: ทำตัวดีๆ ล้างจาน ช่วยงานบ้าน ช่วยคุณยายข้ามถนน ซื้อของให้แม่ แล้วอย่าลืมส่งจดหมายถึงซานต้า
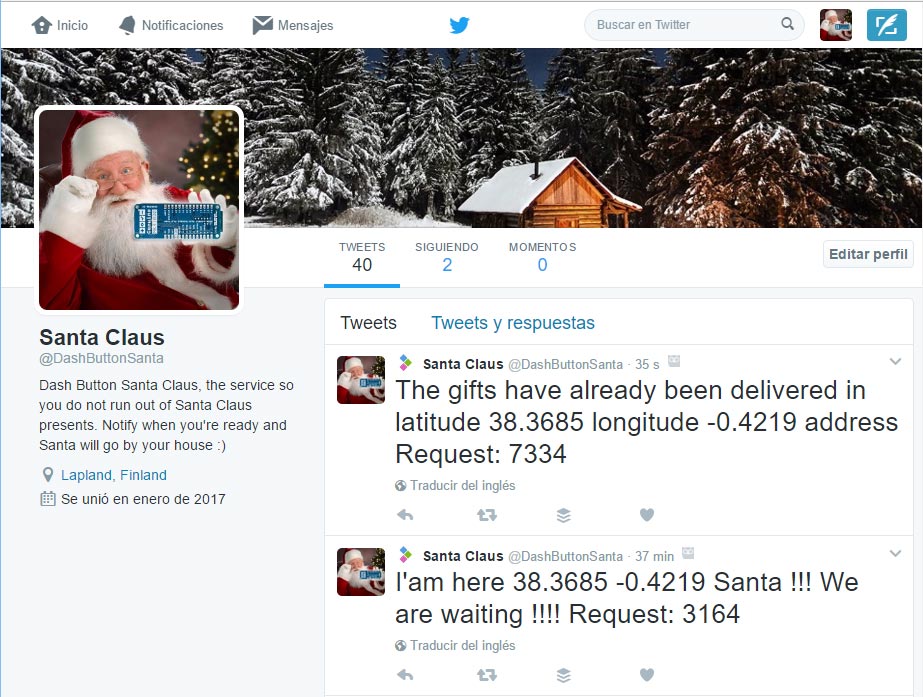
พอทำครบทุกข้อแล้ว ก็กดปุ่มมหัศจรรย์ได้เลย! ปุ่มนี้จะส่งพิกัด GPS ไปที่ทวิตเตอร์ของซานต้า (@dashbuttonsanta) บอกจุดที่ต้องวางของขวัญ
แถมยังส่งอีเมลไปแจ้งเตือนแผนก Dash Button Department ที่เราสร้างขึ้นมาในโปรเจกต์นี้ด้วย
สุดท้าย เมื่อซานต้าวางของขวัญที่บ้านคุณแล้ว ซานต้าจะกดยืนยันการส่งของในทวิตเตอร์ แล้วคุณก็สามารถดูแผนที่อัพเดทได้เลย
แบบนี้ซานต้าจะไม่มีทางลืมแวะบ้านคุณแน่นอน และคุณก็รู้ว่าต้องไปรับของขวัญจากเหล่า Makers ที่ไหน
หลักการทำงานของระบบ
ระบบจะทำงานใน 4 สถานะ ขึ้นอยู่กับสถานการณ์ของ Dash Button Santa
สถานะ 1: ปิดการทำงาน (Disabled)
สถานะนี้คือยังไม่ได้ส่งตำแหน่งให้ซานต้าว่าอยากได้ของขวัญที่ไหน
ขั้นแรกก็ทำตัวดีๆ เหมือนเดิม ล้างจาน ช่วยงานบ้าน ช่วยคุณยาย ซื้อของ ส่งจดหมาย
จากนั้นก็ส่งตำแหน่งบ้านให้ซานต้าได้เลย การกดปุ่มจะทำให้ระบบเปลี่ยนไปสถานะต่อไป
สถานะ 2: ส่งตำแหน่งแล้ว (Sent Location)
เมื่อเข้าสถานะนี้ ระบบจะส่งทวีตไปหา @dashbuttonsanta พร้อมกับส่งอีเมลแจ้งเตือน
Dash Button Santa จะค้างอยู่สถานะนี้จนถึงวันคริสต์มาส ต่อให้กดปุ่มกี่ครั้งก็ไม่ทำอะไร
พอถึงวันที่ 25 ธันวาคม ไฟจะเริ่มกระพริบ นั่นหมายความว่าพร้อมรับซานต้าแล้ว! มีเพียงซานต้าเท่านั้นที่กดปุ่มเพื่อเปลี่ยนไปสถานะต่อไปได้
สถานะ 3: ส่งของขวัญแล้ว (Gifts Delivered)
ซานต้าจะเป็นผู้กดปุ่มเพื่อยืนยันว่าส่งของขวัญเรียบร้อยแล้ว
ตอนเช้าตื่นมาคุณจะรู้ได้ทันทีว่าซานตามาแล้วหรือยัง เพราะ Dash Button Santa จะติดไฟสีเขียวให้เห็นชัดๆ
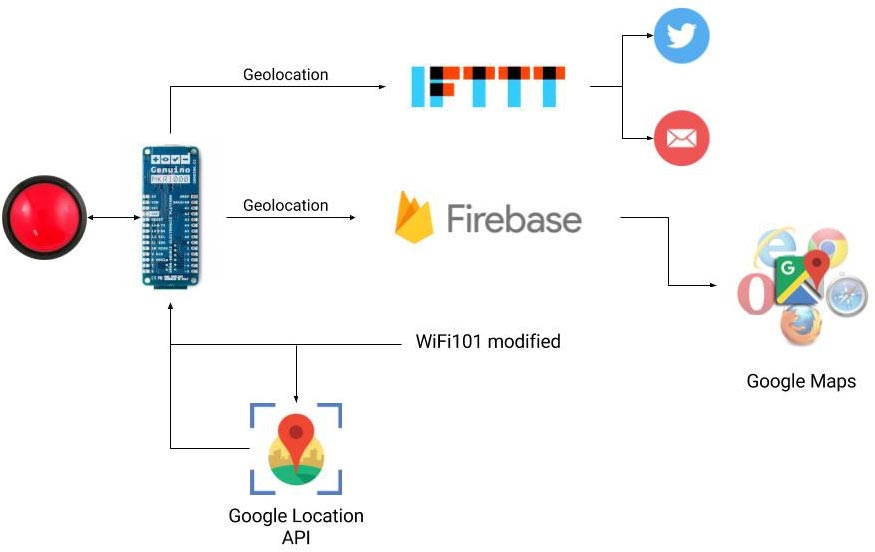
System Architecture
โครงสร้างมันง่ายมากเลยน้อง เราใช้บริการต่างๆ ที่ฟรีทั้งหมด
แน่นอนว่าจุดศูนย์กลางของโปรเจคนี้คือ Arduino MKR1000 นั่นเอง แบ่งออกเป็น 4 ส่วนใหญ่ๆ ได้แก่:
- การหาตำแหน่ง
- บันทึกข้อมูลขึ้นคลาวด์
- โพสต์ลงทวิตเตอร์และส่งอีเมล
- วงจร
Project Perspective
Dash Button Santa with Arduino MKR1000 นี่คือการสำรวจเทคโนโลยีเครือข่ายและการทำงานของ IoT แบบจัดเต็มเลยนะตัวนี้ โดยเน้นไปที่ส่วนประกอบหลักๆ—ก็คือ Secure WiFi telemetry-dispatch และ high-performance Firebase-to-Maps mapping logic—น้องจะได้เรียนรู้วิธีการสื่อสารและประสานงานภารกิจวันหยุดของน้องผ่านซอฟต์แวร์ลอจิกเฉพาะทางและการตั้งค่าที่เสถียรสุดๆ
Technical Implementation: Cloud Databases and Map Proxies
โปรเจคนี้จะเผยให้เห็นเลเยอร์ที่ซ่อนอยู่เบื้องหลังการเชื่อมต่อเซนเซอร์-คลาวด์แบบง่ายๆ:
- Identification layer: MKR1000 WiFi Module ทำหน้าที่เหมือนตาเรดาร์ความละเอียดสูง คอยวัดทุกจุดที่ปุ่มถูกกดและส่งพิกัดขึ้นคลาวด์
- Conversion layer: ระบบใช้โปรโตคอลดิจิทัลความเร็วสูงเพื่อรับแพ็กเก็ตข้อมูล HTTPS สำหรับงานเซนซิ่งที่สำคัญ
- Visual Interface layer: Google Maps Dashboard ให้ฟีดแบ็คภาพและสถานะแบบ HD สำหรับการตรวจเช็คสถานะการติดตามซานต้า (เช่น ตำแหน่งปัจจุบัน)
- Communication Gateway layer: Firebase Real-time DB ให้การส่งข้อมูลแบบแมนนวลหรือตรวจเช็คสถานะการซิงค์กับคลาวด์อัตโนมัติระหว่างการตั้งค่าเริ่มต้น เพื่อประสานสถานะ
- Processing Logic: โค้ด Arduino ใช้กลยุทธ์ "JSON-webhook-dispatch" (หรือ dash-dispatch): มันจะตีความการกดปุ่มทางกายภาพและจับคู่กับคีย์ในฐานข้อมูล เพื่อให้การติดตามช่วงวันหยุดเป็นไปอย่างปลอดภัยและมีจังหวะ
- Communication Dialogue Loop: รหัส telemetry จะถูกส่งเป็นจังหวะไปยัง Serial Monitor ระหว่างการตั้งค่าเริ่มต้น เพื่อประสานสถานะ
Location finding
Dash Button Santa จะไปกับน้องเลย น้องไม่รู้หรอกว่าวันคริสต์มาสน้องจะอยู่ที่ไหน ใช้ Dash Button Santa บอกซานต้าสิว่าอยู่ไหน
มันจะฟังว่าเครือข่าย WiFi รอบๆ มีอะไรบ้างและหาตำแหน่งที่แม่นยำโดยใช้ Google Maps Geolocation API
ไลบรารี WiFi101 ในปัจจุบัน ยังไม่ยอมให้เราได้ลิสต์ที่อยู่ MAC (BSSID) ของ access points เราต้องไปปรับแต่งไลบรารีเพื่อเปิดฟีเจอร์ให้ได้ลิสต์รายละเอียดของเครือข่าย WiFi รอบๆ มา
Store information in the cloud
หลังจากทดลองใช้บริการและแพลตฟอร์มในคลาวด์สำหรับ IoT มาหลายเจ้า อันที่ง่ายที่สุดที่เราเจอสำหรับโปรเจคนี้ก็คือ Firebase
บริการนี้มีฐานข้อมูลแบบง่ายๆ ใช้ JSON เป็นฐานและเข้าถึงผ่าน API ของมัน แค่ส่งคำขอ PUT พร้อม JSON ไป ก็สร้างโครงสร้างข้อมูลของตัวเองได้ทันทีเลย
น้องต้องมีบัญชี Google เพื่อเข้าถึงบริการฟรีที่มีข้อจำกัดที่เขาให้มา
JSON ที่เราใช้หน้าตาแบบนี้:
{
 "persons" : {
   "A9:D8:F5:05:F0:F8" : {
     "lat" : 38.3685,
     "lon" : -0.4219,
     "prec" : 100999,
     "status" : "2"
   }
 }
}
ทุกอย่างแขวนอยู่ใต้ persons เราใช้ MAC ของ Arduino MKR100 เป็นตัวระบุเฉพาะ
จากนั้นเราก็ส่งค่าละติจูด ลองติจูด ความแม่นยำ และสถานะของปุ่มไป
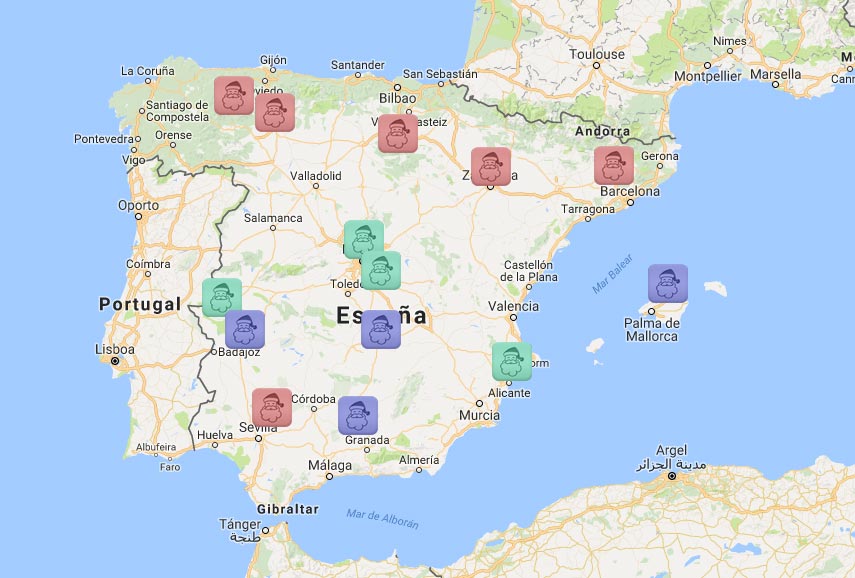
เป้าหมายของการเก็บข้อมูลตำแหน่งก็เพื่อให้เราติดตาม Dash Button Santa ได้ทั่วโลกไง
ในหน้าเว็บเราจะสามารถเห็น Dash Button ทั้งหมดที่เชื่อมต่ออยู่ เว็บนี้สร้างด้วย jQuery ที่เข้าไปดึงข้อมูลจาก Firebase API
มันประกอบด้วยไฟล์สองไฟล์ คือ .html กับ .js ด้านล่างน้องจะเห็นโค้ด
<!DOCTYPE html>
<html>
<head>
	<title>Dash Button Tracking Santa Claus</title>
<style type="text/css">
     html, body { height: 100%; margin: 0; padding: 0; }
     #map { height: 100%; }
   </style>
   <meta name="robots" content="noindex">
</head>
<body>
	<!--<ul id="costumers" class="list-group">
	</ul>-->
	<div id="map"></div>
	<!-- jQuery (necessary for Bootstrap's JavaScript plugins) -->
	<script src="https://ajax.googleapis.com/ajax/libs/jquery/1.11.2/jquery.min.js"></script>
	<!-- Latest compiled and minified Bootstrap -->
	<script src="https://maxcdn.bootstrapcdn.com/bootstrap/3.3.4/js/bootstrap.min.js"></script>
	<!-- Include Firebase Library -->
	<script src='https://cdn.firebase.com/js/client/2.2.1/firebase.js'></script>
	<!-- Tracking Store JavaScript -->
	<script src="script.js"></script>
	<!-- API Google Maps -->
	<script async defer
     src="https://maps.googleapis.com/maps/api/js?key=AIzaSyABRsKsE4ISjkikM96Hn7RIv9nW-oice8Q&callback=initMap">
   </script>
</body>
</html>
และไฟล์ JavaScript
// Create a firebase reference
var dbRef = new Firebase('https://dash-button-arduino.firebaseio.com/');
var costumersRef = dbRef.child('persons');
var markers = {}
//load persons
costumersRef.on("child_added", function(snap) {
   // Print to map
 addNewPerson(snap.val().lat,snap.val().lon,snap.val().status, snap.key());
});
//change persons
costumersRef.on("child_changed", function (snap) {
 changePerson(snap.val().lat, snap.val().lon, snap.val().status);
});
/******** GOOGLE MAPS *********/
var map;
function initMap() {
 // Center map
 var myLatLng = {lat: 38.392101, lng: -0.525467};
 map = new google.maps.Map(document.getElementById('map'), {
   center: myLatLng,
   zoom: 3
 });
}
function addNewPerson(lat, lon,status, key){
	console.log("status",status);
	var image
	if(status==0)
	{
		image='images/santa-icon-1.png';
	}
	else if(status==1)
	{
		image='images/santa-icon-2.png';
	}
	else if(status==2)
	{
		image='images/santa-icon-3.png';
	}
 var marker = new google.maps.Marker({
   position: new google.maps.LatLng(lat,lon),
   icon: image,
   map: map,
   title: key // Tooltip = MAC address
 });
 markers[key] = marker;
}
function changePerson(lat, lon, status, key) {
   console.log("status", status);
   var image;
   if (status == 0) {
       image = 'images/santa-icon-1.png';
   }
   else if (status == 1) {
       image = 'images/santa-icon-2.png';
   }
   else if (status == 2) {
       image = 'images/santa-icon-3.png';
   }
   marker = markers[key];
   marker = new google.maps.Marker({
       position: new google.maps.LatLng(lat, lon),
       icon: image,
       map: map,
       title: key // Tooltip = MAC address
   });
   markers[key] = marker;
}
เพื่อแสดงข้อมูลบนแผนที่ตามสถานะต่างๆ เราใช้รูปภาพพวกนี้จ้า


จัดไปวัยรุ่น! งานนี้เอาไปลองรันดูได้เลย
โพสต์ลงทวิตเตอร์และส่งอีเมล
ในส่วนนี้แหละที่เราอาจจะเจอความยากเพิ่มขึ้น แต่ต้องขอบคุณบริการจาก IFTTT ที่ทำให้งานนี้กลายเป็นเรื่องง่ายมากๆ
เค้ามีบริการใหม่ที่เรียกว่า IFTTT Maker ที่ให้เราสามารถเรียกใช้งานอีเวนต์และทริกเกอร์ผ่าน API ได้เลย แค่เรียก GET ง่ายๆ และตั้งค่า recipes ให้ดี ก็จบแล้ว
มันทำให้การโพสต์ลงโซเชียลเน็ตเวิร์กต่างๆ และเปิดช่องทางการสื่อสารระหว่างวัตถุหรือเครื่องจักรเป็นเรื่องง่ายดาย ปลดปล่อยพลังของ IoT ไปเลย
ในโปรเจคนี้เราจะใช้ 3 recipes
- Recipe 1: ส่งข้อมูลไปยังแอคเคานต์ @dashbuttonsanta พร้อมกับลองจิจูดและละติจูดของปุ่ม
- Recipe 2: ส่งอีเมลพร้อมกับลองจิจูดและละติจูด
- Recipe 3: เมื่อซานต้าทิ้งของขวัญไว้ที่บ้านแล้ว จะโพสต์ว่าส่งของขวัญเรียบร้อยแล้ว
วงจร
แผนพื้นฐานคือเชื่อมต่อปุ่มกดเข้ากับ Arduino MKR1000 และ NeoPixel 3 ดวง
จากนั้นเราก็ตกแต่งได้ตามใจเลย ในกรณีของเรา เราใช้ตุ๊กตากวางเรนเดียร์ของซานตาคลอส
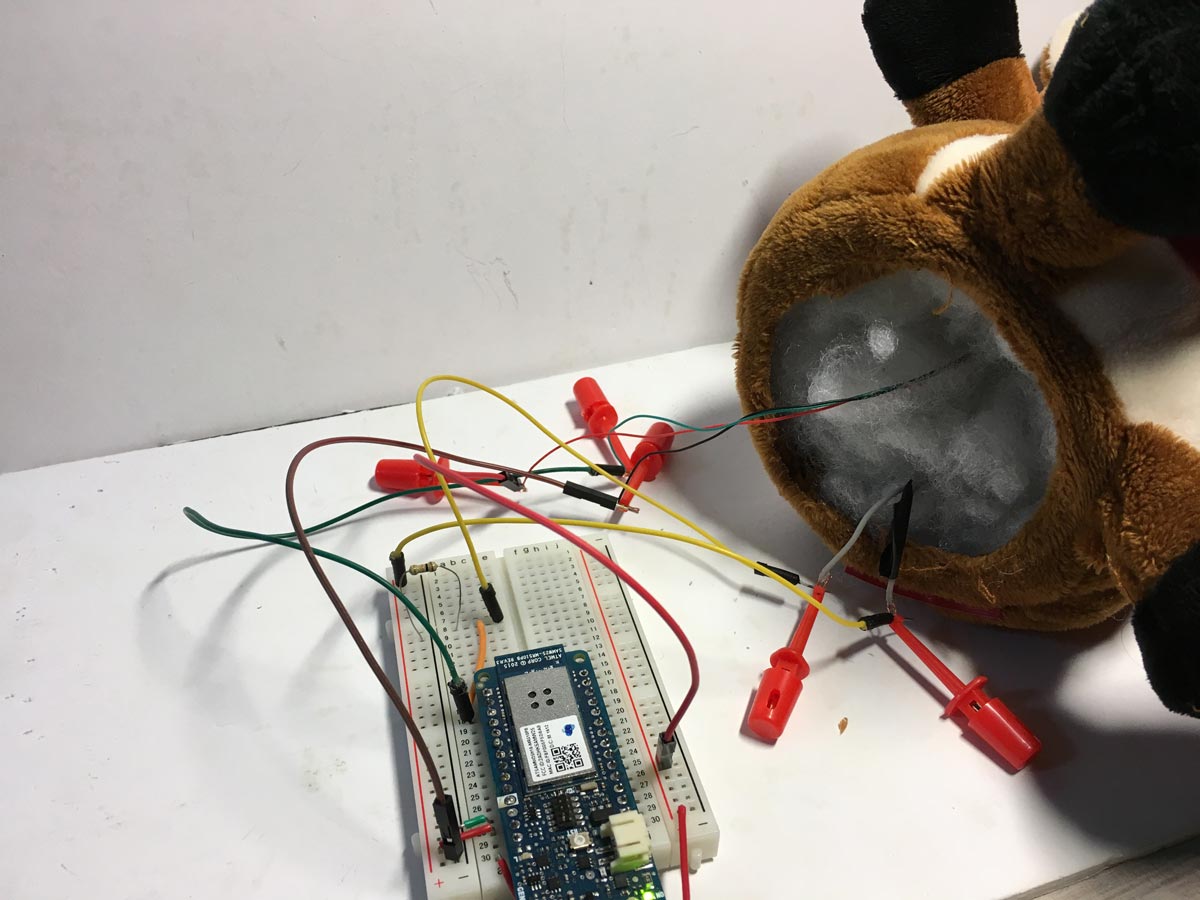
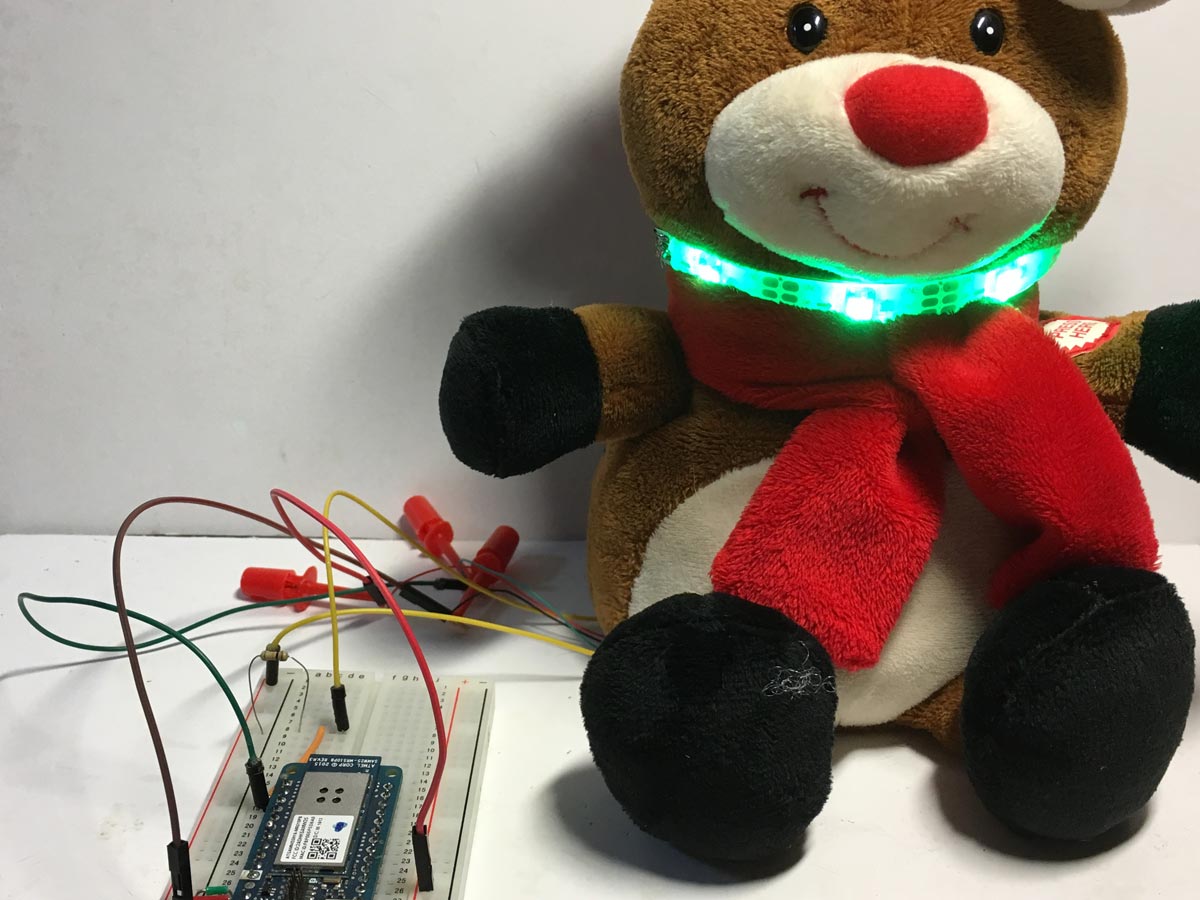
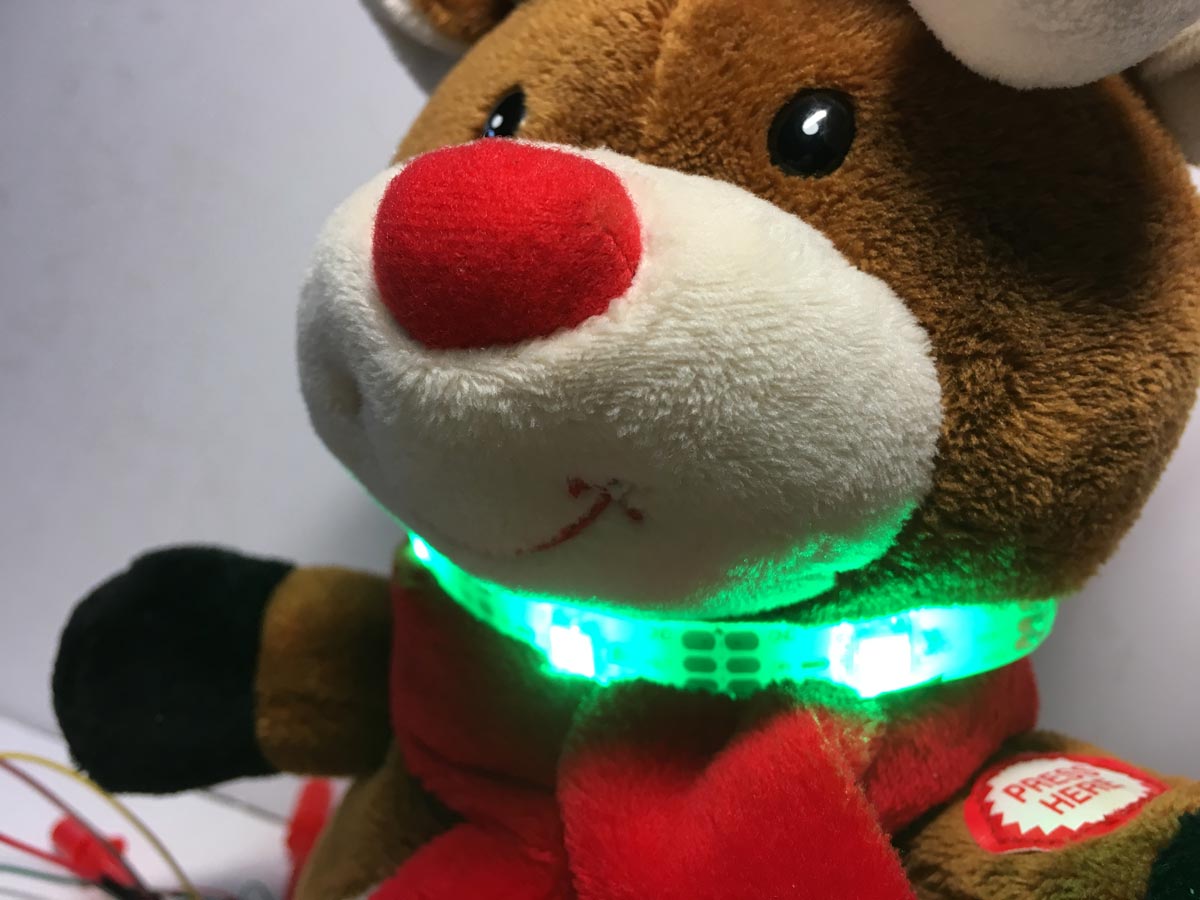

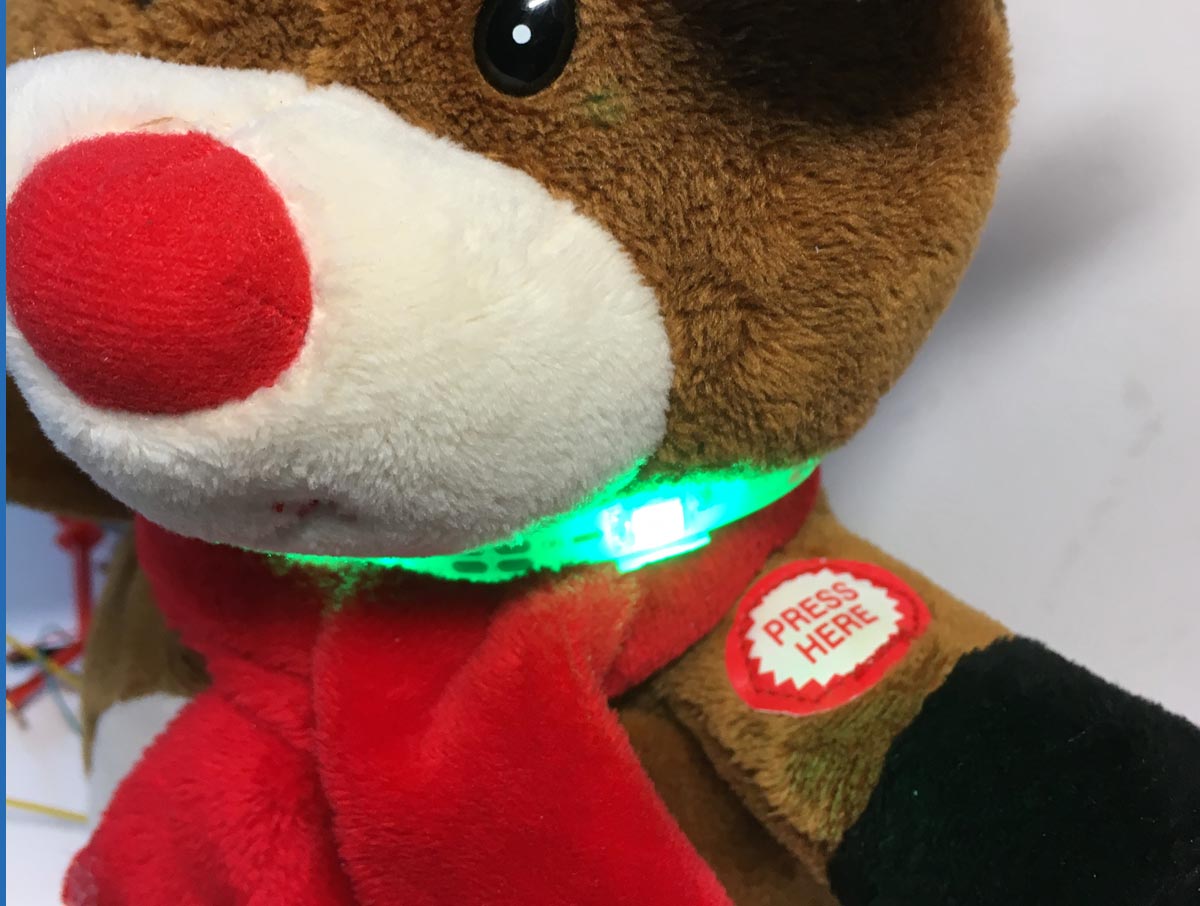
เราใช้ปุ่มที่อยู่ข้างใน และแถบ NeoPixel ที่ผ้าพันคอ
ไฟ NeoPixel จะบอกสถานะของ Dash Button Santa ให้เรารู้
- Pixel 1 แดง, pixel 2 น้ำเงิน และ pixel 3 เขียว = กำลังพยายามเชื่อมต่อ WiFi
- 3 pixels สีส้มกระพริบ = เกิดข้อผิดพลาดเกี่ยวกับ WiFi
- 3 pixels สีแดงกระพริบ = เกิดข้อผิดพลาด RTC
- 3 pixels สีแดงค้าง = อุปกรณ์ปิดอยู่ ยังไม่ได้ส่งตำแหน่งให้ซานต้า
- 3 pixels สีน้ำเงินค้าง = ส่งตำแหน่งให้ซานต้าแล้ว
- 3 pixels สีน้ำเงินกระพริบ = วันคริสต์มาสมาแล้วววว!!!!!
- 3 pixels สีเขียวค้าง = ซานต้าทิ้งของขวัญและกดปุ่มแล้ว
ทั้งหมดนี้จะเห็นได้ในส่วนถัดไปที่เราจะพูดถึงโค้ดกัน
ฮาร์ดแวร์และโครงสร้างพื้นฐาน IoT
- Arduino MKR1000: เป็น "สมอง" ของโปรเจค คอยจัดการการตรวจจับอีเวนต์จากหลายทิศทางและประสานงานระหว่าง WiFi กับ Firebase
- ปุ่มกดแบบสัมผัส (Tactile Dash Button): ให้ "ลิงก์ทริกเกอร์" ที่ชัดเจนและน่าเชื่อถือสำหรับแต่ละจุดของประสบการณ์วันหยุดแบบอินเทอร์แอคทีฟ
- แบตเตอรี่ Li-Po (แบบพกพา): ให้พลังงานความจุสูงและอินเทอร์เฟซทางกายภาพที่เชื่อถือได้สำหรับ "ภารกิจเคลื่อนที่" ครั้งแรกของคุณ
- โครงปุ่มแบบกำหนดเอง: สำคัญมากสำหรับการให้การป้องกันที่ชัดเจนและประหยัดพลังงานสำหรับทุกจุดของฮาร์ดแวร์
- ออดแบบแอคทีฟ (Active Buzzer): สำคัญสำหรับการให้เสียงที่ชัดเจนและประหยัดพลังงานสำหรับการตรวจจับด้วยเสียง
- สาย Micro-USB: ใช้สำหรับโปรแกรม Arduino ของคุณและเป็นอินเทอร์เฟซหลักสำหรับตัวควบคุมระบบ
สเก็ตช์ Arduino
ในสเก็ตช์นี้เราใช้ไลบรารีหลายตัวเพื่อให้การจัดการการเชื่อมต่อกับบริการต่างๆ และการควบคุมเวลา (เพื่อให้รู้ว่าเมื่อไหร่ถึงวันคริสต์มาส) มันง่ายขึ้น
น้องต้องมีบัญชีหลายอย่างเพื่อใช้บริการพวกนี้นะ เราเองก็กำลังพัฒนาอยู่ให้มันดีขึ้นและไม่ต้องพึ่งบริการของคนอื่น :)
ต้องมีสิ่งเหล่านี้ถึงจะรันได้:
- Google API key
- IFTTT key
- ชื่อ WiFi (SSID)
- รหัสผ่าน WiFi
โค้ดทั้งหมดอธิบายไว้ละเอียดดี ถ้ามีคำถามอะไร จิ้มถามไว้ในคอมเมนต์ของบทความนี้ได้เลย
เพื่อเก็บสถานะไว้ในตัวบอร์ดเอง และให้รู้ว่ามันอยู่สถานะไหนตอนที่ไฟดับ เราใช้ FlashStorage ซึ่งมันจำลองการทำงานของหน่วยความจำ EEPROM
ส่วนการควบคุมวันและเดือน เราทำผ่าน RTCZero
นอกจากนี้ เรายังมีลิงก์ให้ดาวน์โหลดไลบรารี WiFi101 ที่เราแก้ไขแล้ว และไลบรารี WifiLocation อีกด้วย
น้องสามารถหาลิงก์ไปยังไลบรารีทั้งหมดได้ใน GitHub ในส่วนไลบรารีของบทความนี้นะ
/*
 DashButtonSanta
 Send information to Santa Claus about the status of the gift request. It uses the geolocation through the WiFi,
 of the Google API, and it is sent to Firebase, along with the state and with the MAC (key value) of the Arduino MKR1000.
 It also sends the information to Twitter @ dashbuttonsanta and to the email dashbuttonsanta@gmail.com through IFTTT.
 On the web https://programarfacil.com/proyectos/dashbuttonsanta/tracking-santa.html you can follow the status of all requests.
 When at the end Santa leaves the gifts on the site sent to Twitter and the email, press the button and gives the delivery finished.
 States:
 0 => Device OFF (LED color red)
 1 => I have behaved well, I have made the bed, I have cleaned the dishes, I have helped an old lady, I pray every night, etc ...
      and I have sent the letter :) (LED color blue)
 2 => Is Christmas Day (LED blink color blue)
 3 => Santa claus left the presents and pressed the button (LED blink color green)
 Errors:
  Wifi shield not present => LED blink Color(233, 149, 16)
  NTP unreachable => LED blink Color(150, 0, 0)
 The circuit:
  Arduino MKR1000
  Pushbutton to pin 6
  pull-down resistor to pushbutton
  3 addressable LEDs
 Created 2017
 By https://programarfacil.com
 Luis del Valle @ldelvalleh
 Germán Martín @gmag12
*/
#include <Adafruit_NeoPixel.h>
#include <WiFi101.h>
#include <WiFiUdp.h>
#include <RTCZero.h>
#include <FlashStorage.h>
#include "WifiLocation.h"
// Fill these fields with your data
#define GOOGLE_API_KEY "YOURGOOGLEAPIKEY"
#define IFTTTKEY "YOUR