รถบังคับ Bluetooth ที่ง่ายที่สุดโดยใช้ Arduino และ MIT app inventor
ทำไมฉันถึงสร้างสิ่งนี้
เมื่อเดือนที่แล้ว ลูกพี่ลูกน้องของฉันขอให้ฉันสร้างรถ ฉันจึงคิดอย่างหนักและสร้างสิ่งนี้ขึ้นมา
หมายเหตุ : สามารถสร้างได้ทั้งแบบมีและไม่มี adafruit motor shield V2 และแบบมีและไม่มีระบบยิง App สามารถแก้ไขได้ โดยบางวิธีในการแก้ไขจะแสดงอยู่ในบทช่วยสอนนี้
โปรดสมัครสมาชิก
ขั้นตอนการทำงาน:
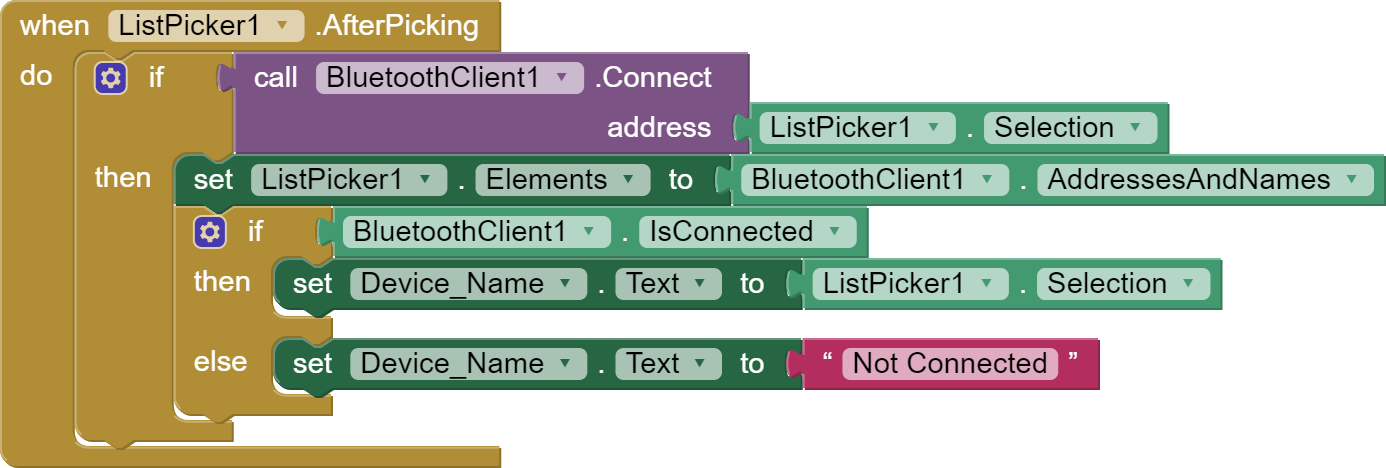
- App เชื่อมต่อกับ Bluetooth (Apk สำหรับ App, Aia สำหรับ App(นำเข้าสู่ MIT ai2))
- App ส่ง string ไปยัง Bluetooth
- Arduino ตรวจสอบ string
- และทำงานตามคำสั่ง (เดินหน้า, ถอยหลัง ฯลฯ)


การเชื่อมต่อ:
เมื่อใช้ shield:
Servo 1 และ 2 ให้คงไว้ที่ตำแหน่งเริ่มต้น
Motor ควรอยู่ที่ M1 และ M4
HC-05 หรือ 06 RX และ TX ควรตรงกับบรรทัดที่ 2 :
SoftwareSerial mySerial(number of rxpinhere, numberoftxpinhere);
VCC และ GND ไปยัง 5V และ GND
เมื่อไม่ใช้ shield:
Servo 1 และ 2 :
- VCC และ GND ไปยัง 5V และ GND ตามลำดับ
- ขา orange สำหรับ Servo 1 ไปที่ 9 และ Servo 2 ไปที่ 10
Motor1 ควรอยู่ที่ 2, 3
Motor2 ควรอยู่ที่ 4, 5
HC-05 หรือ 06 RX และ TX ควรตรงกับบรรทัดที่ 2 :
SoftwareSerial mySerial(number of rxpinhere,numberoftxpinhere);
- VCC และ GND ไปยัง 5V และ GND ตามลำดับ
โค้ด:
พร้อม shield:
หมายเหตุ: ในบรรทัดที่ 2 ตัวเลข 52 และ 53 จะต้องตรงกับการเชื่อมต่อ Bluetooth โดยลำดับการเชื่อมต่อคือSoftwareSerial mySerial(RX,TX);:) Happy coding.
#include <SoftwareSerial.h>
SoftwareSerial mySerial(52, 53); // RX and TX can be edited
String BT_input;
int LED = 13;
#include <Servo.h>
Servo s;
Servo s2;
#include <AFMotor.h>
AF_DCMotor motor(1);
AF_DCMotor motor1(4);
void setup() {
 Serial.begin(9600);
 mySerial.begin(9600);
 s.attach(10);
 s2.attach(9);
 s2.write(0);
 s.write(0);
 pinMode(LED, OUTPUT);
 motor.setSpeed(255);
 motor1.setSpeed(255);
 motor.run(RELEASE);
 motor1.run(RELEASE);
}
void loop() {
 if (mySerial.available())
   {
       BT_input = mySerial.read();
       Serial.println(BT_input);
       if (BT_input=="1")
       {
         front();
       }
       if (BT_input=="3")
       {
         back();
       }
       if (BT_input=="2")
       {
         right();
       }
       if (BT_input=="4")
       {
         left();
       }
       if (BT_input=="5")
       {
         stop();
       }
       if (BT_input=="6")
       {
         shoot();
       }
       if (BT_input=="7")
       {
         shoot2();
       }
   }
}
void front(){
 motor.run(FORWARD);
 motor1.run(FORWARD);
}
void back(){
 motor.run(BACKWARD);
 motor1.run(BACKWARD);
}
void left(){
 motor.run(BACKWARD);
 motor1.run(FORWARD);
}
void right(){
 motor.run(FORWARD);
 motor1.run(BACKWARD);
}
void stop(){
 motor.run(RELEASE);
 motor1.run(RELEASE);
}
void shoot(){
 s.write(120);
 delay(100);
 s.write(0);
}
void shoot2(){
 s2.write(120);
 delay(100);
 s2.write(0);
}
ไม่มี shield
หมายเหตุ: ในบรรทัดที่ 2 ตัวเลข 52 และ 53 จะต้องตรงกับการเชื่อมต่อ Bluetooth โดยลำดับการเชื่อมต่อคือSoftwareSerial mySerial(RX,TX);:) Happy coding.
#include <SoftwareSerial.h>
SoftwareSerial mySerial(52, 53); // RX and TX can be edited
String BT_input;
int LED = 13;
#include <Servo.h>
Servo s;
Servo s2;
const int Motor_L_F = 2;
const int Motor_L_B = 3;
const int Motor_R_F = 4;
const int Motor_R_B = 5;
void setup() {

}
void loop() {
 if (mySerial.available())
   {
       BT_input = mySerial.read();
       Serial.println(BT_input);
       if (BT_input=="1")
       {
         front();
       }
       if (BT_input=="3")
       {
         back();
       }
       if (BT_input=="2")
       {
         right();
       }
       if (BT_input=="4")
       {
         left();
       }
       if (BT_input=="5")
       {
         stop();
       }
       if (BT_input=="6")
       {
         shoot();
       }
       if (BT_input=="7")
       {
         shoot2();
       }