Objective
The objective of this project was to create a prototype for a low-cost device to monitor pressure on industrial equipment in remote locations using cellular data.

Project Walkthrough
The following is a a step by step walkthrough of the project following the flow of data from the pressure transducer to the email notification generated by the script attached to the Google Sheet.
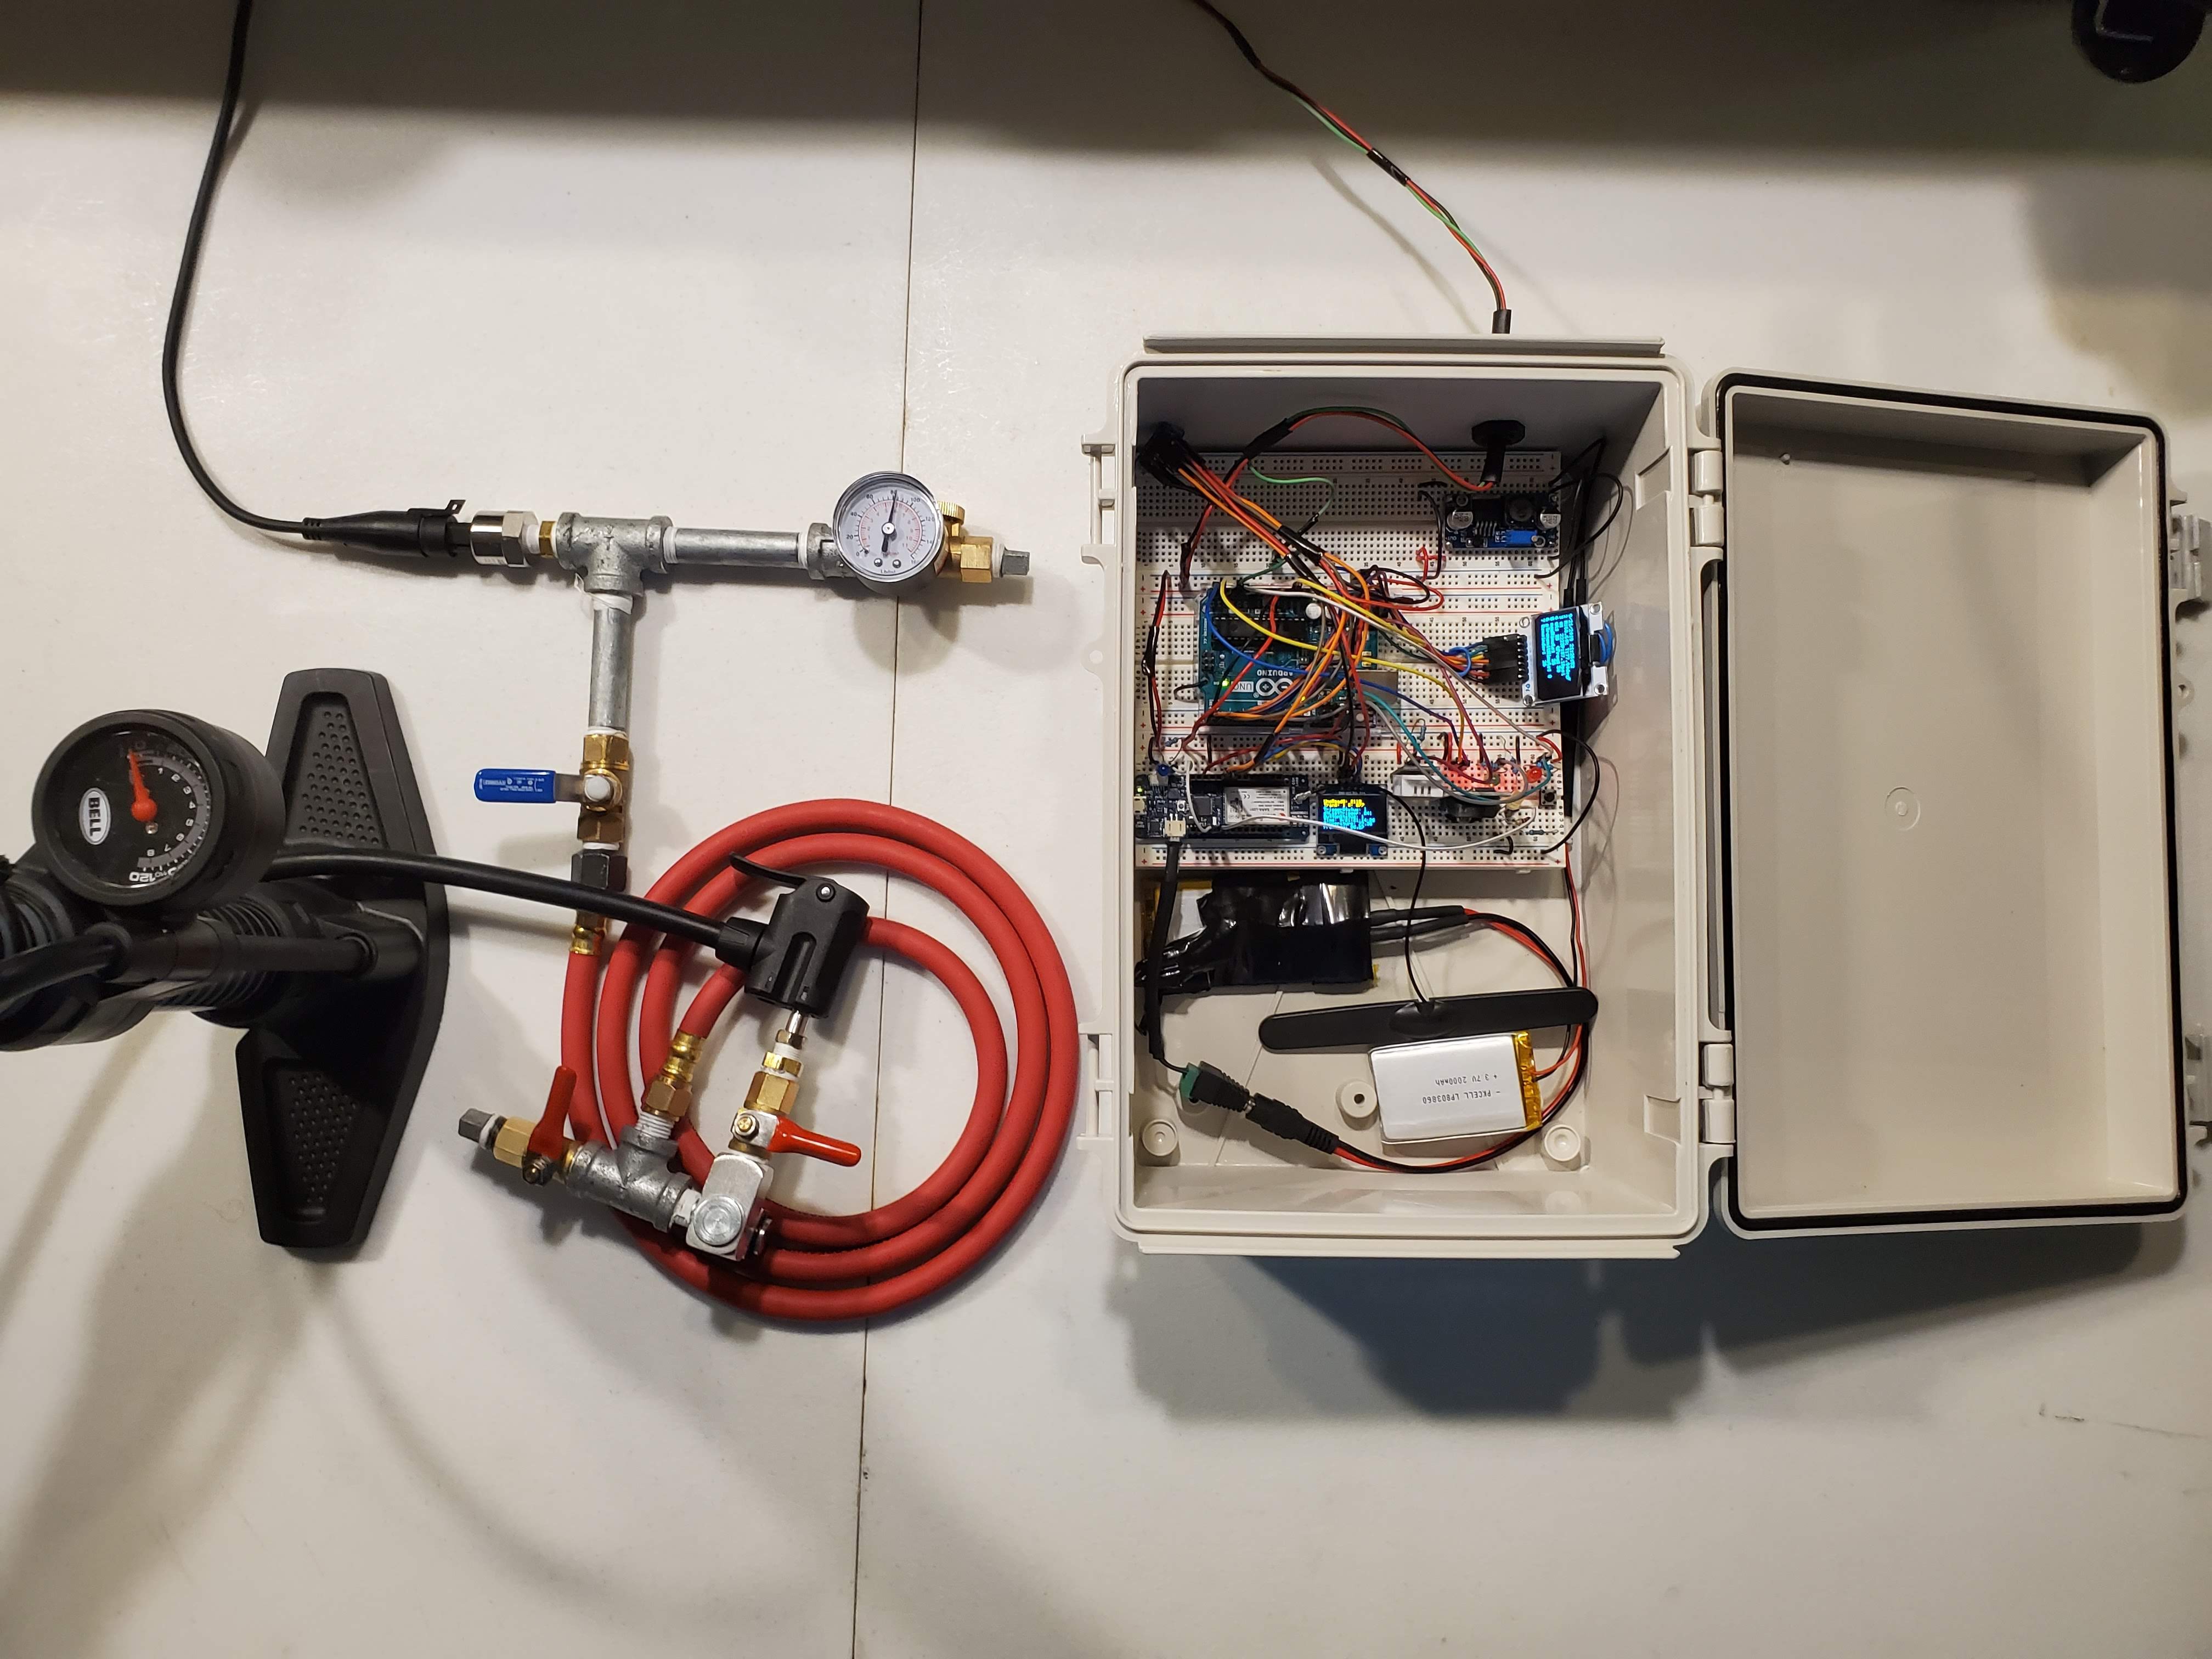
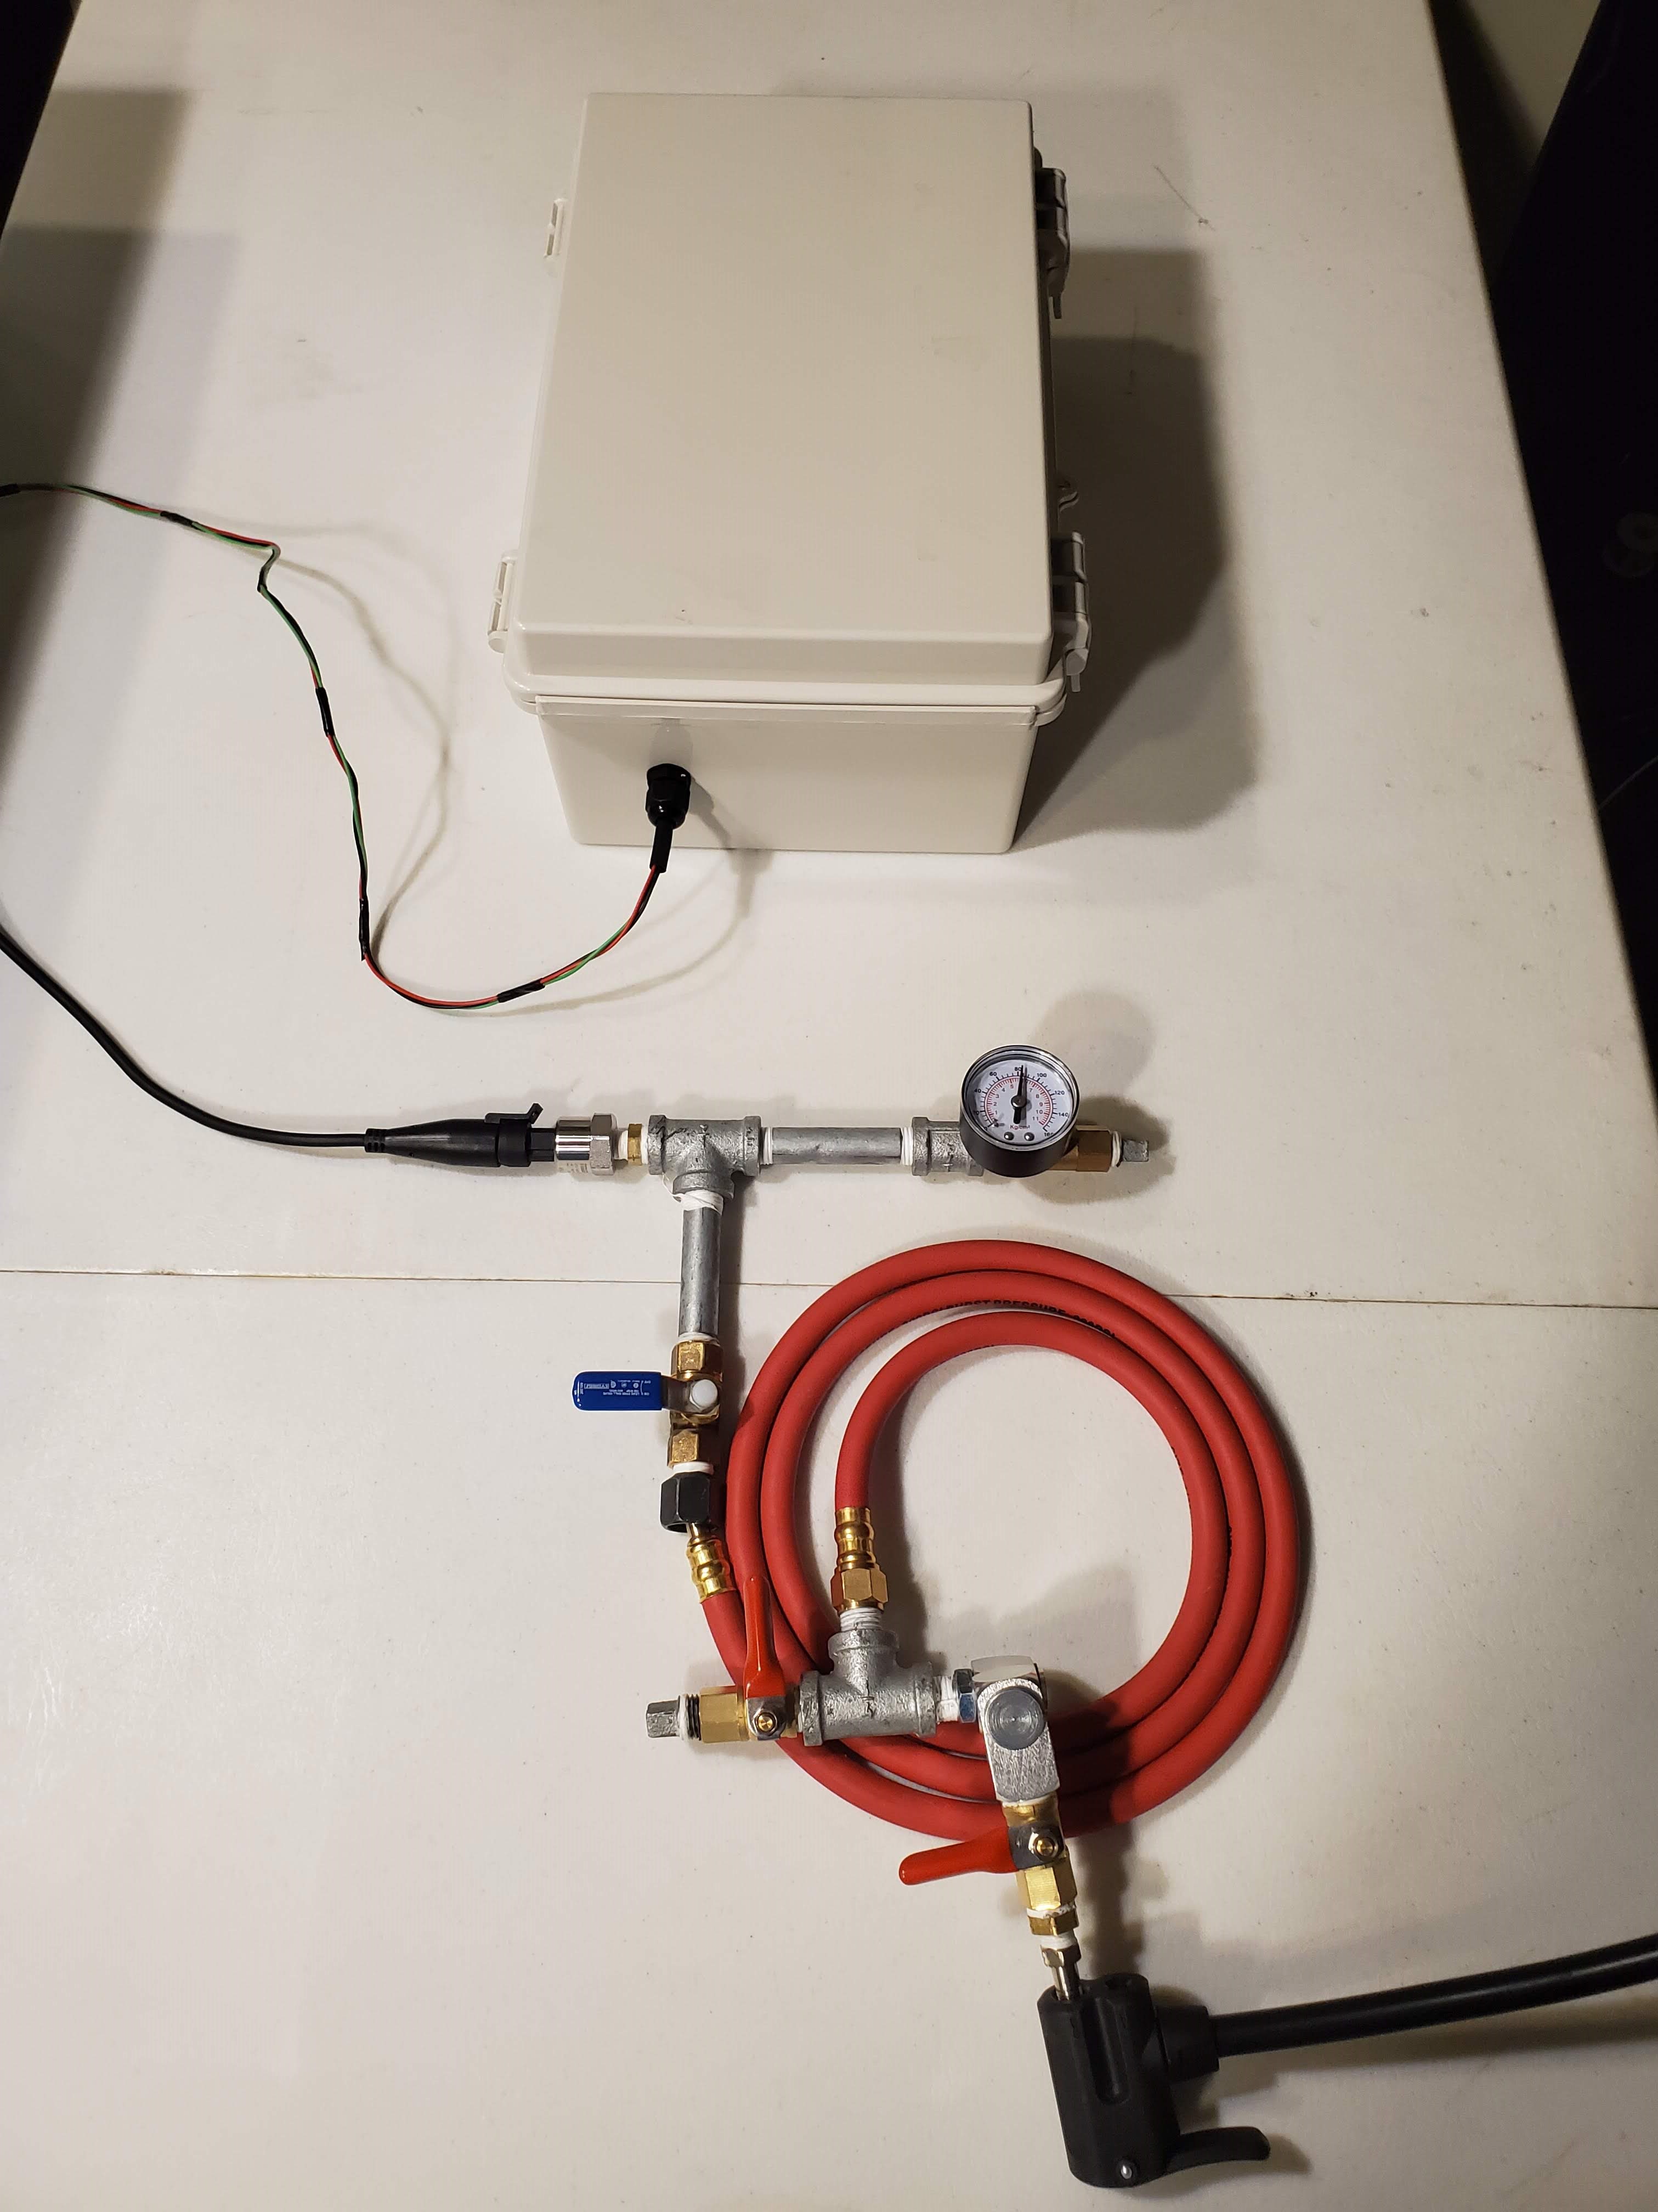
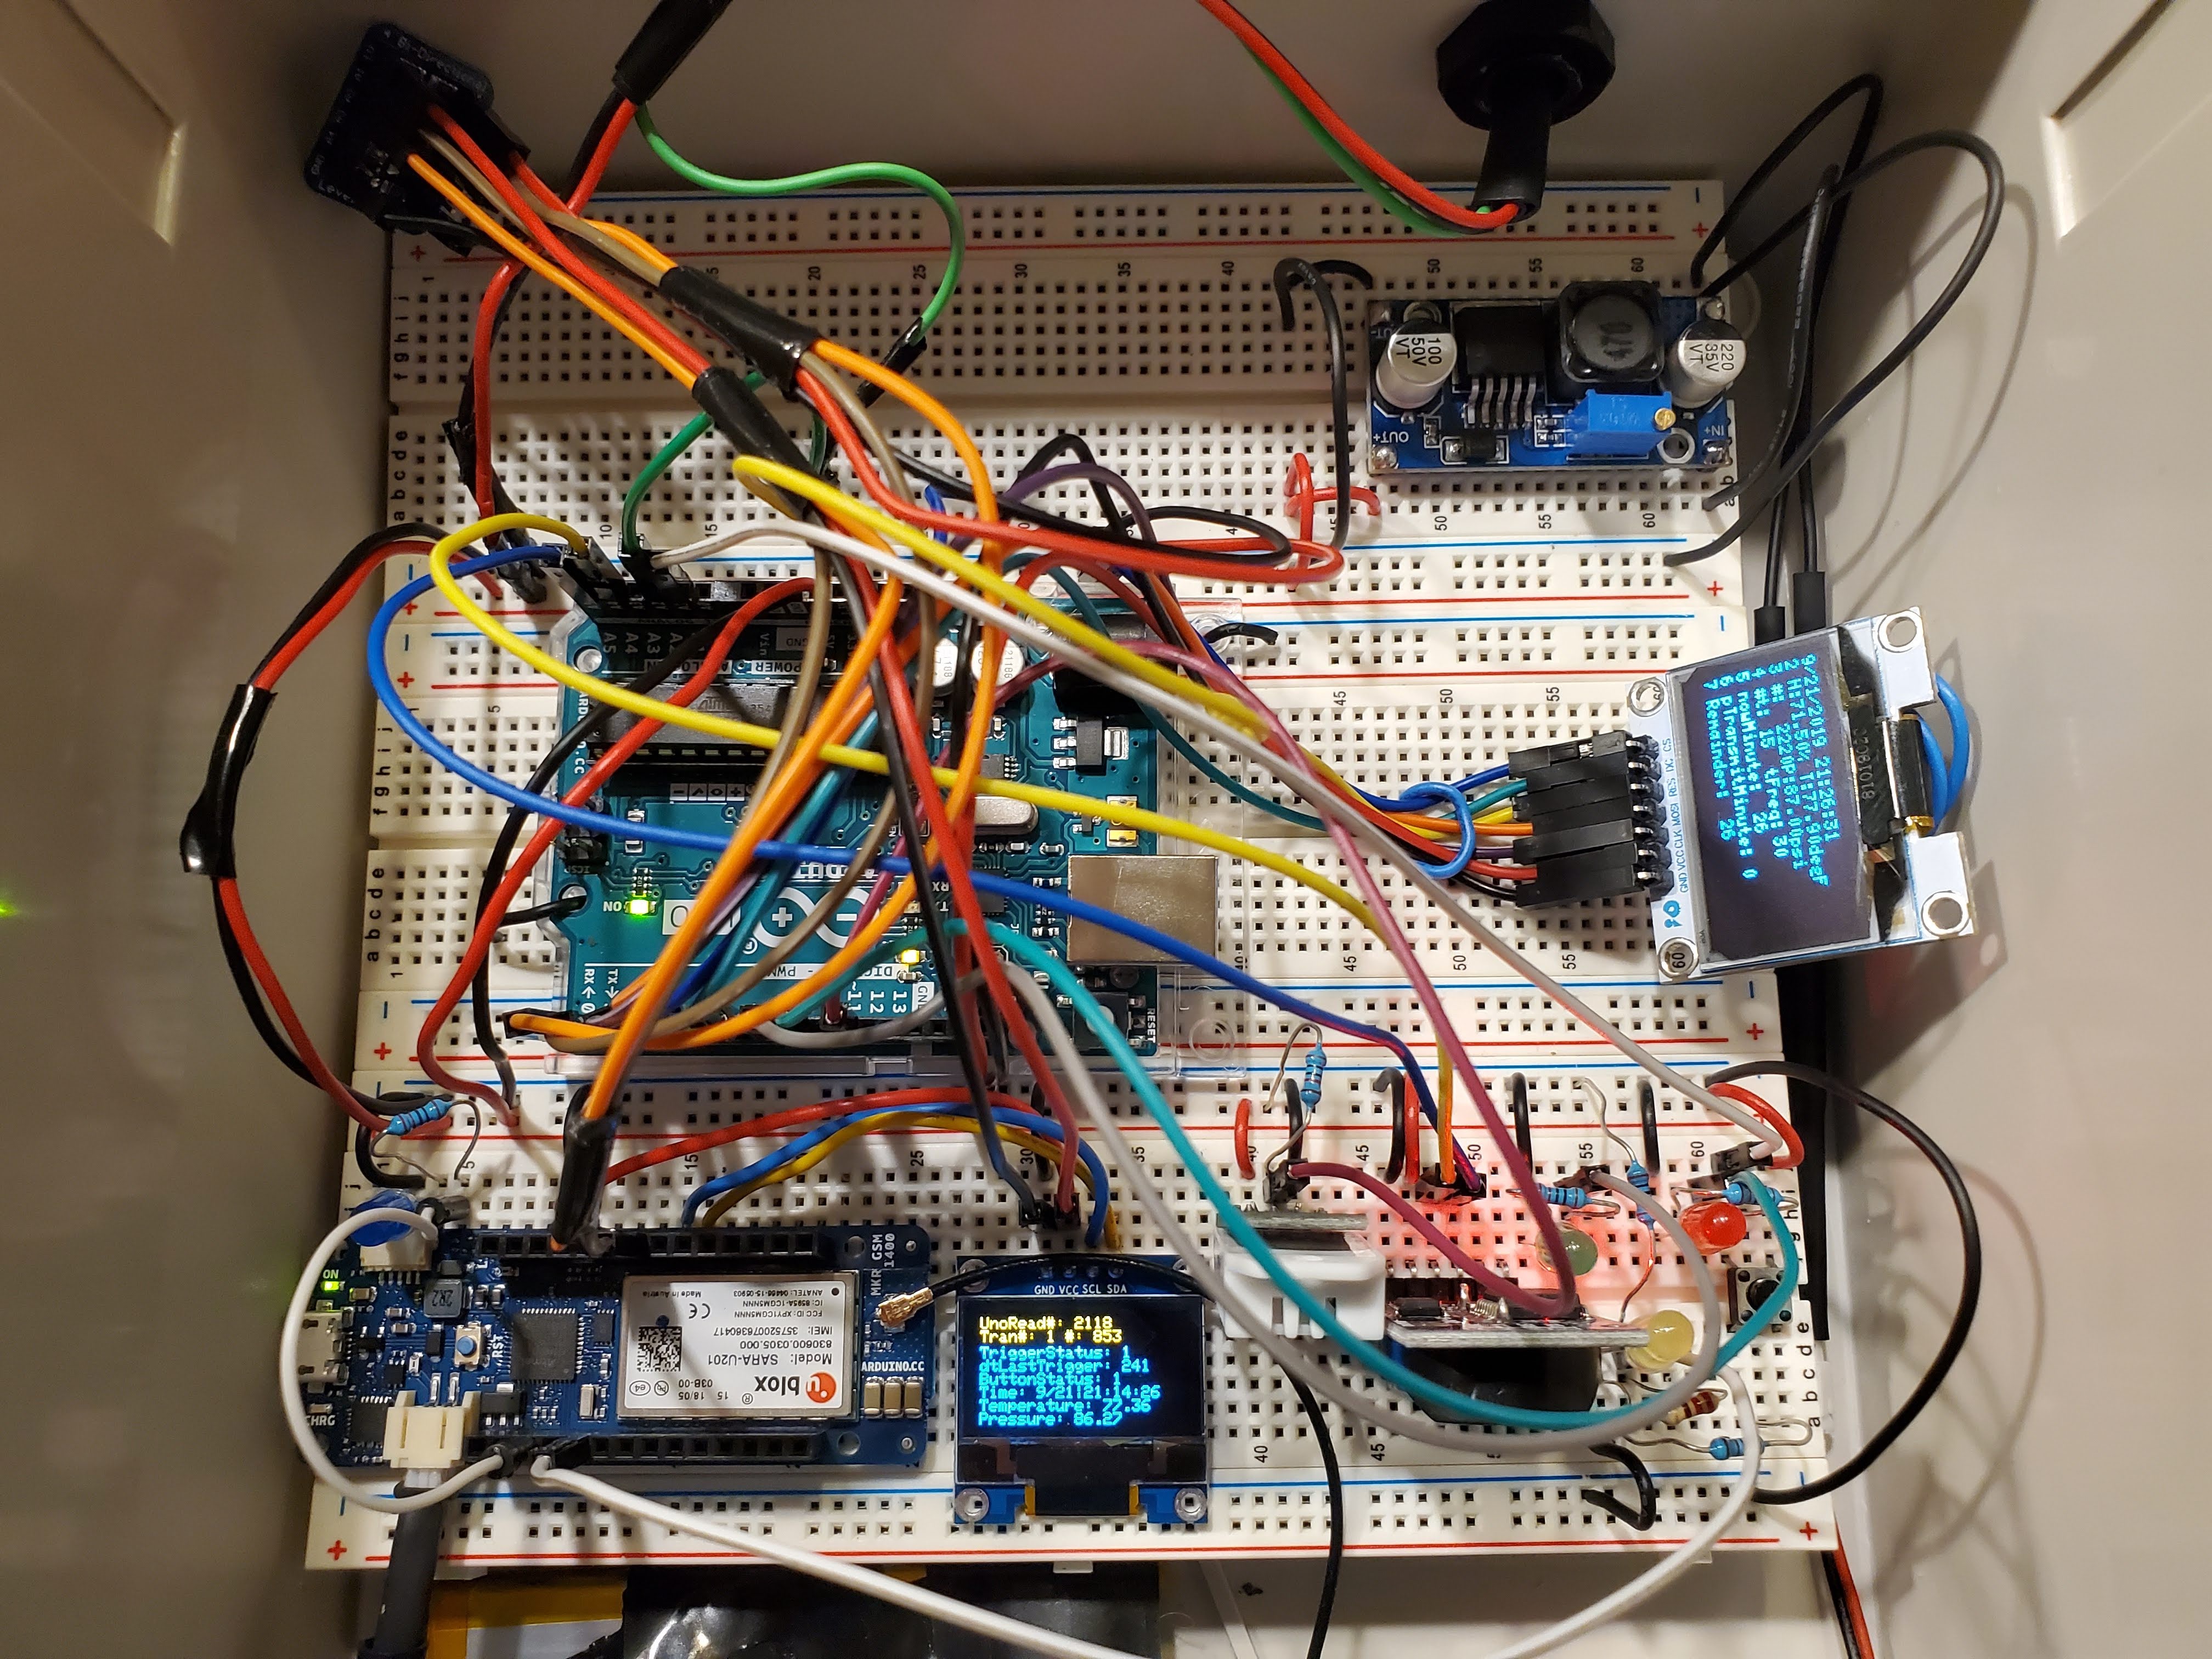
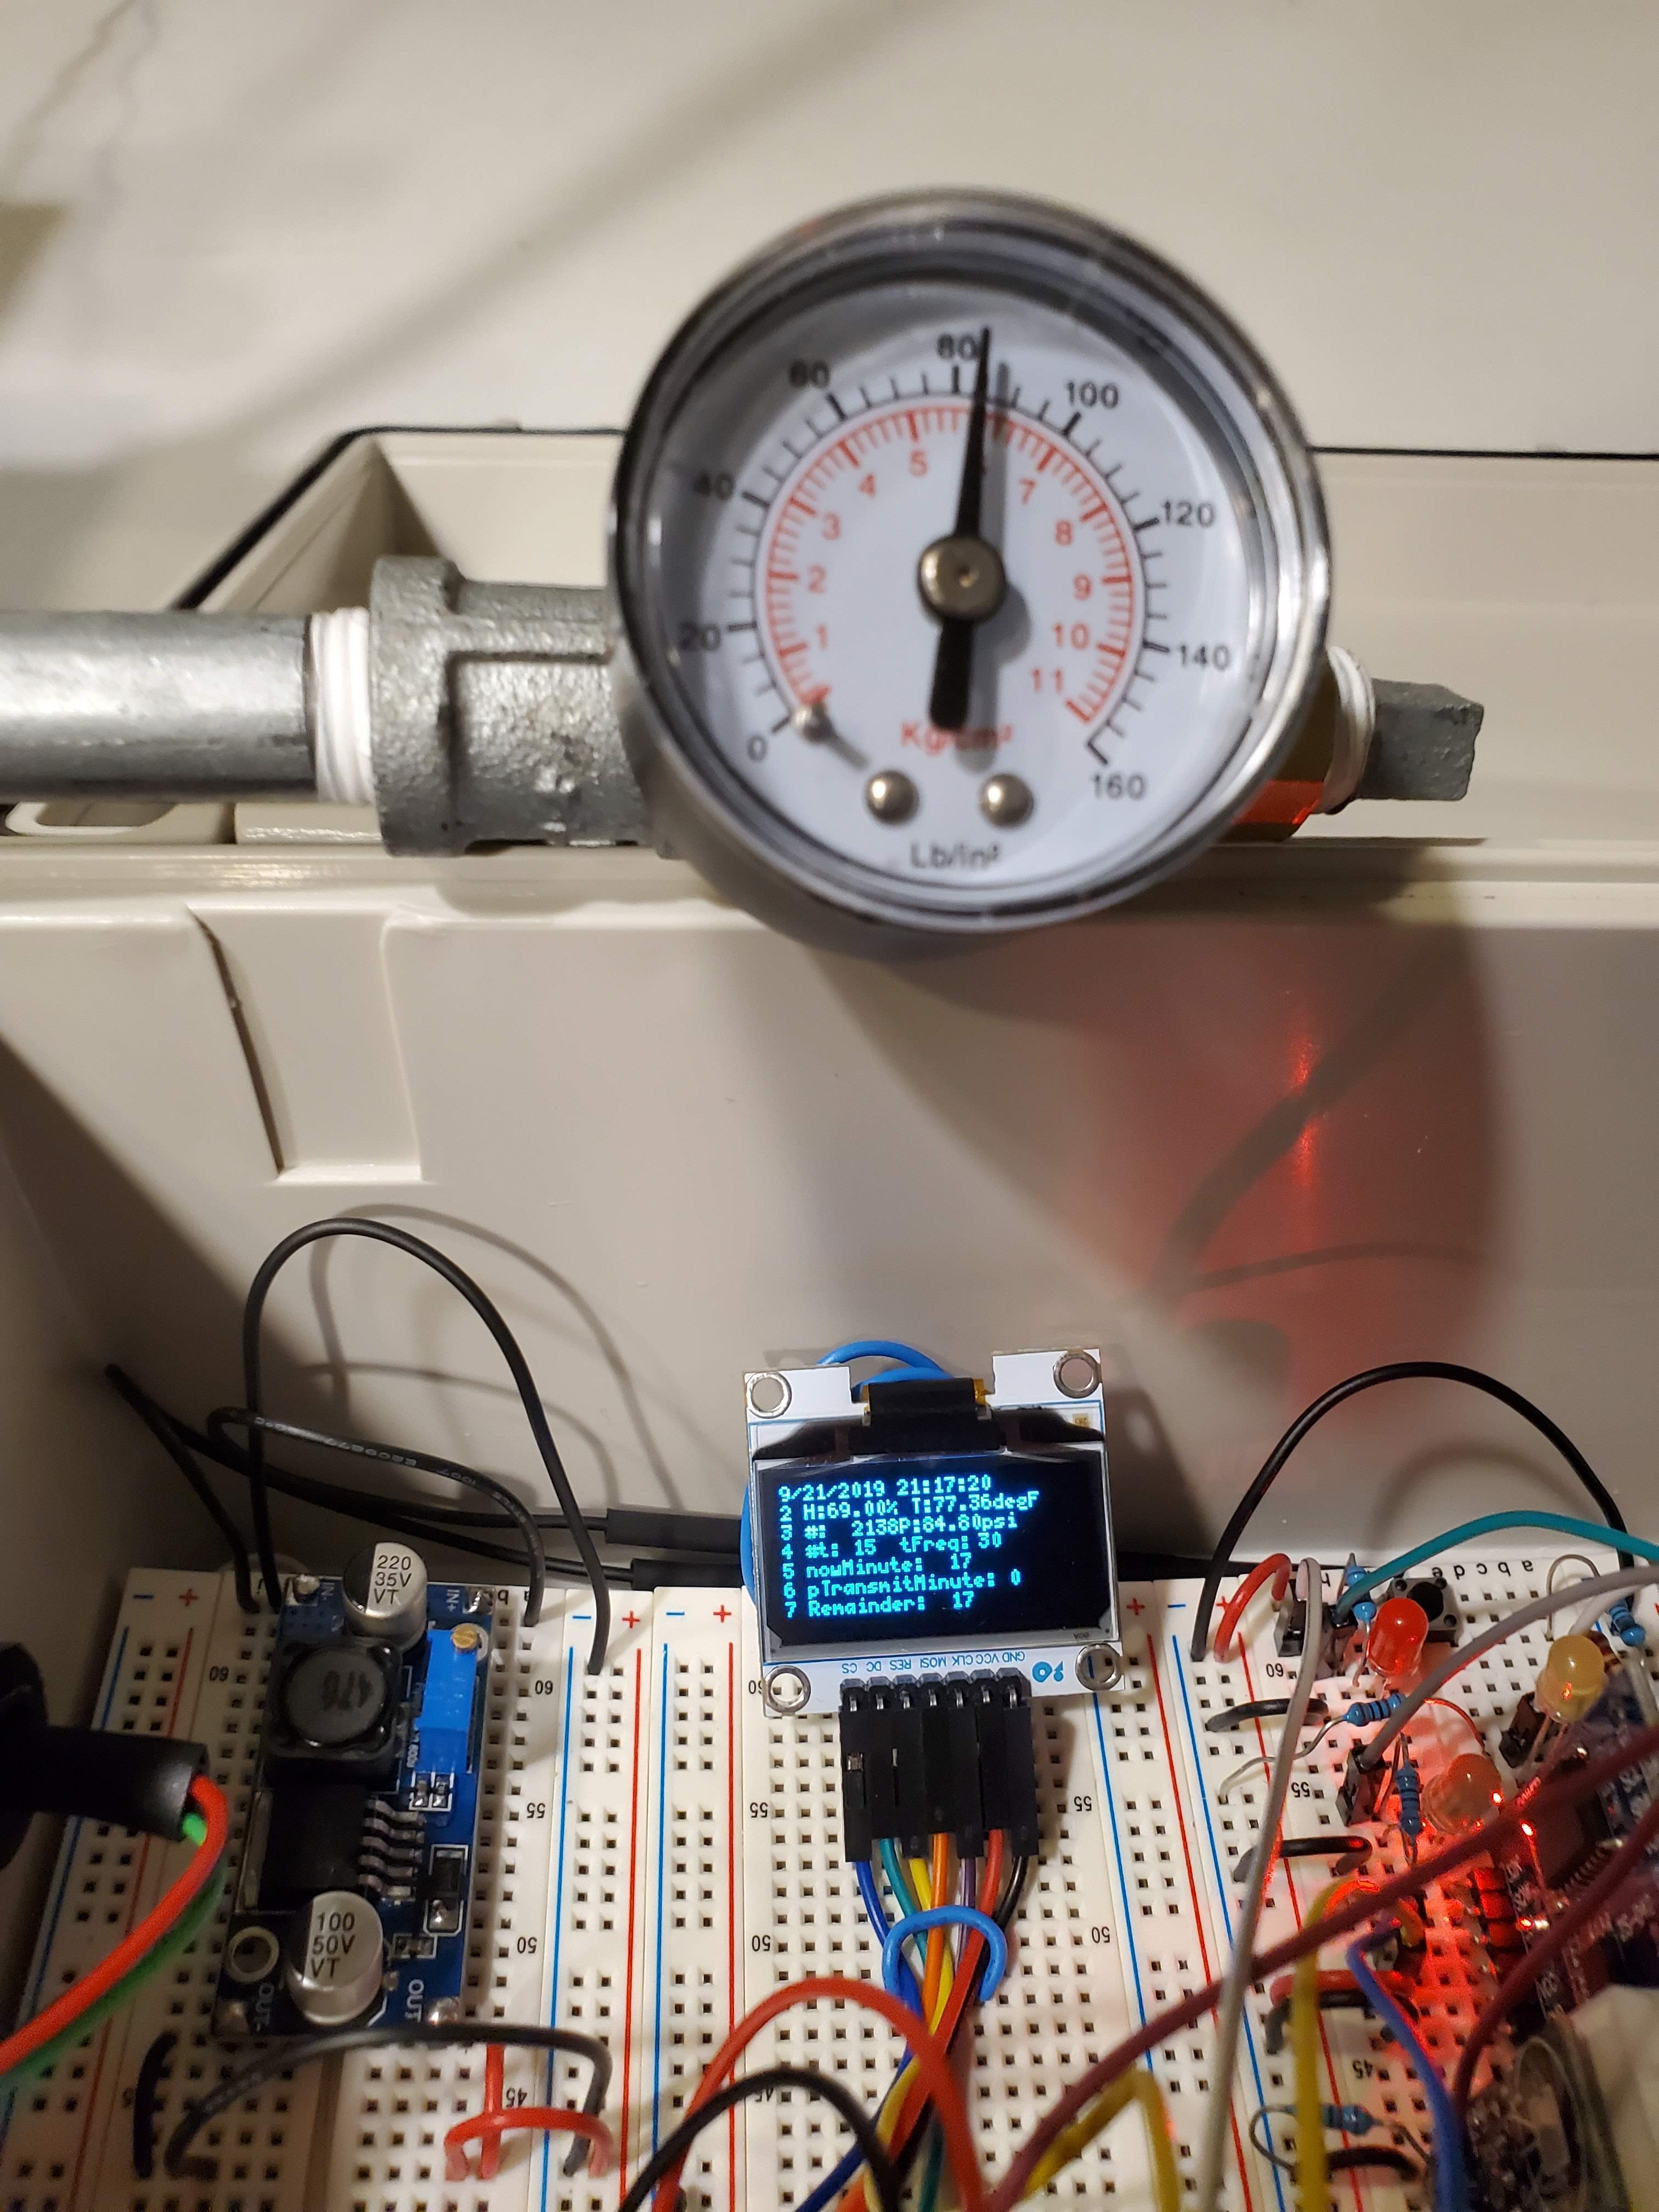
Step 1: Pressure Transducer to Uno
The pressure transducer converts pressure to an analog electrical signal.
The Arduino Uno converts the analog signal from the pressure transducer into pressure (psi).
Step 2: Uno to MKR GSM 1400 via Serial
When communicating between two Arduino devices via Serial:
- Connect RX on Device #1 to TX on Device #2
- Connect TX on Device #1 to RX on Device #2
- The devices must have a common ground
Data Transmission Frequency (Uno to MKR GSM 1400)
- NORMAL: Every 30 minutes (transmitFrequency) the Uno will serial.print data to the MKR GSM 1400 which will transmit the data to the cloud.
- HIGH/LOW TRIGGER: If the pressure goes above 40 psi (highTrigger) or below 20 psi (lowTrigger) and stays there for greater than 2 minutes (dtLastTriggerLimit) the Uno will serial.print data to the MKR GSM 1400 which will transmit the data to the cloud.
- DEMAND POLL: If pin A1 on the Uno is pushed high it will serial.print data to the MKR GSM 1400 which will transmit the data to the cloud. Note: pin A1 is named "buttonPin" in the sketch for the Uno. There are 2 ways that pin A1 on the Uno can get pushed high. (1) There is a push button on the breadboard. (2) If pin A3 on the MKR GSM 1400 is high it will push pin A1 high. Since pin A3 is controlled by an input in the Arduino Cloud, the current pressure can be obtained remotely at any time without having to wait for a regularly scheduled data transmission.
Notes
- The sketch for the Uno could be modified so that multiple inputs like temperature, humidity, battery voltage, etc. could be monitored with high and low setpoints in addition to pressure in the current version.
- The code used to convert the analog signal from the pressure transducer into pressure (psi) is based off the instructions given in the following YouTube video: https://www.youtube.com/watch?v=AB7zgnfkEi4
- The following post on the Arduino Forum covering "Serial Input Basics" was very helpful when it came to writing the code to communicate from one device to the other using serial data: https://forum.arduino.cc/index.php?topic=288234.0
The code used for the Arduino Uno in this project is attached with comments explaining key information.
File Name: "InstrumentReader"
Step 3: MKR GSM 1400 to Arduino Cloud via Cellular
The MKR GSM 1400 processes serial data from the Arduino Uno and transmits the data to the Arduino Cloud using cellular data.
It is worth noting that in the code for the MKR GSM 1400 you'll see Serial1.read as opposed to Serial.read. The reference material on the Arduino website gives a good explanation. The table in the image below shows that the TX/RX pins on MKR boards are accessed via Serial1.
https://www.arduino.cc/reference/en/language/functions/communication/serial/
Arduino Cloud
This project is setup with 2 variables in the Arduino Cloud. The image below shows how these variables are displayed in the dashboard on the Arduino Cloud.
The first variable named "dataStringCloud" is effectively a package of all the data from the device. This approach was taken as opposed to one variable for each value to simplify processing the data in Google Sheets. With individual variable names, it was difficult to tell the difference between a value staying the same and a value that did not get updated. The data from this package is parsed in Google Sheets.
The second variable named "pinCloud" is used to control the MKR GSM 1400 from the Arduino Cloud. There is a switch function in the sketch that controls the action based on the value of pinCloud. When pinCloud = 1, pin A1 is pushed high causing an LED on the board to light up. When pinCloud = 2, pin A3 is pushed high which leads to the Arduino Uno sending the current data as described above.
The code used for the Arduino MKR GSM 1400 in this project is attached with comments explaining key information.
File Name: "CommunicationsDevice"
Step 4: Arduino Cloud to Google Sheets via Webhook
Data is transferred from the Arduino Cloud to Google Sheets using a webhook.
The core of the webhook is the doPost function written in the script of a Google Sheets file.
Here is a quick summary of how to set-up the webhook. Note that the process starts in Google Sheets. You don't get to the Arduino Cloud until the end. To get from A to B, start at B.
- Create a New Google Sheets file
- Click "Tools" on the toolbar & select "Script editor" in the dropdown
- Write code with a doPost function (refer to GoogleSheetsScript.js attached to this project)
- Click "Publish" on the toolbar & select "Deploy as web app..." in the dropdown
- A dialog box will come up with 3 fields.
- (1) Project Version: Always use the dropdown to select "New". After the first update it will default to the # of the current version; if you don't use the dropdown to select "New", the changes will not go into effect.
- (2) Execute the App as: "me (youremail@gmail.com)"
- (3) Who has access to the app: "Anyone, even anonymous"
- Press deploy after verifying the values in the 3 fields
- A second dialog box will appear with the "Current web app URL". This is the URL that you will copy & paste into the webhook tab on the Arduino Cloud. Worth noting, this URL stays the same regardless of the project version.
- Click ok, and you are done!
A good portion of the JavaScript code used in this project is modeled after the code used in another project named "Arduino IoT Cloud Google Sheets Integration". The link to the project is below. I'd recommend checking it out.
Step 5: Use Google Sheets to Parse Data
Use Google Sheets to parse the individual values from dataStringCloud and display the unique records transferred from the Arduino Cloud
The link below is to the Google Sheets file used for a recent test of the device. The cells in this file are colored based on how they were populated as indicated in the legend on each sheet.
https://docs.google.com/spreadsheets/d/1XwCir2Llw8RvGPGgZI3Yk6U5a3LeIfUACNuO1Gr_LFQ/edit?usp=sharing
Step 6: Use Google Sheets to Send Notifications
You may have noticed that there are two functions in the JavaScript file for this project (GoogleSheetsScript.js) referenced above in step 4.
- doPost function - Transmits data from the Arduino Cloud Webhook. It runs when there is new data on the Arduino Cloud.
- sendEmail function - Sends emails based on values extracted from the sheet named "Data" in the Google Sheets file for the project. It runs once every minute based on the settings in the trigger setup.
Steps to Setup a Trigger for the sendEmail function
- Open Google Sheets file
- Click on "Tools" in the toolbar
- Select "Script Editor" in the dropdown
- From the Script editor window proceed to:
- Click on "Edit" in the toolbar
- Select "Current project's triggers" in the dropdown
- From the G Suite Developer Hub window proceed to:
- Select "Add Trigger" in the bottom right corner of the window
- In the dialog box that comes up make selections to run the sendEmail function.
- Note: running the trigger on a Time-Driven basis makes it possible to generate email notifications when the device stops updating.
Battery Life
~24 hours
This could be optimized by turning off or removing the displays. Another option would be to remove non-essential sensors like the DHT22 and the DS3231.
Data Usage
~0.7 megabytes/day
This could be optimized by reducing the size or frequency of data transmissions. For example: To reduce reduce size, only send pressure as opposed to pressure, temperature, humidity, and time. To reduce frequency, only hourly updates as opposed to every 30 minutes.
Project Cost
Total = $241
- Arduino MKR GSM 1400 ($70)
- Arduino Uno ($22)
- 2 x 3.7V LiPo Batteries ($30)
- 2 x LED Displays ($29)
- Weather Resistant Plastic Box ($22)
- Pressure Sensor ($19)
- Temperature / Humidity Sensor - DHT22 ($10)
- RTC Module - DS3231 ($5)
- Voltage Step-up Converter ($5)
- Logic Level Converter ($4)
- Miscellaneous - LEDs, Resistors, Wiring, etc. ($25)
Hardware / Tools
All of the hardware and tools used for this project were purchased from the following:
- Arduino Online Store (https://store.arduino.cc/)
- Adafruit (https://www.adafruit.com/)
- Amazon (https://www.amazon.com/)
- Harbor Freight
- Home Depot


In Conclusion...
Thanks for taking the time to review this project.
Any and all questions / feedback / comments / suggestions are welcome / appreciated.
🛠️ เจาะลึกเบื้องหลังการทำงาน (Deep Dive / Technical Analysis)
What happens when your device is physically located in a desert, thousands of miles from the nearest Wi-Fi router or LoRa gateway? The IoT Pressure Sensor GSM project ascends to the absolute peak of telecommunications. It utilizes a physical cellular SIM card, bypassing local networks completely, connecting to raw cell phone towers via the highly complex Arduino MKR GSM 1400.
The Hardware GPRS Modem Connection
The MKR GSM 1400 incorporates a massive U-Blox cellular modem directly onto its tiny Arduino PCB.
- You purchase an IoT data-only Micro-SIM card (like Hologram or a generic prepaid carrier).
- The C++ code requires initializing the GSM Cellular Stack.
gsmAccess.begin("pin_number_if_applicable");gprs.attachGPRS("apn_name", "user", "pass"); - The board violently searches for cell towers, exactly like a smartphone. When it locks onto the 3G/GPRS signal, it opens an absolute HTTP connection to the global internet!
Cloud to Google Apps Script (Webhooks)
The sensor data (usually an industrial 4-20mA Water Pressure Transducer reading pipeline stress) must go to Google.
- You do NOT send data directly to Google Sheets via SQL. You use a massive API pipeline!
- The MKR pushes the pressure data (
120 PSI) up into the Arduino IoT Cloud via the Cellular link. - The Arduino Cloud triggers a "Webhook" (an automated backend payload).
- This Webhook violently smashes into a custom JavaScript
Google Apps ScriptURL hosted on the backend of a Google Sheet spreadsheet! - The Google Script catches the JSON data payload and prints
120 PSIontoRow 14, Column B, logging thousands of entries autonomously from the desert location!
Enterprise Cellular Requisites
- Arduino MKR GSM 1400 (An immensely powerful pro-level board).
- An active, activated cellular micro-SIM data card.
- 3G/GPRS Antenna (Cell signals cannot be caught without a heavy external antenna screwed onto the tiny U.FL board connector).
- Industrial 5V Pressure Transducer (Usually 0-100 psi).
- A massive Lithium Polymer battery (The U-Blox cellular modem draws unbelievable surges of current precisely when attempting to connect to a cell tower!).