Make Your IoT Cloud Kit Send You Updates on Telegram
หมายเหตุ: บทช่วยสอนนี้อาจล้าสมัย โปรดไป ที่นี่ เพื่อดูเวอร์ชันล่าสุด
ในบทช่วยสอนนี้ เราจะมาลองเล่นกับ IoT Cloud Kit ใหม่จาก Arduino ซึ่งประกอบด้วย (นอกจาก LED, breadboards, LED และสายไฟ) บอร์ด MKR WiFi 1010, Environmental Shield และ MKR Relay Proto Shield.
เราจะทำให้ข้อมูลที่บอร์ดรวบรวมสามารถเข้าถึงได้ผ่าน conversational UI เราจะใช้ Telegram ดังนั้นคุณจะต้องตั้งค่าบัญชีในบริการแชทนั้น (คุณจะต้องใช้หมายเลขโทรศัพท์มือถือด้วย)
- เราจะใช้ไลบรารี Universal Telegram Bot โดย Brian Lough ร่วมกับไลบรารี ArduinoJson ที่เขียนโดย Benoît Blanchon
- เราจะได้รับการแจ้งเตือนหากเซ็นเซอร์เฉพาะ (ในตัวอย่างนี้คือ
tสำหรับ temperature) เกินtemp_limitที่ 35.5
- เราจะสามารถควบคุม LED ในตัวของ Arduino และ RELAY สองตัวบนบอร์ดได้อย่างเต็มที่
เยี่ยม! มาเริ่มเล่นกับบอร์ดกันเลย
สร้าง TelegramBot ใหม่โดยใช้ BotFather
ตรวจสอบให้แน่ใจว่าคุณได้ติดตั้ง Telegram บนโทรศัพท์หรือแล็ปท็อปของคุณแล้ว จากนั้นในช่องค้นหา ให้ค้นหา @botfather
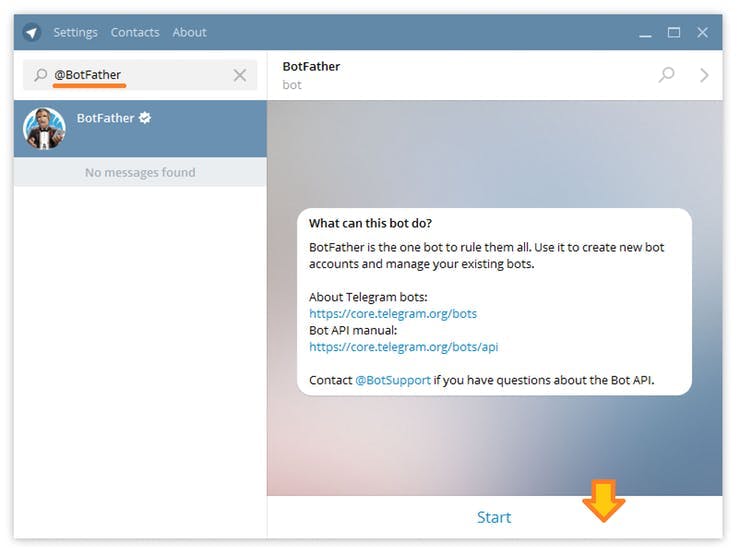
พูดคุยกับเขาและใช้คำสั่ง /newbot เพื่อสร้างบอทใหม่ BotFather จะขอชื่อและ username ของคุณ จากนั้นจะสร้าง authorization token สำหรับบอทใหม่ของคุณ Name ของบอทของคุณจะแสดงในรายละเอียดผู้ติดต่อและที่อื่นๆ Username เป็นชื่อย่อที่ใช้ในการอ้างถึงและลิงก์ telegram.me Username ของบอทของคุณ ต้อง ลงท้ายด้วย ‘bot’ เช่น ‘tetris_bot’ หรือ ‘TetrisBot’
เปิด Universal TelegramBot > 101 > Echobot.ino.
เนื่องจากโค้ดนี้ต้องพึ่งพาไลบรารี Wifi อื่น เราจึงต้องเปลี่ยน
#include <WiFi101.h>
เป็น
#include <WiFiNINA.h>
หรือแม้แต่เพิ่มโค้ดวิเศษนี้ที่จะทำให้ Arduino IDE เรียกใช้ไลบรารีที่เหมาะสมจากสองไลบรารีตามบอร์ดเป้าหมายที่ระบุ
// This header is used to tell the Arduino IDE
// to compile with the proper WIFI Library
// between MKR1000 and MKR1010
#ifdef ARDUINO_SAMD_MKRWIFI1010
#include <WiFiNINA.h>
#elif ARDUINO_SAMD_MKR1000
#include <WiFi101.h>
#else
#error unsupported board#endif
ทีนี้ หากคุณอัปเดต WiFi SSID และ password พร้อมกับ bot token ที่ถูกต้อง คุณควรจะได้รับการตอบกลับด้วยข้อความล่าสุดของคุณ มาเพิ่มข้อมูลกัน
สำคัญ! เพื่อให้ BOT คุยกับคุณ (และแค่คุณเท่านั้น!) คุณต้องค้นหา chat_id ของคุณ (ตัวเลขที่ Telegram กำหนดให้กับการสนทนาระหว่างคุณกับ BOT ของคุณ)
คุณสามารถค้นหาสิ่งนี้ได้โดยการเพิ่มสตริงนี้เข้าไปในฟังก์ชัน HandleNewMessages.
Serial.println(chat_id);
เก็บโค้ดนี้ไว้สำหรับคุณ และเพิ่มลงในโค้ดสุดท้ายเป็น Mychat_id String ที่กำหนดไว้ที่จุดเริ่มต้นของ sketch.
ข้อมูลสิ่งแวดล้อมในการตอบกลับ
เราจะสร้างสตริงที่จะส่งเป็นคำตอบ เราจะจัดเก็บข้อมูลสำคัญทั้งหมดไว้ในสตริงข้อมูล
/*
 MKR ENV Shield - Read Sensors
 This example reads the sensors on-board the MKR ENV shield
 and prints them to the Serial Monitor once a second.
 The circuit:
 - Arduino MKR board
 - Arduino MKR ENV Shield attached
 This example code is in the public domain.
*/

#include <Arduino_MKRENV.h>
#include <WiFiSSLClient.h>

#include <UniversalTelegramBot.h>
#ifdef ARDUINO_SAMD_MKRWIFI1010
#include <WiFiNINA.h>
#elif ARDUINO_SAMD_MKR1000
#include <WiFi101.h>
#else
#error unsupported board
#endif

// Initialize Wifi connection to the router
char ssid[] = "SSIDName"; // your network SSID (name)
char password[] = "SSIDKey";  // your network key
#define BOTtoken "BotToken" // your Bot Token (Get from Botfather)


WiFiSSLClient client;

UniversalTelegramBot bot(BOTtoken, client);
int Bot_mtbs = 1000; //mean time between scan messages
long Bot_lasttime;   //last time messages' scan has been done

void setup() {
 Serial.begin(115200);
 while (!Serial);
 if (!ENV.begin()) {
   Serial.println("Failed to initialize MKR ENV shield!");
   while (1);
 }
 delay(100);
 // Attempt to connect to Wifi network:
 Serial.print("Connecting Wifi: ");
 Serial.println(ssid);
 while (WiFi.begin(ssid, password) != WL_CONNECTED) {
   Serial.print(".");
   delay(500);
 }
 Serial.println("");
 Serial.println("WiFi connected");
 Serial.println("IP address: ");
 IPAddress ip = WiFi.localIP();
 Serial.println(ip);
}
void loop() {
 Serial.print("Temperature = ");
 Serial.print(ENV.readTemperature());
 Serial.println(" °C");
 Serial.print("Humidity    = ");
 Serial.print(ENV.readHumidity());
 Serial.println(" %");
 Serial.print("Pressure    = ");
 Serial.print(ENV.readPressure());
 Serial.println(" kPa");
 Serial.print("Lux .       = ");
 Serial.println(ENV.readLux());
 Serial.print("UVA         = ");
 Serial.println(ENV.readUVA());
 Serial.print("UVB         = ");
 Serial.println(ENV.readUVB());
 Serial.print("UV Index    = ");
 Serial.println(ENV.readUVIndex());
 Serial.println();
 delay(1000);
 String data = "Hey! Temperature is " + String(ENV.readTemperature()) + " C, " + " Humidity is " + String(ENV.readHumidity()) +