Marker Beacon System
we incorporate all marker Beacon stations (IR Proximity Sensor) and Display (LED bulb and Buzzer). There are three IR Proximity Sensor which are working as a three marker beacon station in our project.
Working principle of IR Proximity Sensor is same as radar. When object is reached within Range of it. It detect the object and gives signal to the Arduino Uno (Microcontroller). When signal reaches to the Arduino UNO. It processes the signal as per program installed in it. Then it runs the display as per the program. Then it runs the display as per the program. On the display of Marker Beacon there are three LED bulbs (Blue, Amber and White) for visual indication and one buzzer for aural indications are install. Display works on the output of Arduino UNO to get correct indication.
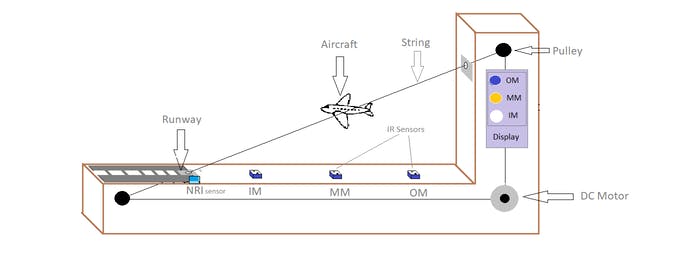
In this way landing phase of aircraft is completed but there is one problem during return phase of aircraft there is no any indications require, so that we install fourth sensor named as NRI (Not Return Indication) to resolve this problem. when aircraft reaches on runway then fourth sensor is in the active phase and as we programmed at that time Arduino pauses its working until the aircraft goes outside of all markers range(return to its initial position i.e. top right part of our Model design).
🛠️ เจาะลึกเบื้องหลังการทำงาน (Deep Dive / Technical Analysis)
A stopwatch requires a human to press a button; human reaction time is 250 milliseconds. A drone going 40MPH covers 15 feet in that time! The Marker Beacon System with IR Sensors establishes incredibly absolute, physical laser checkpoints! It requires the programmer to completely abandon slow, blocking C++ code like delay(), relying heavily upon polling ultra-fast analog/digital IR gates to detect split-second objects crossing the optical threshold to trigger massive buzzer/LED visual confirmations.
The Break-Beam Threshold Calculus (TCRT5000 / Photodiode)
An object flying past a sensor at 40MPH does not stay in the beam for long!
- A standard
analogRead()in the middle of a bulky loop might literally miss the drone! - The project relies on Infrared Obstacle/Break-Beam Sensors.
- The sensor
Pin 2sits normallyHIGH. - The Nanosecond Trigger Trap: You must use a hardware interrupt, or a fiercely optimized
while()blocking loop!
// The loop does absolutely nothing until the IR beam is physically shattered by the drone chassis!
while(digitalRead(IR_Gate_Pin) == HIGH) {
  // Wait infinitely!
}
// The instant the beam shatters, jump down immediately!
unsigned long gateCrossTime = millis();
blastGiantRedLEDMatrix(); // Visual confirmation!
soundPiezoBuzzer();       // Acoustic confirmation!
State Failsafes and Anti-Bounce Masking
If the drone triggers the optical beam, the Buzzer must screech for 1.0 Seconds.
- If you use
delay(1000)to blast the buzzer, the Uno entirely freezes. If the drone crosses Gate 2 during that second, it is completely ignored! - The system must employ massive
millis()Non-Blocking Timer Arrays. if (millis() - buzzerTimer >= 1000) { digitalWrite(BuzzerPin, LOW); }- The "Tail" Bounce Fix: As the drone leaves the beam, the "tail" might accidentally trigger the sensor a second time, registering 2 laps!
- The system implements a mandatory
cooldownLockout: If a lap is triggered, ignore the IR sensor for exactly 3.0 seconds!
Marker Tracking Equipment
- Arduino Uno/Nano (Standard execution speeds are perfectly sufficient).
- Multiple IR Obstacle Avoidance Modules (Or dedicated IR Laser Break-Beam pairs!).
- Massive 10mm Red / Green Output LEDs (Mounted physically on a racing archway!).
- Active Piezo Buzzers (Produces the piercing "BEEP" required for high speed sporting lap-time confirmation).