ชื่อโปรเจกต์: Matrix Orbital GTT TFT Thermometer ขั้นที่ 1
สวัสดีทุกท่าน! โปรเจกต์นี้มีวัตถุประสงค์เพื่อแสดงให้เห็นว่าการเชื่อมต่อจอแสดงผล HMI แบบ TFT อัจฉริยะ Matrix Orbital GTT เข้ากับ Arduino Uno ผ่าน I2C นั้นง่ายดายเพียงใด เซ็นเซอร์วัดอุณหภูมิ DS18S20 ใช้สำหรับรับข้อมูลอุณหภูมิ ซึ่งจะถูกประมวลผลโดย Uno เมื่อ Arduino ประมวลผลข้อมูลอุณหภูมิแล้ว จะทำการอัปเดต Bar graph และ Label ของ GTT
ฮาร์ดแวร์
- GTT Series Intelligent TFT HMI Display
- Arduino Uno
- Bread Board
- สาย Jumper แบบ Male to Male
- ตัวต้านทาน 4.7k Ohm
- DS18S20 Temperature Sensor
- สาย Bread Board แบบ 4 พิน
- สาย USB to Mini-USB
- Power Adapter (เลือกได้)
ซอฟต์แวร์
- GTT GUI Designer Software
- Arduino IDE
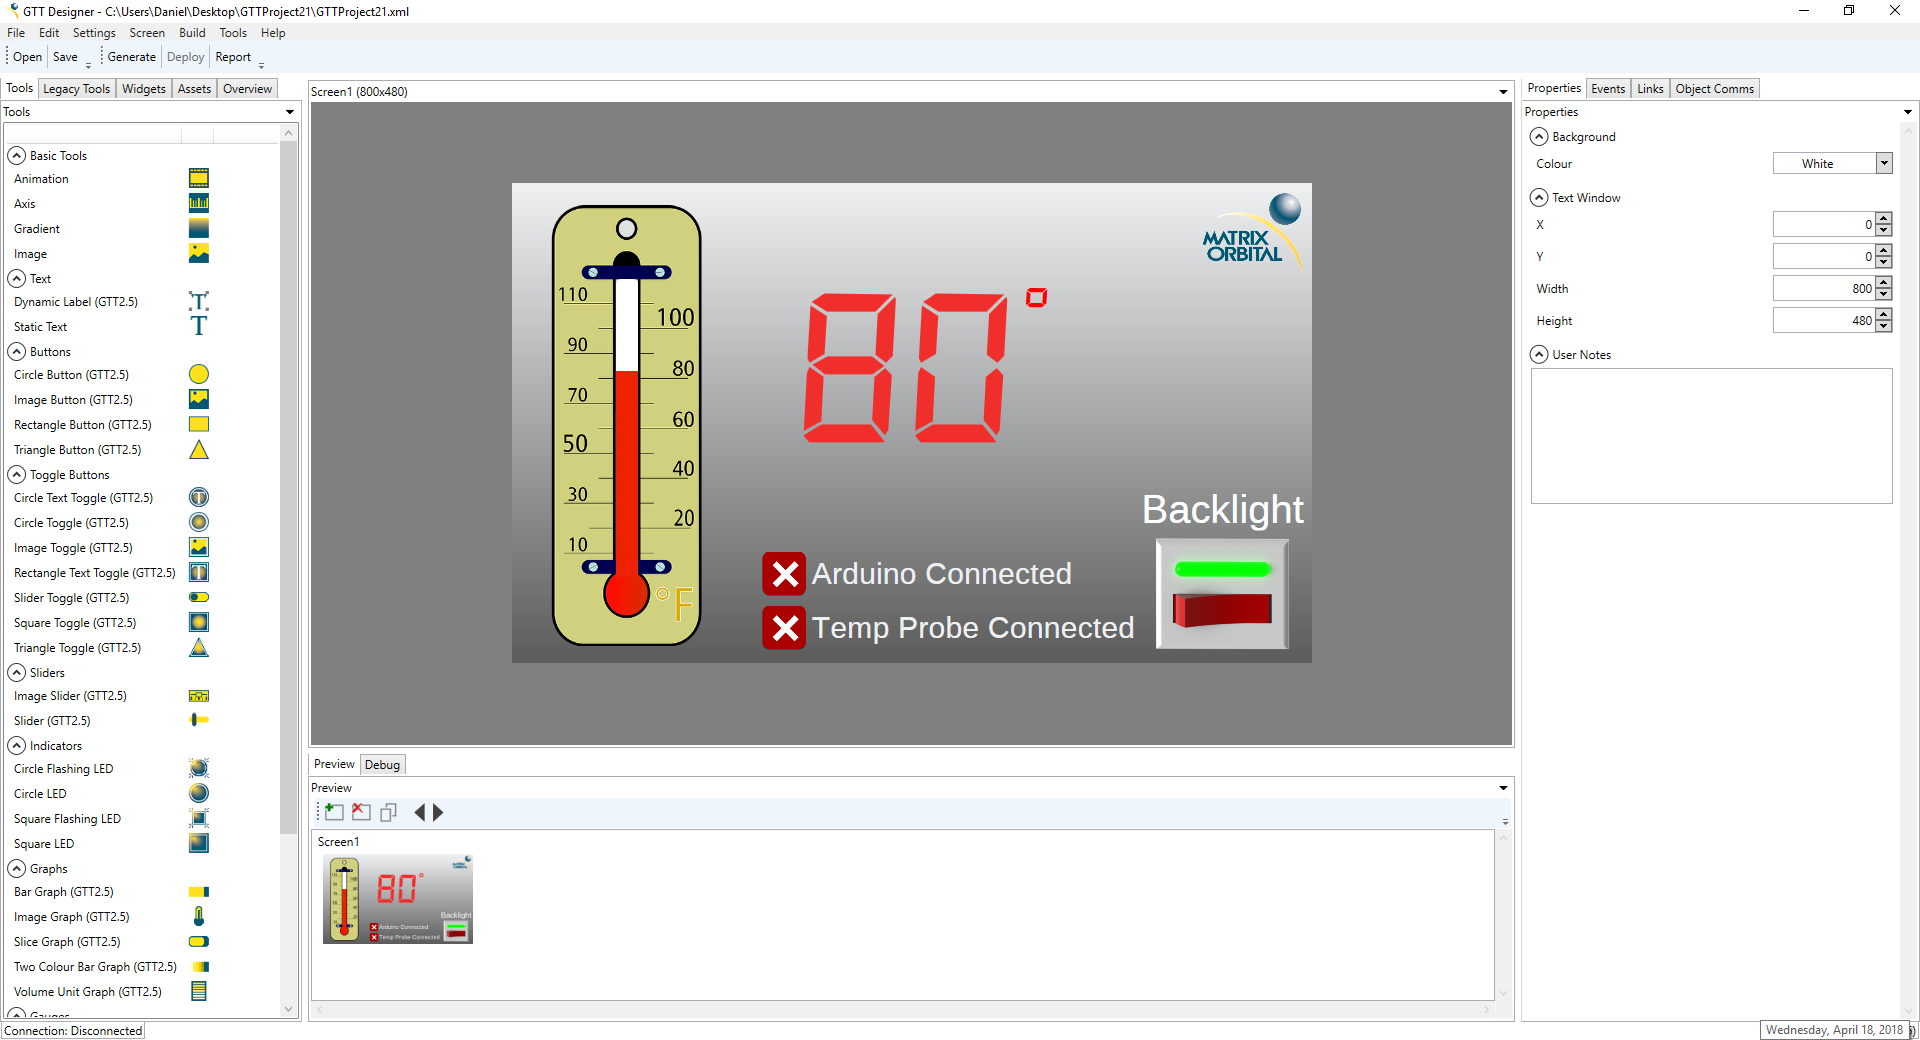
ขั้นตอนที่ 1: การออกแบบ User Interface
GTT Designer Suite ช่วยให้ผู้ใช้สามารถลากและวาง Widget ลงบนหน้าจอได้อย่างง่ายดาย นอกจากนี้ยังสามารถนำเข้าไฟล์รูปภาพและ Font มาใช้ในการสร้าง GUI ได้ สำหรับโปรเจกต์นี้ เราได้ลาก Bar graph, Image Toggles 3 อัน, Label และรูปภาพ Thermometer เข้ามา Bar graph ใช้เพื่อแสดงอุณหภูมิปัจจุบันในรูปแบบภาพ Label จะแสดงค่าอุณหภูมิปัจจุบันเป็นตัวเลข Image toggles สองอันใช้เพื่อระบุว่า Arduino และ DS18S20 temperature sensor เชื่อมต่อและทำงานอย่างถูกต้องหรือไม่ สุดท้าย Image toggle อันที่สามช่วยให้ผู้ใช้สามารถเปิดและปิด Backlight ของจอแสดงผลได้
คุณสามารถดาวน์โหลดซอฟต์แวร์ออกแบบ GUI ที่รวดเร็วและฟรีของเราได้ ที่นี่
ไฟล์โปรเจกต์สามารถดาวน์โหลดได้ ที่นี่
เมื่อออกแบบเสร็จสิ้น โปรเจกต์สามารถ Deploy ไปยัง GTT ได้ คุณจะต้องเชื่อมต่อ PC ของคุณเข้ากับ Mass Storage header ของ GTT และกด "Deploy" ใน GTT Designer ไฟล์ที่จำเป็นทั้งหมดจะถูกสร้างขึ้นและ Deploy ไปยังจอแสดงผลโดยตรง
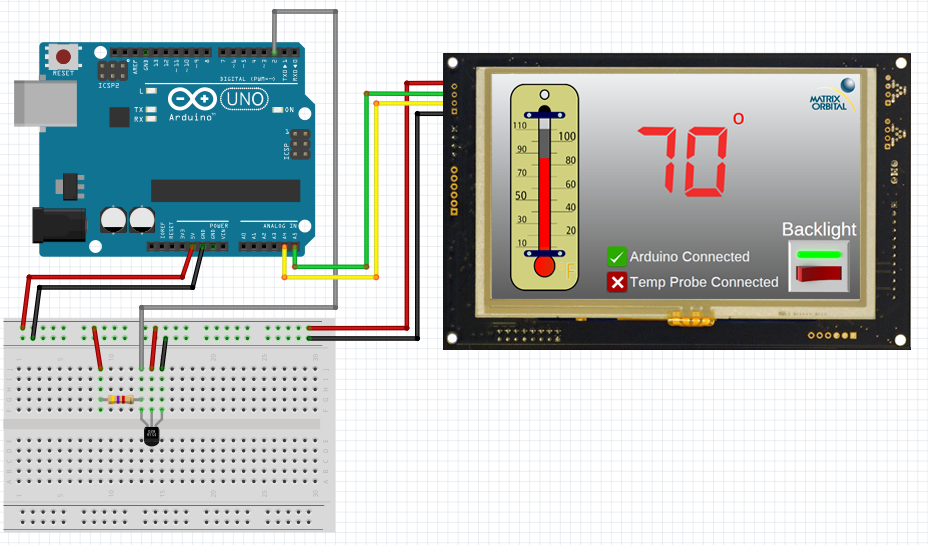
ขั้นตอนที่ 2: การเชื่อมต่อ GTT
สำหรับการสาธิตนี้ เราจะใช้ I2C ในการสื่อสารระหว่าง Arduino Uno และ GTT ใช้ Bread Board Cable เพื่อเชื่อมต่อ 4 pin header เข้ากับ I2C header ของ GTT จากนั้นเชื่อมต่อสาย Bread Board สีแดงเข้ากับแหล่งจ่ายไฟ 5V และเชื่อมต่อสายสีดำเข้ากับ Ground สายสีเหลือง (SDA) และสีเขียว (SCL) ต้องเชื่อมต่อกับ Pin SDA (A4) และ Pin SCL (A5) ของ Arduino Uno ตามลำดับ ไม่จำเป็นต้องใช้ I2C pull-up resistors สำหรับการสื่อสารกับ GTT สามารถจ่ายไฟเพิ่มเติมได้ผ่าน Barrel jack ของจอแสดงผล
ขั้นตอนที่ 3: การเชื่อมต่อ DS18S20
ต้องติดตั้งตัวต้านทาน Pull-up ขนาด 4.7k Ohm แบบขนานกับ Pin Power และ Data ของ DS18S20 มิฉะนั้นเซ็นเซอร์จะไม่สามารถสื่อสารได้อย่างถูกต้อง Pin Data สามารถเชื่อมต่อกับ Digital Pin ใดก็ได้บน Arduino ในกรณีนี้ เราเลือก Pin 2
ขั้นตอนที่ 4: การติดตั้ง Libraries
ก่อนดำเนินการต่อ ให้ดาวน์โหลดและแตกไฟล์ GTT Client Libraries ต่อไปนี้ Libraries เหล่านี้สามารถพบได้ใน GTT Firmware release เวอร์ชันล่าสุด เมื่อดาวน์โหลดแล้ว ให้คัดลอกเนื้อหาของ GttClient ไปยัง \\Users\\YourUserName\\Documents\\Arduino\\libraries\\gtt
ขั้นตอนที่ 5: Code
//GTT Arduino Thermometer Demo Stage 1
//Arduino Uno with Matrix Orbital GTT70A and DS18S20
//Created by Divino, 19/04/2018
//support@matrixorbital.ca
//www.matrixorbital.ca/appnotes
#include <gtt.h>
#include <gtt_device.h>
#include <gtt_enum.h>
#include <gtt_events.h>
#include <gtt_ext_types.h>
#include <gtt_packet_builder.h>
#include <gtt_parser.h>
#include <gtt_protocol.h>
#include <gtt_text.h>
#include <Wire.h>
#include <OneWire.h>
#include "GTTProject21.c"
#include "GTTProject21.h"
#define I2C_Address 0x28 //Define default 8bit I2C address of 0x50 >> 1 for 7bit Arduino
// Buffer สำหรับข้อมูลขาเข้า
uint8_t rx_buffer[64];
// Buffer สำหรับข้อมูลขาออก
uint8_t tx_buffer[64];
#include <stdlib.h>
OneWire ds18s20(2); //เซ็นเซอร์ที่ Pin 2
byte addr[8]; //Buffer สำหรับเก็บ One wire Address
bool probeConnected; //Bool เพื่อระบุว่า DS18S20 เชื่อมต่ออยู่หรือไม่
gtt_device gtt; //ประกาศ GTT device
void setup() {
//ตั้งค่า I2C bus
gtt.Write = i2cWrite; //ตั้งค่าฟังก์ชัน Write
gtt.Read = i2cRead; //ตั้งค่าฟังก์ชัน Read
gtt.rx_buffer = rx_buffer; //ประกาศ Buffer สำหรับข้อมูลขาเข้า
gtt.rx_buffer_size = sizeof(rx_buffer); //ประกาศขนาดของ Buffer ขาเข้า
gtt.tx_buffer = tx_buffer; //ประกาศ Buffer สำหรับข้อมูลขาออก
gtt.tx_buffer_size = sizeof(tx_buffer); //ประกาศขนาดของ Buffer ขาออก
Wire.begin(); //เริ่มต้นการสื่อสาร I2C
Serial.begin(9600);
delay(500);
resetDisplay();
delay(3000);
gtt_set_screen1_image_toggle_2_state(>t, 1); //หาก Arduino สามารถสร้างการสื่อสารกับ GTT ได้ ให้ตั้งค่าตัวบ่งชี้การเชื่อมต่อ Arduino อย่างเหมาะสม
}
void loop() {
// ใส่โค้ดหลักของคุณที่นี่ เพื่อให้ทำงานซ้ำๆ:
probeConnected = searchForTempProbe(); //ค้นหา DS18S20
if(probeConnected){ //หาก Probe เชื่อมต่ออยู่
int16_t temp = readTempProbe(); //อ่านอุณหภูมิ
char buf[] = {0};
sprintf(buf,"%d",temp); //แปลงค่าอุณหภูมิเป็น String
gtt_set_screen1_bar_graph_1_value(>t, temp); //อัปเดต GTT Bar graph
gtt_set_screen1_dynamic_label_2_text(>t, gtt_make_text_ascii(buf)); //อัปเดต GTT Label
}
else{ //หาก Probe ไม่ได้เชื่อมต่ออยู่
gtt_set_screen1_image_toggle_3_state(>t, 0); //ตั้งค่าตัวบ่งชี้ Probe เป็น "Disconnected"
gtt_set_screen1_bar_graph_1_value(>t, 0); //ตั้งค่า GTT Bar graph ให้เหมาะสม
gtt_set_screen1_dynamic_label_2_text(>t, gtt_make_text_ascii("NA")); //อัปเดต GTT Label เป็น "NA"
ข้อมูล Frontmatter ดั้งเดิม
title: "Matrix Orbital GTT TFT Thermometer Stage 1"
description: "This project demonstrates how easy it is to display temperature information on a Matrix Orbital GTT HMI using a DS18S20 and an Arduino Uno."
author: "MatrixOrbital"
category: "Screens & Displays"
tags:
- "embedded"
- "tft"
- "monitoring"
views: 13960
likes: 10
price: 2450
difficulty: "Easy"
components:
- "1x Breadboard (generic)"
- "1x Matrix Orbital Center Positive 5V Adapter (optional)"
- "1x DS18S20"
- "1x Matrix Orbital DS18S20 Temperature Probe"
- "1x Arduino UNO"
- "1x Matrix Orbital GTT70A"
- "1x Resistor 4.75k ohm"
- "1x Matrix Orbital 4 pin Bread Board Cable"
- "1x USB A to Mini-B Cable"
- "4x Jumper wires (generic)"
tools: []
apps:
- "1x Arduino IDE"
- "1x Matrix Orbital GTT GUI Designer"
downloadableFiles:
- "https://github.com/MatrixOrbital/GTT-Arduino-Thermometer-Demo"
- "https://github.com/MatrixOrbital/GTT-Arduino-Thermometer-Demo"
documentationLinks: []
passwordHash: "b676cd90ef412e30f141e7b55f26cd894f453221fdb3a3ba802f638667ea64d3"
encryptedPayload: "U2FsdGVkX1+fJJq+Zx496fCQQotyZ+wHIk/krAlr+JbClBGR5omGXfIo83MyhtU1V9AD5yDCKBa1vNn9hZKOabSFioWb21KFVdw0rYWShk6EFnSVFVjw+0RjHffGK9YOZWkBgmzTj/IbQ+AGUE1SGw=="
seoDescription: "Display temperature on Matrix Orbital GTT HMI using DS18S20 and Arduino Uno. A simple guide for Stage 1."
videoLinks:
- "https://www.youtube.com/embed/A4d3_fNZMFM"
heroImage: "https://cdn.jsdelivr.net/gh/bigboxthailand/arduino-assets@main/images/projects/matrix-orbital-gtt-tft-thermometer-stage-1-e918ef_cover.jpg"
lang: "th"