วางแผนการต่อวงจร (Circuit Planning):
[Arduino](https://s.shopee.co.th/7fUgFAWSki) UNO R3 --> MQ2 [Sensor](https://s.shopee.co.th/7VBG2rX65j)
Pins--> Vin (หรือ 5V) --> Vcc (จัดไปอย่าให้ขาด)
Pins--> GND --> GND (ลงกราวด์ให้แน่นนะน้อง)
Pins--> A0 --> A0 (ส่งสัญญาณ Analog เข้ามา)
Code:
// เขียนและทดสอบโดยรุ่นพี่ :
// Sheekar Banejee, AI-ML-IOT Solution Engineer and Researcher
int smokeA0 = A0;
// ค่า Threshold ที่เราตั้งไว้ (จูนได้ตามใจชอบ)
int sensorThres = 700;
void setup() {
pinMode(smokeA0, INPUT);
Serial.begin(9600); // เปิด Serial Monitor ที่ 9600 bps ไว้ดูค่าไหลผ่าน
}
void loop() {
int analogSensor = analogRead(smokeA0);
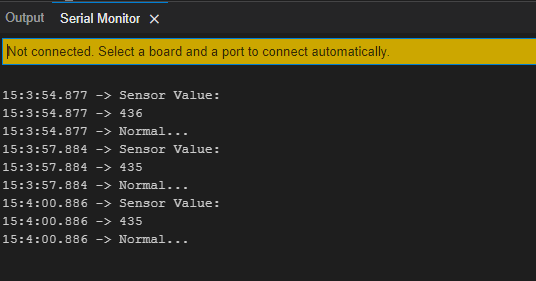
Serial.println("Sensor Value: ");
Serial.println(analogSensor);
// เช็คดูดิ๊ว่าค่าที่อ่านได้มันเกินเกณฑ์ที่เราตั้งไว้รึยัง
if (analogSensor > sensorThres)
{
Serial.println("Alert! Smoke Detected! (ควันโขมงแล้วไอ้น้อง!)");
}
else
{
Serial.println("Normal... (สถานการณ์ยังชิลล์ๆ)");
}
delay(3000); // พักรอดูอาการ 3 วินาที
}
Results:
ดูที่ Serial monitor สิวัยรุ่น:
รายละเอียดทางเทคนิคแบบจัดเต็ม (EXPANDED TECHNICAL DETAILS)
การตรวจจับก๊าซด้วยหลักการทางเคมีไฟฟ้า (Electrochemical Gas Detection)
เจ้า MQ-2 ตัวนี้คือตัวตึงสารพัดประโยชน์เลยน้อง ตรวจจับได้ทั้ง LPG, ควัน, แอลกอฮอล์, โพรเพน ยันไฮโดรเจน
- การจัดการไส้ความร้อน (Heating Element Management): ฟังดีๆ นะ Sensor ตัวนี้ต้องมีช่วง "วอร์มเครื่อง" (Pre-heat) ด้วย ถ้าเป็นของใหม่แกะกล่อง พี่แนะนำให้เผาทิ้งไว้ 24 ชั่วโมงเลย แต่ถ้าใช้ปกติในชีวิตประจำวันก็สัก 60 วินาทีก่อนเริ่มวัด เพื่อให้ Heater ข้างในมันร้อนจนนิ่ง ข้อมูลจะได้แม่นๆ ไม่มั่ว
- การปรับแต่งความไว (Sensitivity Calibration): บนบอร์ด Module มันจะมี Potentiometer (ตัวต้านทานปรับค่าได้) ให้เราหมุนจูนเอาตามหน้างาน บอร์ด Arduino จะคอยอ่านแรงดัน Analog ที่ออกมา ยิ่งก๊าซหนาแน่น ความต้านทานข้างในจะยิ่งลด ทำให้แรงดัน Output พุ่งสูงขึ้นนั่นเอง
ตรรกะการแจ้งเตือนภัย (Safety Alert Logic)
- การแจ้งเตือนด้วยภาพและเสียง: พอค่าก๊าซพุ่งทะลุลิมิตที่ตั้งไว้ เราสามารถสั่ง Arduino ให้ไปสะกิด Piezo Buzzer ให้ดังลั่น หรือจะสั่ง LED ให้กะพริบถี่ๆ เป็นสัญญาณเตือนก็ทำได้ หล่อเท่เลยงานนี้
- ระบบปฏิบัติการฉุกเฉิน: ถ้าอยากให้งานเนี๊ยบระดับโปร น้องสามารถเอา Relay มาต่อเพิ่มเพื่อสั่งปิดวาล์วก๊าซอัตโนมัติ หรือจะสั่งพัดลมระบายอากาศให้ทำงานตอนก๊าซรั่วก็ย่อมได้ สู้งานนะน้อง!