Main article: Play Home Alone song with a piezo buzzer and Arduino
Home Alone has since been considered one of the best Christmas films and Somewhere in My Memory has been nominated as best original song. We wanted to recreate the melody of the film's theme song with a piezo buzzer and share with you. Buzzer is used to generate sound, beep or even melody of a song. It can be found in alarm devices, computers, timers and confirmation of user input such as a mouse click or keystroke.
A piezo buzzer is not like a regular speaker that you might think of. It uses a material that actually changes shape when you apply electricity to it which in turn creates noise. The faster you bend the material, the higher the pitch of the noise that is produced.
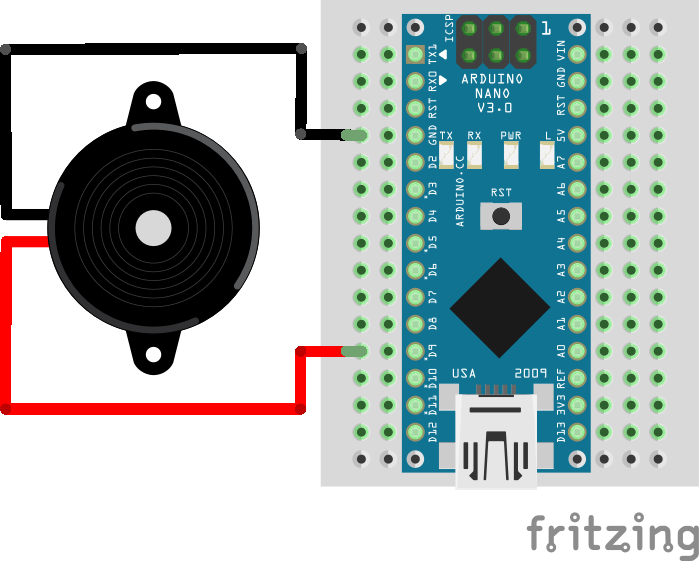
Wiring schema
The connection is pretty easy, it only has control signal and GND. Pin D9 will be used to control the tone.
Pitches library
The code used to generate the melody uses an extra library with predefined pitches. It's a set of constants that represent notes. It can be downloaded from our official repository.
To import a library, open the Arduino IDE, go to Sketch > Include Library > Add.ZIP Library and select the library file downloaded from our GitHub repository.

Then you can simply use include statement:
#include "pitches.h"
It will include the library with predefined pitch constants so the melody generation becomes easier.
Arduino code
Built-in Arduino functions will be used to generate the melody. Tone() generates a square wave of the specified frequency (and 50% duty cycle) on a pin. A duration can be specified, otherwise the wave continues until a call to noTone(). If you are trying to make tones for the human ear, then values between 2000 and 5000 are where our ears are most tuned.
The main program will iterate over notes and and use assigned duration for the note. The code has self explanatory comments to better understand what is being done.
#include "pitches.h"

#define BUZZER_PIN 9

int melody[] = {
  NOTE_E4, NOTE_C5, NOTE_B4, NOTE_B4,
  NOTE_C5, NOTE_B4, NOTE_F4, NOTE_G4,
  NOTE_G4, NOTE_E4, NOTE_G4, NOTE_E4,
  NOTE_C5, NOTE_G4,
  NOTE_D4, NOTE_A4, NOTE_G4, NOTE_C4, NOTE_F4,
  NOTE_E4, NOTE_D4,
  NOTE_G4, NOTE_E4, NOTE_G4, NOTE_E4,
  NOTE_C5, NOTE_G4,
  NOTE_A4, NOTE_C5, NOTE_F4, NOTE_E4, NOTE_G4, NOTE_C4,
  NOTE_E4, NOTE_D4,
  REST, NOTE_E4,NOTE_C4, NOTE_F4, NOTE_D4,
  REST, NOTE_FS4, NOTE_D4, NOTE_A4, NOTE_G4,
  REST, NOTE_GS5, NOTE_E4, NOTE_B4, NOTE_A4,
  NOTE_F4, NOTE_C5, NOTE_A4, NOTE_B4,
  NOTE_G4, NOTE_E4, NOTE_G4, NOTE_E4,
  NOTE_C5, NOTE_G4,
  NOTE_D4, NOTE_A4, NOTE_G4, NOTE_C4, NOTE_F4,
  NOTE_E4, NOTE_D4,
  NOTE_G4, NOTE_E4, NOTE_G4, NOTE_E4,
  NOTE_C5, NOTE_G4,
  REST, NOTE_A4, NOTE_B4, NOTE_C5, NOTE_G4, NOTE_E4,
  REST, NOTE_A4, NOTE_B4, NOTE_C5, NOTE_G4, NOTE_E4,
  REST, NOTE_A4, NOTE_B4, NOTE_C5, NOTE_G4, NOTE_E4,
  NOTE_C4, NOTE_C5, NOTE_B4,
  NOTE_D5, NOTE_E4, NOTE_G4, NOTE_E4,
  NOTE_C5, NOTE_G4,
  NOTE_C5
};

int durations[] = {
  4, 8, 8, 2,
  8, 8, 4, 4,
  4, 4, 4, 4,
  2, 2,
  4, 4, 4, 8, 8,
  2, 2,
  4, 4, 4, 4,
  2, 2,
  8, 8, 4, 8, 8, 4,
  2, 2,
  4, 8, 8, 4, 4,
  4, 8, 8, 4, 4,
  4, 8, 8, 4, 4,
  4, 8, 8, 2,
  4, 4, 4, 4,
  2, 2,
  4, 4, 4, 8, 8,
  2, 2,
  4, 4, 4, 4,
  2, 2,
  4, 16, 16, 8, 4, 4,
  4, 16, 16, 8, 4, 4,
  4, 16, 16, 8, 4, 4,
  4, 2, 4,
  4, 4, 4, 4,
  2, 2,
  1
};

void setup()
{
  pinMode(BUZZER_PIN, OUTPUT);
}

void loop()
{
  int size = sizeof(durations) / sizeof(int);

  for (int note = 0; note < size; note++) {
    //to calculate the note duration, take one second divided by the note type.
    //e.g. quarter note = 1000 / 4, eighth note = 1000/8, etc.
    int duration = 1000 / durations[note];
    tone(BUZZER_PIN, melody[note], duration);

    //to distinguish the notes, set a minimum time between them.
    //the note's duration + 30% seems to work well:
    int pauseBetweenNotes = duration * 1.30;
    delay(pauseBetweenNotes);

    //stop the tone playing:
    noTone(BUZZER_PIN);
  }
}
Note: tone() function uses one of the built in timers on the Arduino’s micro-contoller and works independently of the delay() function.
Only one tone can be generated at a time. If a tone is already playing on a different pin, the call to tone() will have no effect. If the tone is playing on the same pin, the call will set its frequency. Use of the tone() function will interfere with PWM output on pins 3 and 11 (on boards other than the Mega). Also, it is not possible to generate tones lower than 31Hz.
Merry Christmas and Happy New Year!
🛠️ เจาะลึกเบื้องหลังการทำงาน (Deep Dive / Technical Analysis)
Most programmers simply download an MP3 module to play songs. The Auditory Synthesis projects teach you how music is physically constructed from raw math. By understanding pitch matrices and tempo intervals, you force the tiny, mechanical ATmega328P timers to painstakingly recreate John Williams' legendary "Home Alone" soundtrack using raw square waves.
Defining the Pitch Library
A C++ compiler does not understand the word "F-Sharp". You must define the physics of the musical scale using pre-processor directives (#define).
- The Header File (
pitches.h): You create a separate file in your IDE containing hundreds of definitions.#define NOTE_G4 392#define NOTE_A4 440#define NOTE_B4 494 - This massive library gives the Arduino a mathematical map. When you type
NOTE_G4, the compiler secretly injects the integer392(Hertz) directly into thetone()function.
Mapping Melody Arrays and Tempo Logic
A song is two arrays running simultaneously: The note you hit, and exactly how long you hold it.
- The Melody Array:
int melody[] = { NOTE_G4, NOTE_E5, NOTE_D5, NOTE_C5... }; - The Duration Array: (Represented as fractions of a whole note. E.g.,
4= a quarter note,8= an eighth note).int noteDurations[] = { 4, 8, 8, 4... }; - The Execution Loop: The Arduino iterates through the massive array.
for (int thisNote = 0; thisNote < songLength; thisNote++) {
  int durationDelay = 1000 / noteDurations[thisNote]; // Calculate true milliseconds based on Tempo
  tone(8, melody[thisNote], durationDelay); // Fire the Piezo!
  int pauseBetweenNotes = durationDelay * 1.30; // Need silence between notes or they slur together!
  delay(pauseBetweenNotes);
  noTone(8); // Mathematically shut off the wave
}
Basic Noise Requirements
- Arduino Uno/Nano.
- A Passive Piezo Buzzer (A Passive buzzer is required. An Active buzzer has its own internal tone generator and will just emit an agonizing, flat continuous screech no matter what math you send it!).
- A 100-ohm Resistor in line with the buzzer to prevent burning out the Arduino's digital pin over prolonged use.