Programming bare microcontrollers and using external programmers may be intimidating, but ATtinys are a great start. Here I want to provide a comprehensive beginner's guide to get started with programming ATtinys, using the USBasp programmer and Arduino IDE.
Technical terms
- Microcontrollers (MCUs): small computers on integrated circuit (IC) chips that typically contain a microprocessor, memory, an oscillator, ADC converters, and IO peripherals.
- Microprocessors: contain the arithmetic, logic, and control circuitry required to perform the functions of a computer's central processing unit.
- Development boards: printed circuit boards containing a microcontroller and supporting components, such as additional oscillators, a USB port, a power jack, buttons, and so on. Oftentimes development boards contain a built-in programmer - another microcontroller used for flashing the program onto the main microcontroller.
For example, an Arduino Uno development board contains an Atmel ATmega328 microcontroller (which inside has an 8-bit AVR RISC microprocessor), and also an ATmega16U2 microcontroller which is by default used as a programmer. A typical use for a development board is to test the microcontroller and prototype some functionalities - and once you're done prototyping, you can design your own device with just the microcontroller and the needed components.
Atmel manufactures ATmegas and ATtinys. ATtinys, as the name suggests, have fewer features, fewer I/O pins, and less memory than ATmegas - but they are still used in plenty applications, both industrial and educational. And you can program them with the Arduino programming language through the Arduino IDE - although don't expect all the libraries to work - some of them rely on hardware that ATtinys are simply not equipped with.
USBasp
USBasp is an open source USB programmer for Atmel AVR controllers designed by Thomas Fischl with an ATmega8 microcontroller on board. This programmer is open source - a lot of producers manufacture their own versions that you can buy online.
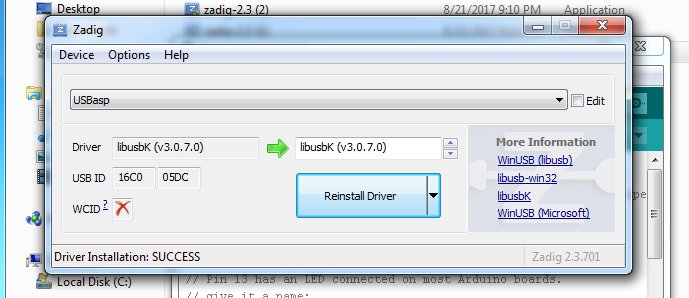
Installing drivers
On Linux and MacOS this step should not be necessary. On Windows, install Zadig and after plugging the USBasp programmer into a USB port of your computer, choose the install the libusbK (v3.1.0.0) driver (libusb-win32 did not work for me). If USBasp does not show up in the drop down menu, try selecting “List All Devices” from the Options menu.
Connections
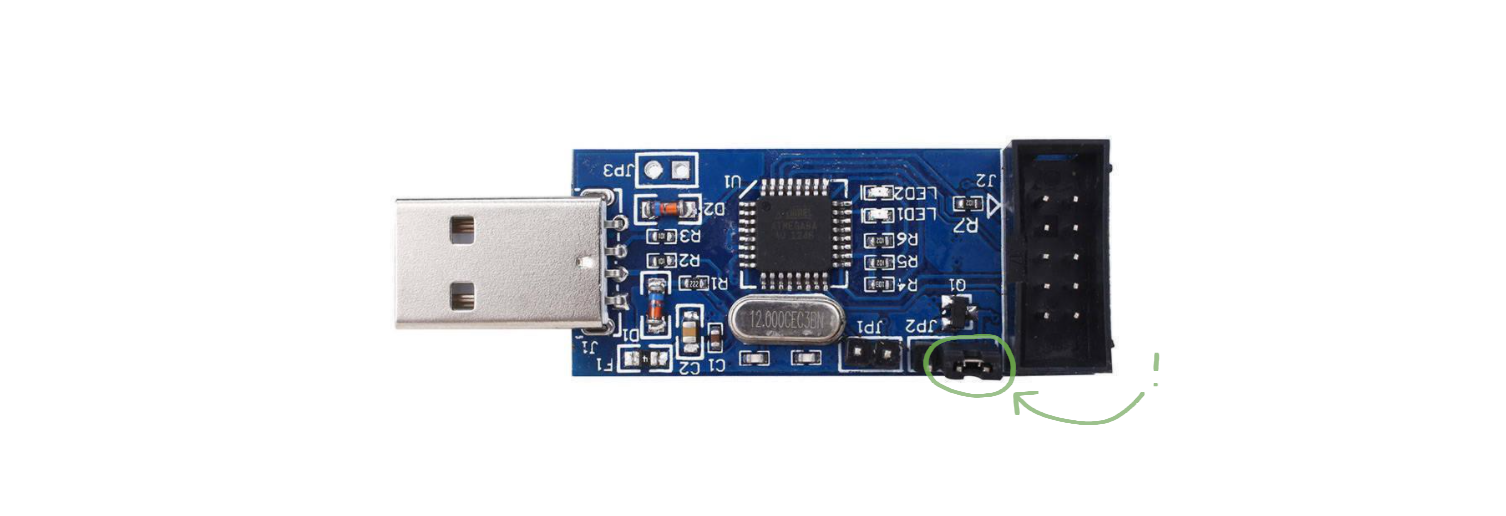
1. Make sure the jumper is in this position:
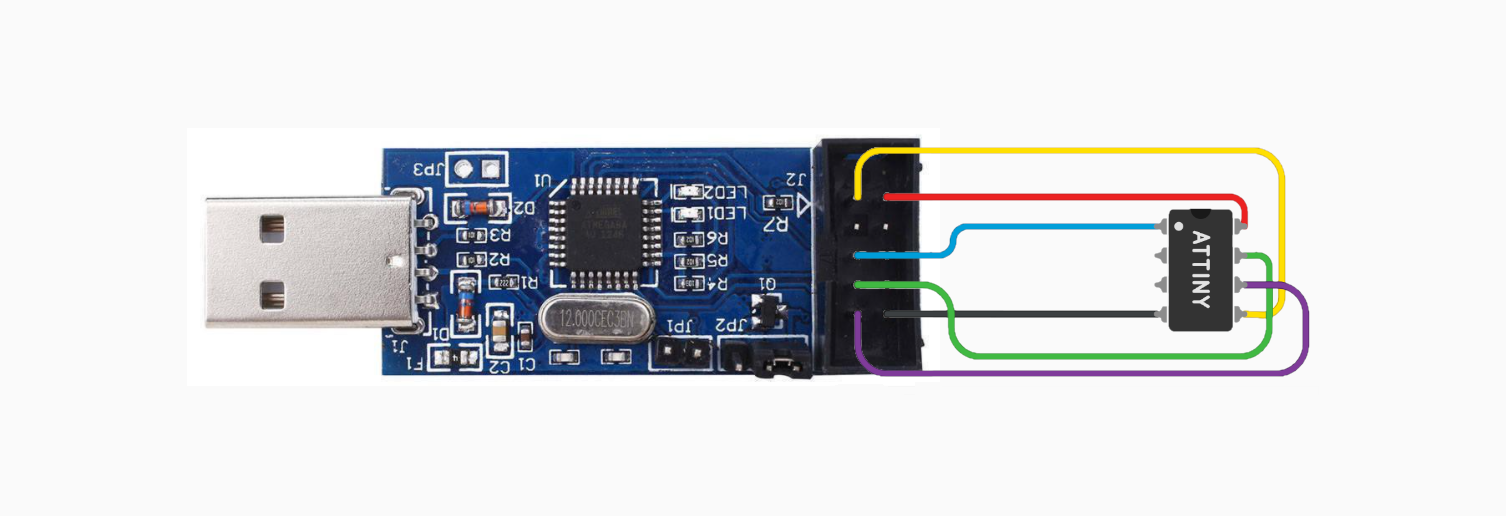
2. Connect the USBasp to the ATtiny (bear in mind the orientation of the USBasp pinout, check if it’s not mirrored when using a ribbon cable).
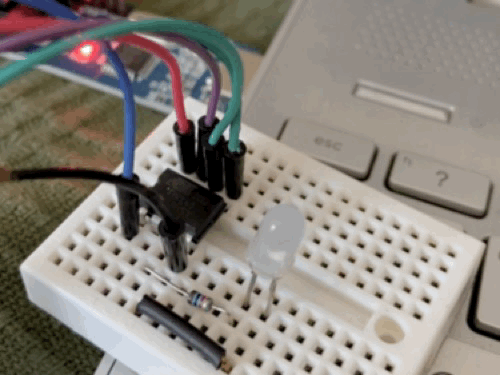
3. Connect an LED through a resistor to a free pin (I will be using pin 4) and ground.

Arduino IDE setup
1. Go to File -> Preferences. In Additional Boards Manager URLs paste https://raw.githubusercontent.com/damellis/attiny/ide-1.6.x-boards-manager/package_damellis_attiny_index.json.
2. Go to Tools -> Boards -> Board Manager. Search for attiny and install the boards.
3. In Tools, set board, processor, and clock to the values corresponding to the chip.
4. In Tools, set programmer to USBasp.
Blink!
Upload Using Programmer (ctrl + shift + U):
const uint8_t LED = 4;
const uint16_t SLEEP = 1000;
void setup() {
 pinMode(LED, OUTPUT);
}
void loop() {
 digitalWrite(LED, HIGH);
 delay(SLEEP);
 digitalWrite(LED, LOW);
 delay(SLEEP);
}
Troubleshooting
- If 1 second delay results in an 8 second delay: the device runs at 1 MHz instead of 8 MHz - go to
Tools -> Burn Bootloaderto make it run at 8 MHz.
- If in Arduino IDE you get an error that the serial port does not exist: make sure that the jumper is in the position shown above in the "Connections" part of this article.
- If something is wrong with the wiring between the USBasp and the ATtiny: check the orientation of the connector - if you're using a ribbon cable you have to check the connections and possibly wire it like in this article.
- If in Zadig you get a message like “could not find USB device with...”: you might have selected the wrong driver - re-run Zadig and try installing libusbK again.
- If the Zadig install times-out and says that it failed to install - re-run Zadig and try installing libusbK again.
- If you don’t see USBasp in the devices list in Zadig: remember to plug in your USBasp before starting Zadig, and select Options > List All Devices in Zadig’s window.
🛠️ เจาะลึกเบื้องหลังการทำงาน (Deep Dive / Technical Analysis)
The ATtiny Programming Guide teaches you how to move from "prototyping" to "production." When you finish a project (like a single blinking LED), stuffing an entire $20 Arduino Uno board inside your 3D printed case is an enormous waste of money and space. The solution is the $2 ATtiny85 chip.
ICSP Programming Protocol
The ATtiny chip does not have a USB port. You cannot plug it into your computer. Instead, you must use a dedicated hardware programmer, like the USBasp, or you can use your old Arduino Uno as the programmer (ArduinoISP).
- The Pinout Math: You connect 6 specific pins from the USBasp to the bare ATtiny on a breadboard:
MISO,MOSI,SCK(Serial Clock),RESET,VCC, andGND. - The IDE Setup: You add the "ATTinyCore" by SpenceKonde to your Arduino IDE Boards Manager.
- The Burn: You select "ATtiny85" from the boards list, select "USBasp" as your Programmer, and hit "Upload."
- The IDE compiles the code, and instead of sending it over Serial USB, it literally jams the binary data into the tiny chip's memory over the raw hardware pins!
Hardware Constraints
- ATtiny85 Chip: Just 8 pins. 5 are usable I/O, 2 are power/ground, and 1 is a reset.
- USBasp Programmer: The bridge.
- Tiny Memory Space: The chip only has 8KB of flash memory. You cannot run massive TFT screens or complex libraries on this. It is designed for simple, robust tasks: reading a button, running a timer, or turning on an LED strip.
Mastering this skill is the true mark of graduating from an "Arduino Hacker" to an "Electronics Manufacturer."