Discord server has a system to send messages automatically to a channel.
This system uses webhook, so you just have to send a web request to a URL and a message will be written on the selected channel.
https://en.wikipedia.org/wiki/Webhook
This could be used in many ways, for example:
- Make a badge reader using RFID to send a message when someone is at your fablab.
- Display the temperature of a room each hour.
Update
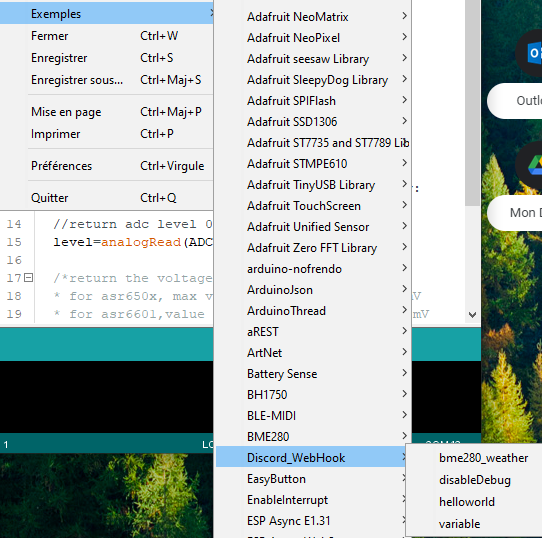
Since this tutorial was made, I create a library on Arduino with examples !
Search Discord on the library manager and you will find it
/*
  Send Hello World to Discord using WebHook
*/

#include <Discord_WebHook.h>

Discord_Webhook discord; // Create a Discord_Webhook object
// How to get the Webhook URL
// https://support.discord.com/hc/en-us/articles/228383668-Intro-to-Webhooks
String DISCORD_WEBHOOK = "https://discord.com/api/webhooks/id/token";

void setup() {
  Serial.begin(115200);
  discord.begin(DISCORD_WEBHOOK); // Initialize the Discord_Webhook object
  discord.addWiFi("WiFiName","WiFiPassword"); // Add WiFi credentials (you can add multiples WiFi SSID)
  discord.connectWiFi(); // Connect to WiFi
  discord.send("Hello World"); // Send Hello World to Discord
}

void loop() {

}
Create a Webhook
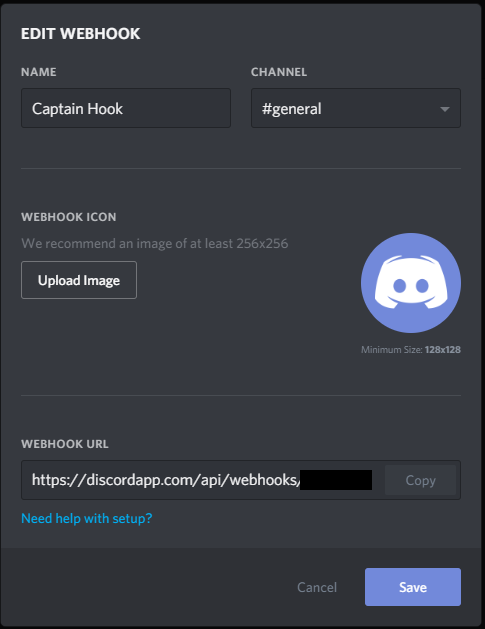
First we need to create a webhook in our server:
https://support.discordapp.com/hc/en-us/articles/228383668-Intro-to-Webhooks
Click on your discord servername → Discord Settings Then click on Webhook → Create WebHook
Copy the Webhook URL
Arduino Code
I used Arduino Create to write my code, but you can also use the classic IDE.
Here is a link to the code: https://create.arduino.cc/editor/madnerd/429197a3-8a40-4d2c-bc16-1a502cb26cd9/preview
Settings
Settings are inside arduino_secrets.h or the Secrettab
- SECRET_SSID: your Wi-Fi network name
- SECRET_PASS: your Wi-Fi password
- SECRET_WEBHOOK: your Webhook URL without https://discordapp.com
- SECRET_TTS: true to enable text to speech or false to disable it

Upload your code on your Arduino MKR 1010, you should see this message:

You can find more information on how to use Discord webhook here: https://discordapp.com/developers/docs/resources/webhook#execute-webhook
Here is also some information for text-to-speech: https://support.discordapp.com/hc/en-us/articles/212517297-Text-to-Speech-101
To send a message on discord, just type:
discord_send("Hello World");Library
I used two libraries for this code:
- WiFiNINA: Wi-Fi manager
- ArduinoHttpClient: Web request
🛠️ เจาะลึกเบื้องหลังการทำงาน (Deep Dive / Technical Analysis)
When a security system detects an intruder, sending a simple text message costs money natively. Sending data via Discord is entirely free and incredibly globally instantaneous! The Send a Message on Discord project fundamentally leverages the immense power of the ESP8266 or ESP32 Wi-Fi SoC array. Discord utilizes "Webhooks": hidden internet URLs that immediately print text into a chat channel natively if they receive a properly formatted JSON payload. The ESP8266 executes a heavy HTTPS POST protocol, tunneling securely through the encrypted internet to violently blast alerts straight into your private Discord gaming server!
Negotiating Complex Secure Sockets (HTTPS)
You CANNOT use a standard WiFiClient to talk to Discord. Discord requires heavy https:// encryption. If you send unencrypted text, Discord immediately drops the connection natively!
- The ESP8266 MUST use
<WiFiClientSecure.h>. - To save memory, instead of validating the entire massively complex Discord SSL Certificate tree natively, developers often utilize
client.setInsecure();! This forces the ESP to encrypt the data perfectly without wasting RAM validating the end-server identity! - The board constructs a highly explicit JSON string:
{"content": "Motion Detected in Sector 4!"}.
#include <ESP8266WiFi.h>
#include <WiFiClientSecure.h>

const char* discord_webhook = "/api/webhooks/12345/abcde"; // Your massive specific Discord Hash!

void sendDiscordAlert(String message) {
  WiFiClientSecure client;
  client.setInsecure(); // Bypass intense SSL validation to save extreme RAM overhead!

  if (client.connect("discord.com", 443)) { // 443 is the explicit HTTPS Port!
    String jsonPayload = "{\"content\": \"" + message + "\"}"; // Escape quotes natively!

    // Construct the massive HTTP POST Request Header block manually!
    client.println("POST " + String(discord_webhook) + " HTTP/1.1");
    client.println("Host: discord.com");
    client.println("Content-Type: application/json");
    client.print("Content-Length: ");
    client.println(jsonPayload.length());
    client.println();
    client.println(jsonPayload); // Blast the JSON body!

    Serial.println("DISCORD PAYLOAD INJECTED NATIVELY!");
  }
}
Creating The Discord Webhook
The Arduino code intrinsically requires an endpoint.
- Open your Discord Server
Server Settings -> Integrations -> Webhooks. - Click "New Webhook". By grabbing the unique URL, Discord grants you a massive cryptographic string (e.g.,
discord.com/api/webhooks/999.../xxx...). - The Arduino targets this URL explicitly. As long as the ESP has a stable Wi-Fi connection, you can attach an IR sensor, Temperature sensor, or Door switch to immediately summon automated Discord bots natively from physical hardware triggers!
IoT Transmission Hardware Elements
- NodeMCU ESP8266 / ESP32 (An Arduino Uno is absolutely useless here; you mandatorily require the heavy Wi-Fi stack and massive RAM allocations natively available on the ESP chips to negotiate the SSL strings!).
- A Valid Discord Account and Server (With Administrator privileges to generate Webhooks).
- Physical Input Trigger (A PIR Motion Sensor, a basic push-button, or an intense Water Depth sensor to definitively initiate the JSON transmission event sequence natively!).