Introduction
ว่าไงทุกคน
รุ่นพี่ลองทำโปรเจคมาเยอะแล้ว (และปล่อยบางอันให้ดูด้วย) ที่ใช้ทั้ง HC-SR04 และ Sparkfun Sound Detector อย่างแรกสุด มาเริ่มกันที่วิธีสั่งซื้อของพวกนี้กันก่อน
- Elegoo HC-SR04 Ultrasonic Sensors (Amazon Best Seller - Pack of 5 for $10)
- SparkFun Sound Detector (With headers - 1 for $15)
เห็นมั้ยล่ะ ราคามันต่างกันชัดเจนเลย HC-SR04 ตัวละแค่ $2 ในขณะที่ Sound Detector ตัวเดียวราคา $15 ไปแล้ว เอาล่ะ ไปดูส่วนอื่นๆ ของการเปรียบเทียบกันต่อเลย
Hardware Compatibility/Pinout
Ultrasonic Sensor
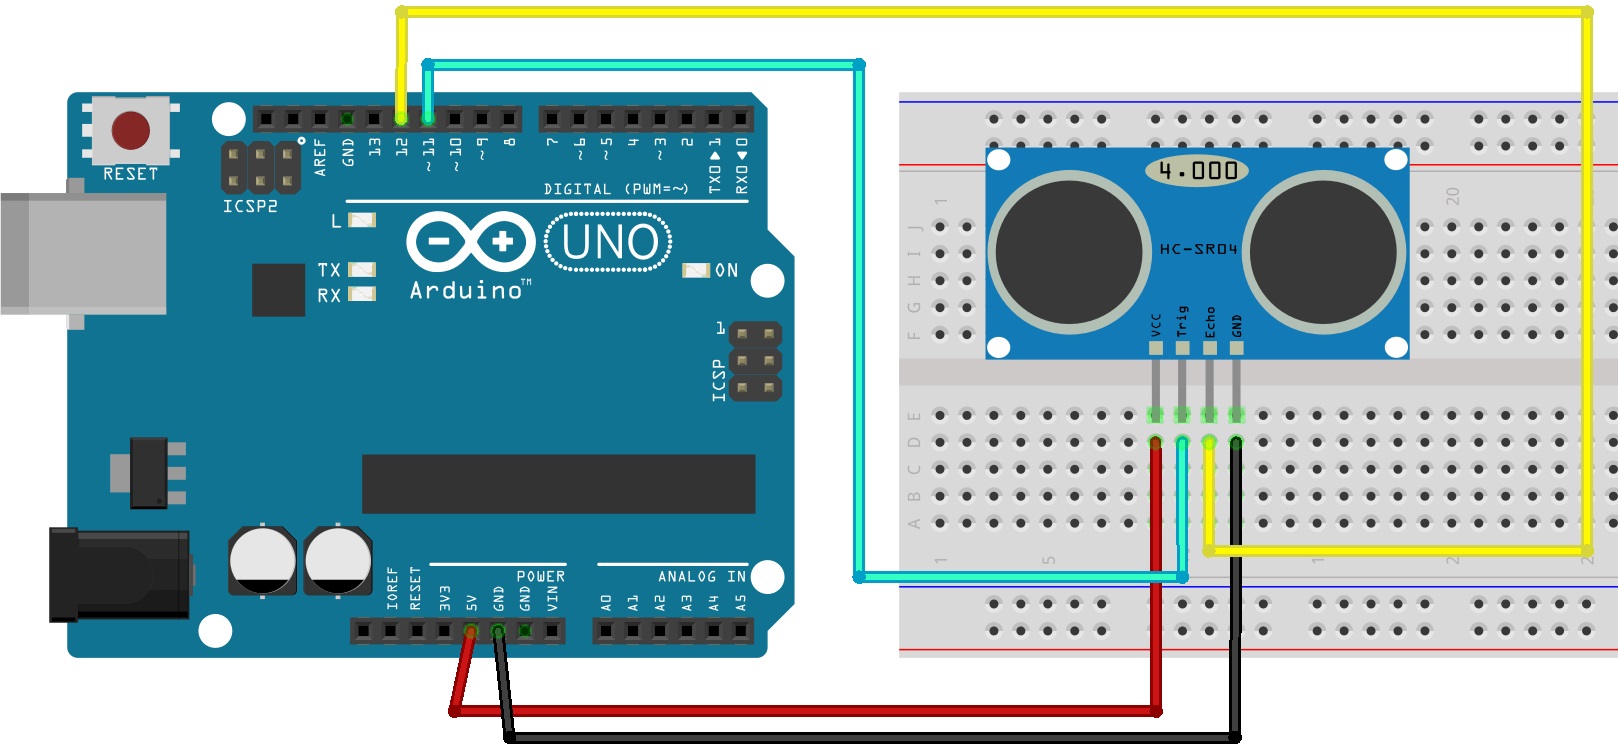
เซ็นเซอร์อัลตราโซนิกมีดีไซน์และวงจรที่ค่อนข้างเรียบง่าย มีพิน echo กับ trig สำหรับตรวจจับการเคลื่อนไหว อยากรู้ว่าเจ้าพวกนี้ทำงานยังไง ก็ลองไปหาอ่านเพิ่มเติมดูได้
Sparkfun Sound Detector
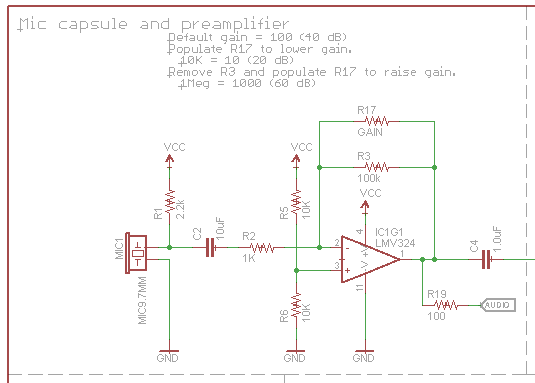
Sound Detector มีเอาต์พุตสามแบบสำหรับสัญญาณเสียงที่เปลี่ยนแปลง มันยืดหยุ่นและไวมากๆ อยากรู้รายละเอียดการทำงานก็ลองศึกษาดู
Hardware Winner - Even.
Sound Detector มีเอาต์พุตสามทางให้เลือกใช้ แต่ก็แค่สู้ตีเสมอกับ Ultrasonic Sensor เท่านั้น เพราะตัวหลังเรียบง่ายกว่า เหมาะกับน้องๆ มือใหม่หัดเล่น
Code
โค้ดก็วาดภาพให้เห็นเหมือนกับวงจรเลย Sound Detector ยืดหยุ่นกว่า ส่วน Ultrasonic Sensor เรียบง่ายกว่า
Ultrasonic Sensor
int trigPin = 11;
int echoPin = 12;
long duration;
int distance;
void setup() {
pinMode(trigPin, OUTPUT);
pinMode(echoPin, INPUT);
Serial.begin(9600);
}
void loop() {
digitalWrite(trigPin, LOW);
delayMicroseconds(2);
digitalWrite(trigPin, HIGH);
delayMicroseconds(10);
digitalWrite(trigPin, LOW);
duration = pulseIn(echoPin, HIGH);
distance= duration*0.034/2;
Serial.print("Distance: ");
Serial.println(distance);
}
โค้ดสำหรับ Ultrasonic Sensor นี่ค่อนข้างตายตัวนะ (เว้นแต่ว่าจะเพิ่มอุปกรณ์อื่นเข้าไป) สิ่งเดียวที่เปลี่ยนได้ก็คือเลขพินดิจิตอลในโค้ดนั่นแหละ (ถ้าน้องใช้พินคนละอันกับตัวอย่างฮาร์ดแวร์ที่ให้ไว้) ง่ายๆ ตรงไปตรงมาแบบนี้แหละ วัยรุ่น
Sound Detector (โค้ดตัวนี้เอามาจากที่ไหนสักแห่งน่ะ จำไม่ได้ละ 555+)
/******************************************************************************
* sound_detector_demo.ino
* Sound detector sample sketch
* Byron Jacquot @ SparkFun Electronics
* February 19, 2014
* https://github.com/sparkfun/Sound_Detector
*
* This sketch demonstrates the use of the Sparkfun Sound Detector board.
*
* The Sound Detector is a small board that combines a microphone and some
* processing circuitry. It provides not only an audio output, but also a
* binary indication of the presence of sound and an analog representation
* of it's amplitude.
*
* This sketch demonstrates two different modes of usage for the Sound
* Detector. The gate output (a binary indication that is high when sound
* is present, and low when conditions are quiet) is used to fire a pin-change
* ISR, which lights an LED when the sound is present. The envelope output
* (an analog voltage to rises to indicate the amplitude of the sound) is
* sampled in the loop(), and it prints an indication of the level to the
* serial terminal.
*
* For more details about the Sound Detector, please check the hookup guide.
*
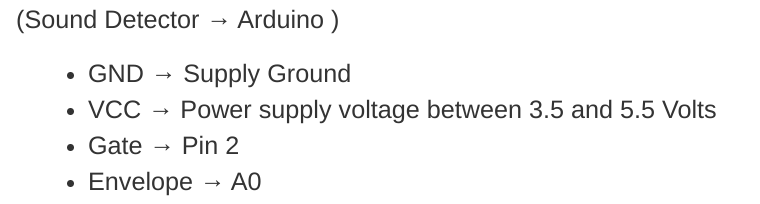
* Connections:
* The Sound Detector is connected to the Adrduino as follows:
* (Sound Detector -> Arduino pin)
* GND → GND
* VCC → 5V
* Gate → Pin 2
* Envelope → A0
*
* Resources:
* Additional library requirements: none
*
* Development environment specifics:
* Using Arduino IDe 1.0.5
* Tested on Redboard, 3.3v/8MHz and 5v/16MHz ProMini hardware.
*
* This code is beerware; if you see me (or any other SparkFun employee) at the
* local, and you've found our code helpful, please buy us a round!
*
* Distributed as-is; no warranty is given.
******************************************************************************/
// Define hardware connections
#define PIN_GATE_IN 2
#define IRQ_GATE_IN 0
#define PIN_LED_OUT 13
#define PIN_ANALOG_IN A0
// soundISR()
// This function is installed as an interrupt service routine for the pin
// change interrupt. When digital input 2 changes state, this routine
// is called.
// It queries the state of that pin, and sets the onboard LED to reflect that
// pin's state.
void soundISR()
{
int pin_val;
pin_val = digitalRead(PIN_GATE_IN);
digitalWrite(PIN_LED_OUT, pin_val);
}
void setup()
{
Serial.begin(9600);
// Configure LED pin as output
pinMode(PIN_LED_OUT, OUTPUT);
// configure input to interrupt
pinMode(PIN_GATE_IN, INPUT);
attachInterrupt(IRQ_GATE_IN, soundISR, CHANGE);
// Display status
Serial.println("Initialized");
}
void loop()
{
int value;
// Check the envelope input
value = analogRead(PIN_ANALOG_IN);
// Convert envelope value into a message
Serial.print("Status: ");
if(value <= 10)
{
Serial.println("Quiet.");
}
else if( (value > 10) && ( value <= 30) )
{
Serial.println("Moderate.");
}
else if(value > 30)
{
Serial.println("Loud.");
}
// pause for 1 second
delay(1000);
}
โค้ดนี้มาจากคู่มือการต่อวงจรของ Sparkfun นะ นี่คือวิธีหนึ่งในการใช้ Sound Detector ของเค้า
ผู้ชนะ - เสมอกัน! ด้วยเหตุผลเดียวกับตอนเปรียบเทียบฮาร์ดแวร์ - เซ็นเซอร์อัลตราโซนิก (Ultrasonic Sensor) มันง่ายดี แต่ Sound Detector นี่ให้ความยืดหยุ่นและฟังก์ชันการทำงานที่หลากหลายกว่า
รายละเอียดทางเทคนิคแบบจัดเต็ม
การเปรียบเทียบการตรวจจับแบบผสม
โปรเจคนี้ให้การวิเคราะห์เปรียบเทียบที่ค่อนข้างเฉพาะ ระหว่าง "การตรวจจับเสียง" (ความดัง) กับ "การวัดระยะด้วยโซนาร์" (ระยะทาง) สำหรับการนำทางหุ่นยนต์
- ตรรกะการตัดสินใจจากสองเซ็นเซอร์: Arduino จะตรวจสอบเอาต์พุต "Envelope" จาก Sparkfun Sound Detector พร้อมๆ กับพัลส์เอคโค่จาก HC-SR04 ไปพร้อมกัน เฟิร์มแวร์นี้จะสาธิตให้เห็นว่าหุ่นยนต์สามารถใช้เสียงเพื่อ "ได้ยิน" คำสั่ง ขณะเดียวกันก็ใช้อัลตราโซนิกพัลส์เพื่อ "มองเห็น" วัตถุขวางหน้าได้ยังไง
- ความสัมพันธ์ระหว่างเกนกับระยะทาง: ไปสำรวจกันว่าสภาพแวดล้อมทางเสียงส่งผลต่อเซ็นเซอร์ทั้งสองแบบยังไง ให้ข้อมูลพื้นฐานทางเทคนิคสำหรับวิศวกรที่ต้องเลือกใช้ระหว่างสองโมดาลิตี้นี้สำหรับงานออโตเมชันระดับอุตสาหกรรม
การวิเคราะห์ด้วยภาพ
- พล็อตเปรียบเทียบ ADC แบบเรียลไทม์: ใช้ Serial Plotter ใน Arduino IDE เพื่อพล็อตเอาต์พุตดิบจากเซ็นเซอร์ทั้งสองบนกราฟเดียว ทำให้เห็นภาพความสัมพันธ์ระหว่างระดับเสียงแวดล้อมกับการอ่านค่าระยะทางได้ชัดเจน
เรื่องเงินๆ ทองๆ
สุดท้าย เรื่องความแตกต่างของราคามาแล้ว อย่างที่บอกไป Sparkfun Sound Detector ราคา $15 (พร้อมเฮดเดอร์) เทียบกับเซ็นเซอร์วัดระยะราคา $2 (เวลาซื้อเป็นแพ็คห้าตัว) แต่อย่างไรก็ตาม ตอนนี้ Sparkfun Sound Detector มีแบบไม่มีเฮดเดอร์ขายในราคา $10
ผู้ชนะ - เซ็นเซอร์อัลตราโซนิก ด้วยราคาที่ถูกมากเมื่อซื้อเป็นแพ็ค
ความทนทาน
หลังจากใช้เซ็นเซอร์อัลตราโซนิกตัวเดิมมาสองสามรอบ บางทีรู้สึกเหมือนมันทำงานได้แค่ครึ่งเดียวเลยอะ พี่ว่าน่าจะบอกไว้หน่อย ถ้าน้องเคยเจออะไรแบบนี้บ้าง ก็คอมเมนต์มาเล่าสู่กันฟังได้
ส่วน Sound Detector นี่ พี่ยังไม่เคยมีปัญหาอะไรกับมันเลย
สรุปปิดงาน
โดยรวมแล้ว เซ็นเซอร์อัลตราโซนิกเหมาะกับมือใหม่มากกว่า ในขณะที่ Sound Detector น่าจะเป็นตัวเลือกของนักสร้างสรรค์ระดับสูงขึ้นมาหน่อย ด้วยเอาต์พุต 3 แบบนี่แหละ พี่ใช้มาทั้งคู่แล้ว ไม่มีข้อร้องเรียนหรือเสียดายอะไรเลย ทั้งสองตัวเป็นโมดูลเซ็นเซอร์ที่เจ๋งมากและสามารถนำไปใช้กับโปรเจค Arduino ได้เกือบทุกแบบ