Easy
โปรเจกต์ Cancellino
ควบคุมทุกอย่างด้วย SINGLE Phone call เพียงครั้งเดียว
ควบคุมทุกอย่างด้วย SINGLE Phone call เพียงครั้งเดียว
หมายเหตุ: บทช่วยสอนนี้อาจจะเก่าแล้ว กรุณาไปที่ ที่นี่ สำหรับเวอร์ชันที่เป็นปัจจุบันกว่า
โปรเจกต์นี้แสดงวิธีการใช้งาน Arduino เพื่อรับสายและเปรียบเทียบเบอร์ที่โทรเข้ากับเบอร์ที่บันทึกไว้ใน microSD card โดยไม่ต้องกดรับสาย! วิธีนี้สามารถใช้งานได้กับ SIM ทั่วไปที่ไม่มีแพ็กเกจอินเทอร์เน็ต
นอกจากนี้ยังสามารถบันทึกเบอร์โทรศัพท์ที่ได้รับอนุญาตใหม่ๆ ผ่านทาง SMS ได้อีกด้วย
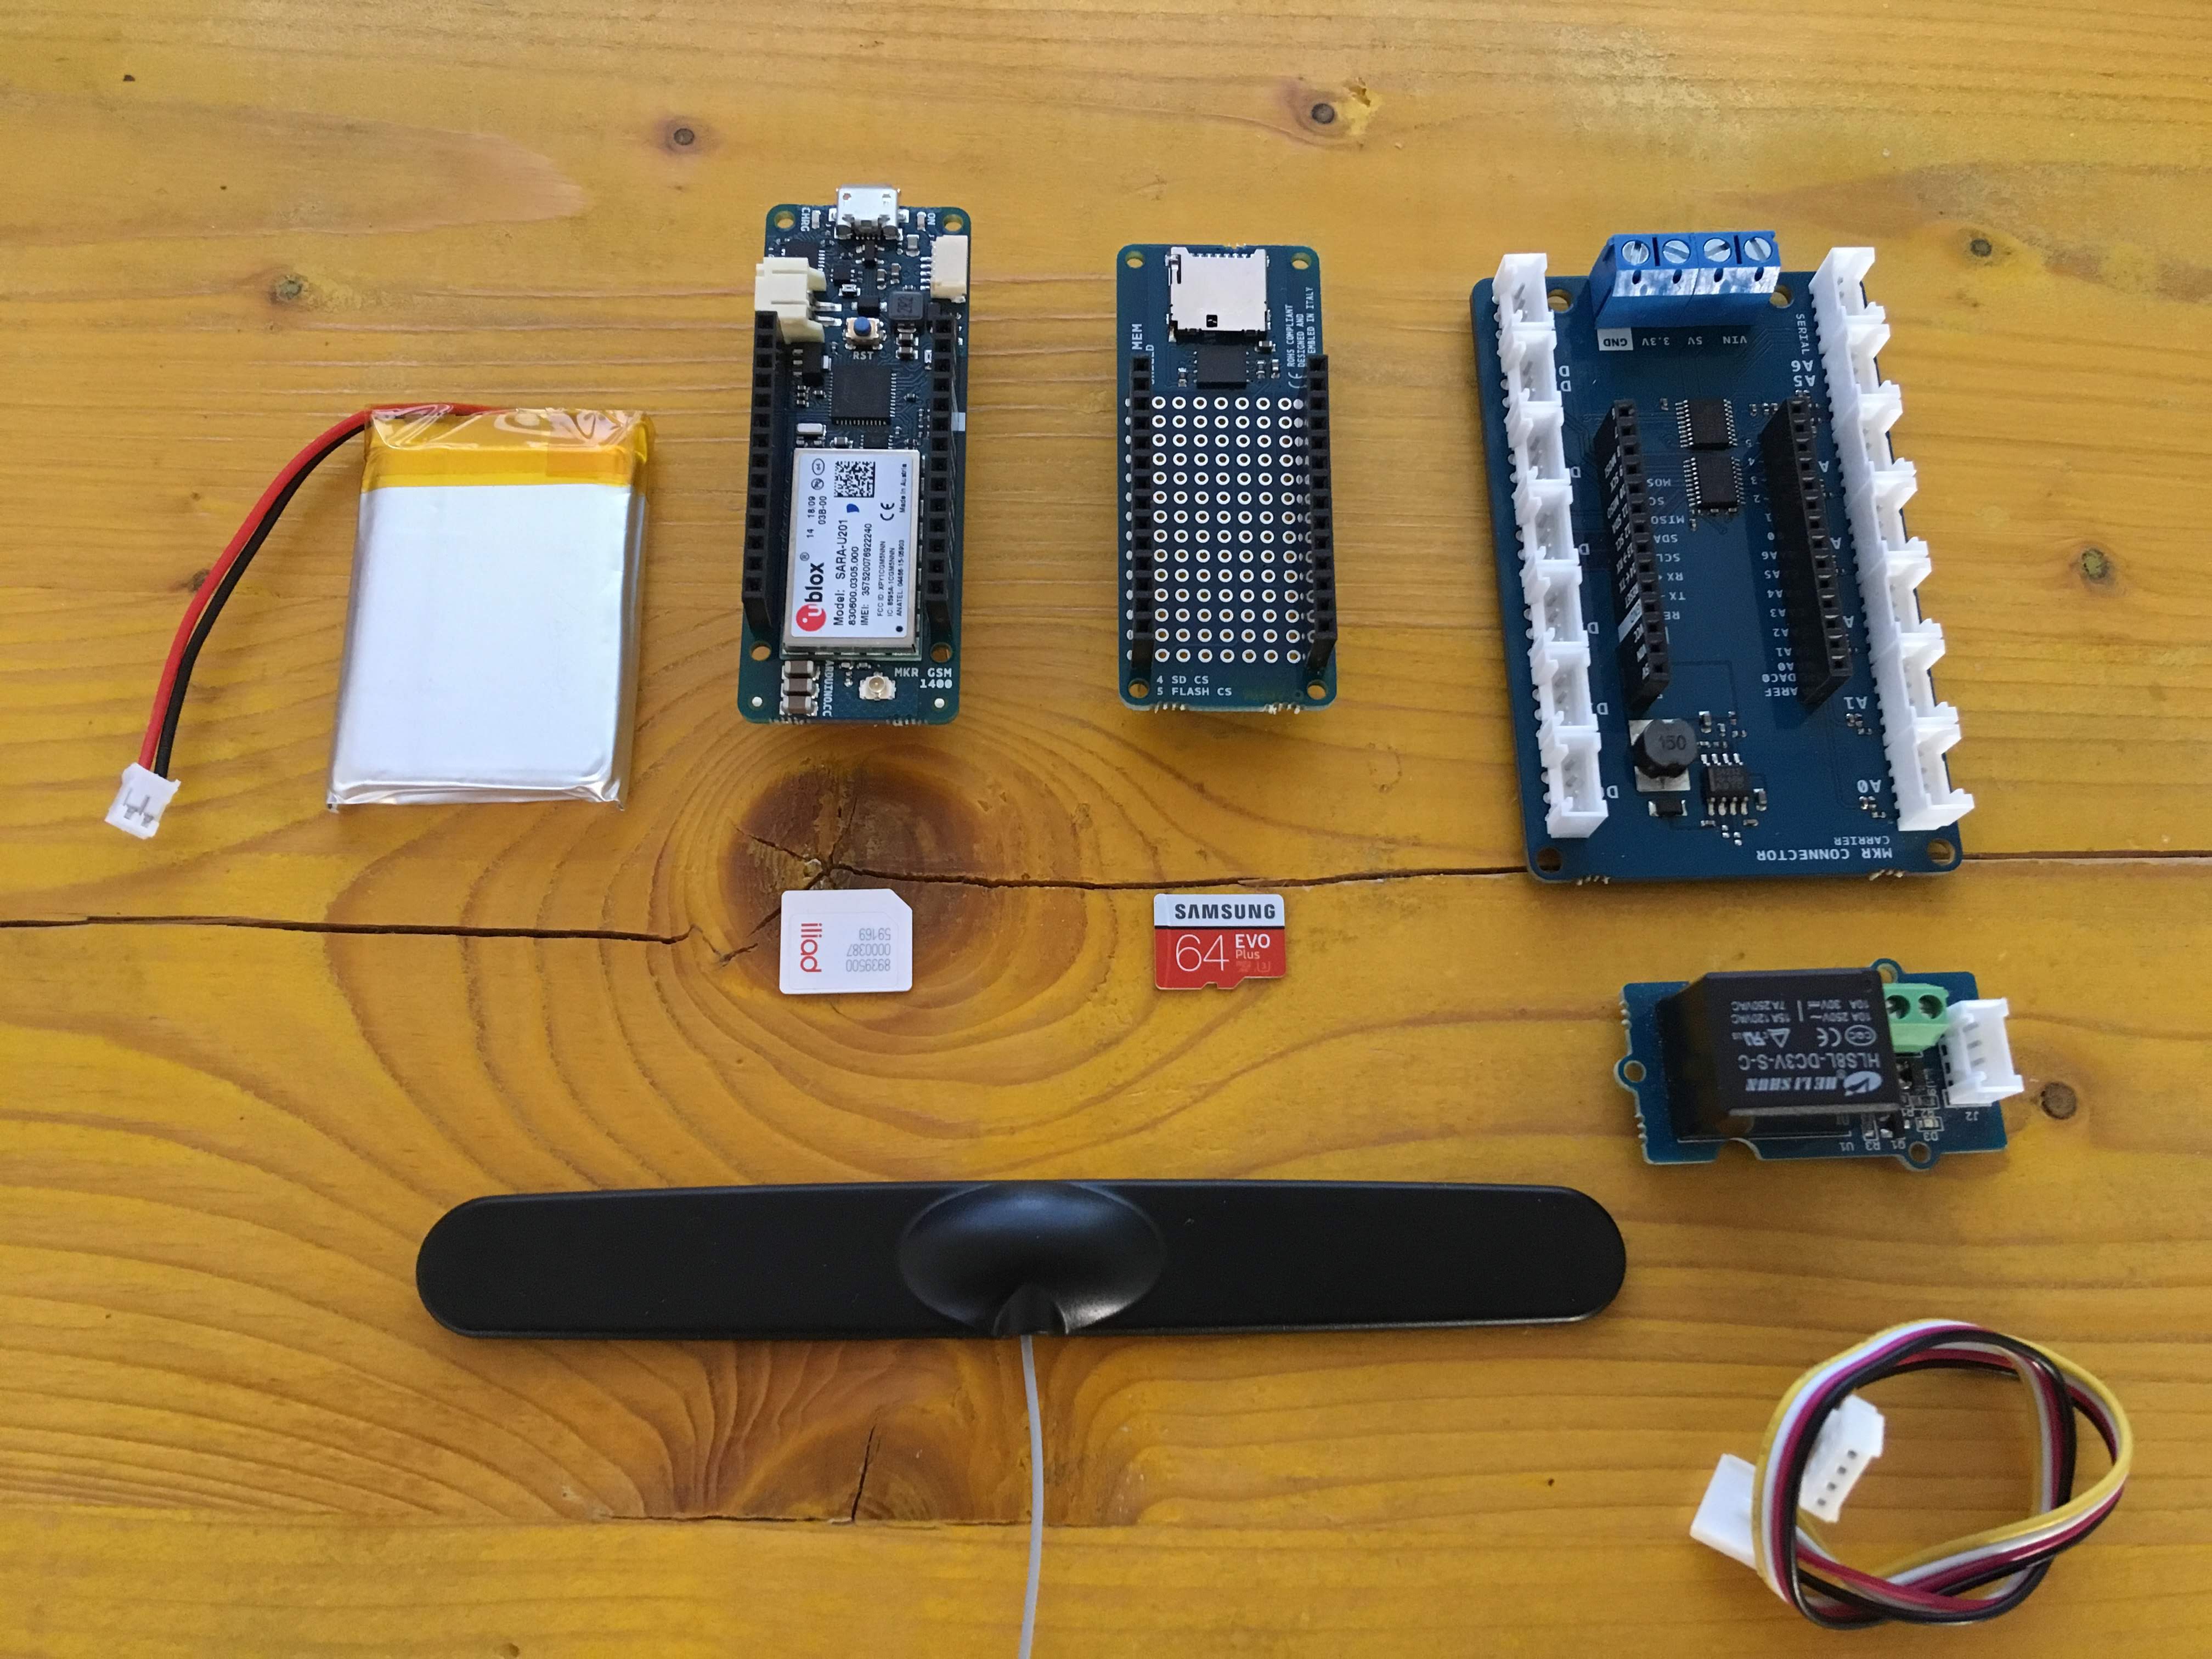
โปรเจกต์นี้ใช้พื้นฐานจาก Arduino MKR GSM 1400, Antenna, ชุด Battery แบบ LiPo, Arduino MKR MEM shield, microSD card, Arduino MKR Connector Carrier, Grove Relay Module, SIM card และแน่นอนว่าต้องมีโทรศัพท์อีกหนึ่งเครื่อง!
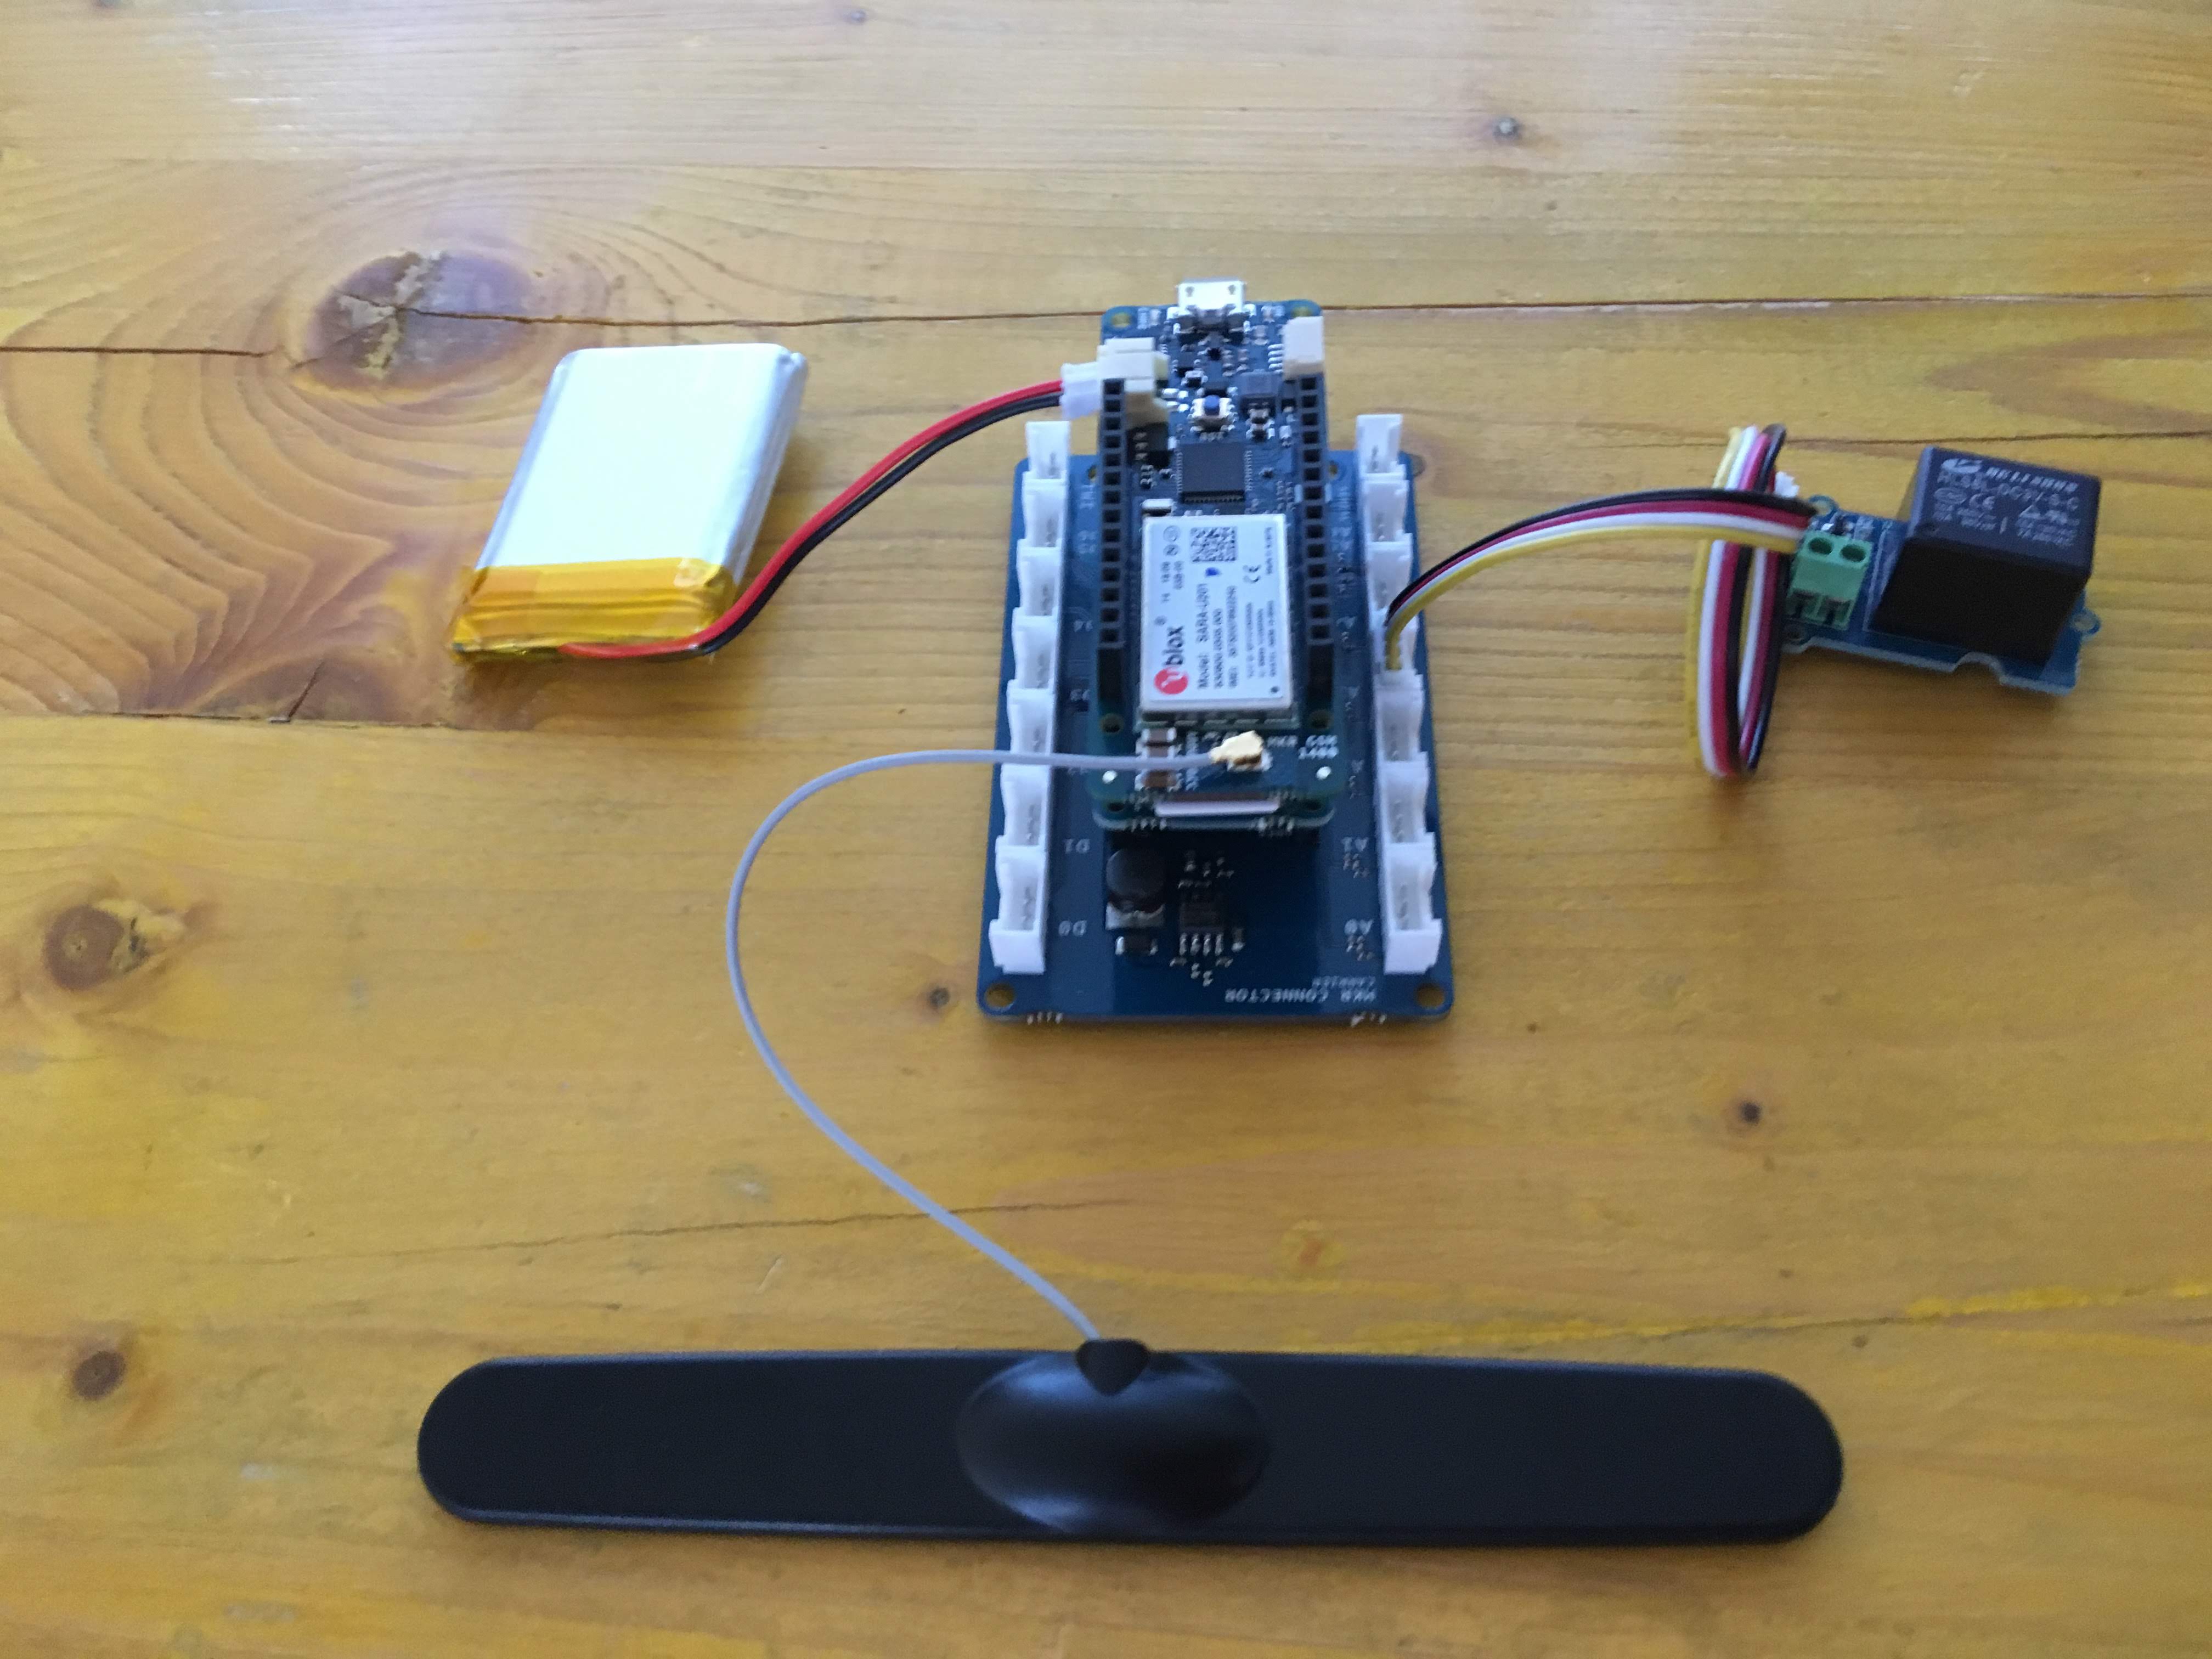
เสียบ microSD ในช่องใส่การ์ดบน MKR MEM shield แล้วนำไปวางซ้อนบน MKR Connector Carrier
Antenna, SIM และชุด Battery ควรเชื่อมต่อเข้ากับช่องเชื่อมต่อของตัวเองที่ส่วนหัวและส่วนท้ายของ Arduino MKR GSM 1400
จากนั้นเชื่อมต่อ Grove Relay เข้ากับ MKR Connector Carrier ที่ช่อง D2
Battery แบบ LiPo เป็นอุปกรณ์เสริม แต่จะช่วยรองรับช่วงที่มีการดึงกระแสสูง (peak current) ซึ่ง Module GSM อาจต้องการในสภาวะที่สัญญาณเครือข่ายไม่ดี
โปรเจกต์นี้ใช้ Library MKRGSM ในการจัดการสายเรียกเข้าและข้อความ SMS
เมื่อมีสายเรียกเข้า Code ของ Arduino จะจับเบอร์ที่โทรเข้าและทำการตัดสาย จากนั้นจะตรวจสอบเบอร์นั้นว่าอยู่ในรายการที่ได้รับอนุญาตหรือไม่ หากได้รับอนุญาต Port Digital 2 (D2) จะถูกสั่งให้เปิด (ON) เป็นเวลา 1 วินาทีเพื่อเปิดการทำงานของ Relay โดยรายการเบอร์โทรศัพท์ที่ได้รับอนุญาตจะถูกโหลดมาจากไฟล์ numbers.txt (ซึ่งอยู่ใน microSD card) เมื่อ Arduino เริ่มทำงาน หรือเมื่อมีการเพิ่มเบอร์ใหม่เข้าไปในรายการ
เมื่อได้รับ SMS หากผู้ส่งเป็น Admin และข้อความอยู่ในรูปแบบ SET<+XXXXXXXXXXX> เบอร์ที่ส่งมาจะถูกเพิ่มเข้าไปในไฟล์ numbers.txt (ที่เก็บอยู่ใน microSD)
เพื่อความปลอดภัย Sketch จะตรวจสอบเบอร์ของ Admin ด้วย ซึ่งข้อมูลนี้จะต้องถูกเก็บไว้ในไฟล์ arduino_secrets.h
ส่วนแรกของ Code ใช้สำหรับรวม Library ที่จำเป็น โดย MKRGSM จะรวมฟังก์ชันการเชื่อมต่อ GSM ทั้งหมด ซึ่งสามารถเรียกใช้งานผ่าน Object GSMClient และ GSM
SD รวมฟังก์ชันการอ่านและเขียน SD card ทั้งหมด
arduino_secrets.h เก็บข้อมูลสำคัญ เช่น PIN ของ SIM และเบอร์โทรศัพท์ของ Admin
// Include the GSM an SD library
#include <MKRGSM.h>
#include <SPI.h>
#include <SD.h>
// Include file with your sensitive data
#include "arduino_secrets.h"
// Max stored numbers
#define MAX_NUMBERS 5
// Relay pin number
#define GATE_PIN    2
สร้างและกำหนดค่าเริ่มต้นให้กับ Object (GSM และ SD) และ Variable ต่างๆ
// Initialize the library instance
GSM gsmAccess;
GSMVoiceCall vcs;
GSM_SMS sms;
// File object
File myFile;
// Pin number and Admin phone number from external file
const char PINNUMBER[] = SECRET_PINNUMBER;
String adminphone = SECRET_ADMINNUMBER;
// Array to hold the phone number for the incoming sms and call
char callnumber[20];
char smsnumber[20];
// phone numbers array
String numbers[MAX_NUMBERS];
int numberindex = 0;
ฟังก์ชัน setup ทำหน้าที่ดึงรายการเบอร์โทรศัพท์จากไฟล์ numbers.txt และเชื่อมต่อกับเครือข่าย GSM
void setup() {
 // initialize serial communications and wait for port to open
 Serial.begin(9600);
 // USE ONLY WITH A COMPUTER CONNECTED AND SERIAL MONITOR OPENED
 while (!Serial) {
   ; // wait for serial port to connect. Needed for native USB port only
 }
 // set up the pin as output and put it down
 pinMode(GATE_PIN, OUTPUT);
 digitalWrite(GATE_PIN, LOW);
 Serial.println("GSM Open Gate Sketch starting...");
 // Init SD card
 if (!SD.begin(4)) {
   Serial.println("initialization failed!");
   return;
 }
 // retreive number from file stored in SD
 myFile = SD.open("numbers.txt");
 if (myFile) {
   // read from the file until there's nothing else in it
   while (myFile.available()) {
     // read a line and delete \\r\

     String reading = myFile.readStringUntil('\
');
     reading.trim();
     // add to numbers array
     if (numberindex < MAX_NUMBERS) {
       numbers[numberindex] = reading;
       numberindex++;
     }
   }
   // print the numbers
   if (numberindex > 0) {
     for (int i = 0; i < MAX_NUMBERS; i++) {
       Serial.print(i);
       Serial.print(" - ");
       Serial.println(numbers[i]);
     }
   }
   numberindex = 0;
   // close the file:
   myFile.close();
 } else {
   // if the file didn't open, print an error:
   Serial.println("error opening test.txt");
 }
 // connection state
 bool connected = false;
 // Init GSM shield
 while (!connected) {
   if (gsmAccess.begin(PINNUMBER) == GSM_READY) {
     connected = true;
   } else {
     Serial.println("Not connected");
     delay(1000);
   }
 }
 // This makes sure the modem correctly reports incoming events
 vcs.hangCall();
 Serial.println("Waiting for a call");
}
ฟังก์ชัน loop ประกอบด้วยสองส่วนหลัก ส่วนแรกจัดการเรื่องสายเรียกเข้าและดึงเบอร์โทรศัพท์ออกมา ส่วนที่สองจะทำงานเมื่อได้รับ SMS แล้วทำการแยกเนื้อหาข้อความ
void loop() {
 // Check the status of the voice call
 switch (vcs.getvoiceCallStatus()) {
   case IDLE_CALL:
     // Nothing is happening
     break;
   case RECEIVINGCALL:
     //Someone is calling us
     Serial.println("RECEIVING CALL");
     // Retrieve the calling number
     vcs.retrieveCallingNumber(callnumber, 20);
     // Check if it's the adminphone
     if (adminphone.equals(callnumber)) {
       Serial.println("Admin phone, open gate!");
       // open the gate and after 1 second close it
       digitalWrite(GATE_PIN, HIGH);
       delay(1000);
       digitalWrite(GATE_PIN, LOW);
     }
     // Check if it's an authorized number
     else {
       for (int i = 0; i < MAX_NUMBERS; i++) {
         if (numbers[i].equals(callnumber)) {
           Serial.println("Authorized, open gate!");
           // open the gate and after 1 second close it
           digitalWrite(GATE_PIN, HIGH);
           delay(1000);
           digitalWrite(GATE_PIN, LOW);
           break;
         }
       }
     }
     // Put down the call
     vcs.hangCall();
     break;
   case TALKING:
     // In this case the call would be established
     // Nothing to do here
     break;
 }
 // Check if there are any SMSs available
 if (sms.available()) {
   Serial.println("Message received from:");
   // Get remote number
   sms.remoteNumber(smsnumber, 20);
   Serial.println(smsnumber);
   // Read message bytes, save and print them
   int c;
   String smsmessage = "";
   while ((c = sms.read()) != -1) {
     // Serial.print((char)c);
     smsmessage += (char)c;
   }
   // Only the admin can edit the number list
   // example sms => SET <+00123456789>
   if (adminphone.equals(smsnumber)) {
     // Check the command
     if (smsmessage.indexOf("SET") > -1) {
       // Check for a phone number and add to the stored file
       int startindex = smsmessage.indexOf("<");
       int endindex = smsmessage.indexOf(">");
       String newnumber = smsmessage.substring(startindex + 1, endindex);
       myFile = SD.open("numbers.txt", FILE_WRITE);
       if (myFile) {
         Serial.print("Number to add: ");
         Serial.println(newnumber);
         // write number in the file
         myFile.println(newnumber);
         // close the file:
         myFile.close();
         Serial.println("saved.");
         // add to the local numbers list
         if (numberindex < MAX_NUMBERS) {
           newnumber.trim();
           numbers[numberindex] = newnumber;
           numberindex++;
         }
         else {
           Serial.println("Too many saved numbers!");
         }
       } else {
         // if the file didn't open, print an error:
         Serial.println("error opening numbers.txt");
       }
     }
   }
   Serial.println("\
END OF MESSAGE");
   // Delete message from modem memory
   sms.flush();
   Serial.println("MESSAGE DELETED");
 }
 delay(1000);
}
ตรวจสอบให้แน่ใจว่าคุณมีไฟล์ numbers.txt เก็บอยู่ใน microSD โดยอาจจะเป็นไฟล์ว่างเปล่าหรือจัดรูปแบบดังนี้:
+00XXXXXXXXXX
+00XXXXXXXXXX
+00XXXXXXXXXX
สิ่งที่สำคัญคือต้องมีบรรทัดใหม่ (newline) ต่อท้ายเบอร์สุดท้ายเสมอ
ตรวจสอบเบอร์โทรศัพท์ของคุณให้ดีว่าถูกจัดเก็บไว้ในไฟล์ arduino_secrets.h อย่างถูกต้อง จากนั้นทำการ Upload Sketch และเปิด Serial Monitor เพื่อตรวจสอบว่า Module สามารถเชื่อมต่อกับเครือข่ายได้เรียบร้อยหรือไม่
ตอนนี้คุณก็สามารถโทรหรือส่ง SMS ไปยัง Arduino ได้แล้ว
สนับสนุนเพื่อรับ Source Code หรือแอปพลิเคชันสำหรับโปรเจกต์นี้
ประเมิน Project
เอาฟอร์มยาวออกจากท้ายหน้า Project แล้ว เหลือเป็นปุ่มให้กดไปกรอกหน้าเดียว ตัวใหญ่ เว้นบรรทัดเยอะ อ่านง่ายกว่า
รีวิวจากคนใช้งานจริง
ถ้าเคยสั่งงาน เคยอ่านหน้านี้แล้วได้ประโยชน์ หรือมีข้อเสนอแนะ ฝากรีวิวไว้ได้เลย
ยังไม่มีรีวิวบนหน้านี้ ถ้าเคยใช้งานหรือมีข้อเสนอแนะ เขียนเป็นคนแรกได้เลย