Expert
โปรเจกต์ Dash Button Santa กับ Arduino MKR1000
ส่งข้อมูลไปยัง Santa Claus เกี่ยวกับสถานะการขอของขวัญ
ส่งข้อมูลไปยัง Santa Claus เกี่ยวกับสถานะการขอของขวัญ
Project Supporter Team
โพสต์โดย
กี่ครั้งแล้วที่คุณขอให้ซานต้านำชุดเครื่องมือ Arduino kit, เครื่องพิมพ์ 3D หรือชุดเครื่องมือต่างๆ มาให้ แต่เขากลับเอาถุงเท้ามาให้คุณแค่คู่เดียว? เรื่องนี้กำลังจะจบลงแล้ว
ซานตาคลอสได้จ้างพวกเราให้ทำโปรเจกต์ที่ใช้ IoT และ Arduino MKR1000 ซึ่งจะช่วยให้คุณควบคุมตำแหน่งที่จะส่งของขวัญได้ดียิ่งขึ้น
อย่างแรกที่คุณต้องทำคือทำตัวให้ดี ช่วยล้างจาน ช่วยงานที่บ้านและช่วยเหลือผู้สูงอายุ ไปซื้อของ และแน่นอนว่าต้องส่งจดหมายหาซานต้า
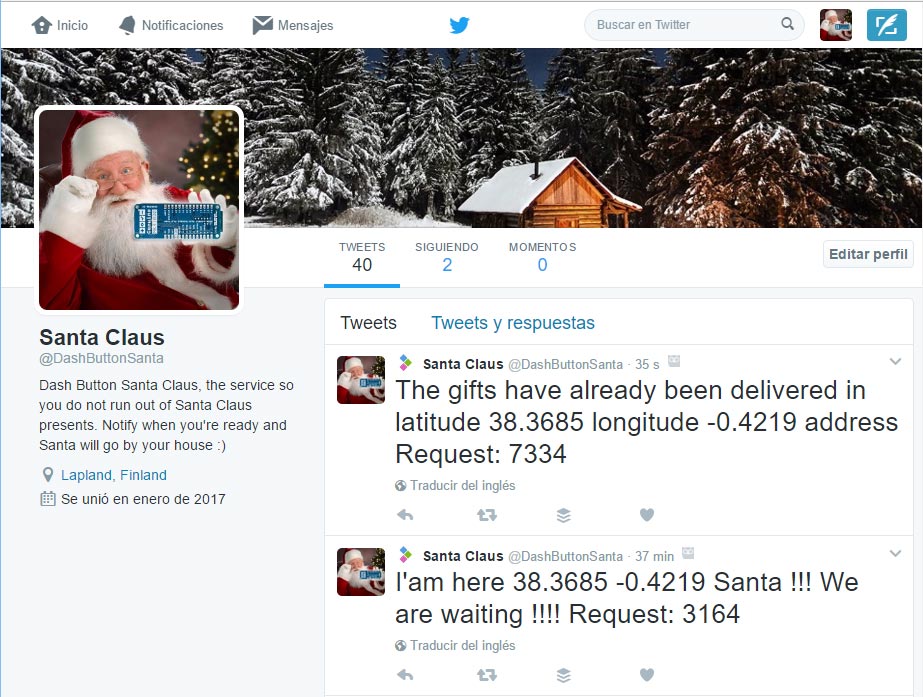
เมื่อคุณทำตามเงื่อนไขครบถ้วนแล้ว คุณก็พร้อมที่จะกดปุ่มวิเศษที่จะส่งพิกัดตำแหน่งที่คุณต้องการให้ซานต้าวางของขวัญไปยัง Twitter ของซานต้า (@dashbuttonsanta)
นอกจากนี้ ระบบจะส่ง Email ไปยังแผนกที่สร้างขึ้นสำหรับโปรเจกต์นี้โดยเฉพาะ นั่นคือ Dash Button Department
สุดท้าย เมื่อซานตาคลอสวางของขวัญไว้ในบ้านของคุณแล้ว เขาจะทำการยืนยันการส่งของในบัญชี Twitter ของคุณ และคุณจะสามารถเห็นแผนที่ที่อัปเดตได้ใน หน้าเว็บนี้
ด้วยวิธีนี้ซานต้าจะไม่มีวันลืมแวะที่บ้านของคุณ และคุณจะรู้ว่าจะไปรับของขวัญสำหรับชาว Maker ได้ที่ไหน
ระบบจะทำงานโดยแบ่งออกเป็น 4 สถานะ ขึ้นอยู่กับสถานการณ์ของ Dash Button Santa
Status 1: Disabled
ในสถานะนี้จะยังไม่มีการส่งการแจ้งเตือนพิกัดที่ต้องการให้วางของขวัญไปหาซานต้า
อย่างแรกที่คุณต้องทำคือทำตัวให้ดี ล้างจาน ช่วยงานที่บ้านและช่วยเหลือผู้สูงอายุ ไปซื้อของ และแน่นอนว่าต้องส่งจดหมายหาซานต้า
จากนั้น คุณสามารถส่งตำแหน่งให้ซานต้าเพื่อให้นำของขวัญมาส่งที่บ้านของคุณ การกดปุ่มจะเป็นการเปลี่ยนไปยังสถานะถัดไป
Status 2: sent location
เมื่อเข้าสู่สถานะนี้ ระบบจะส่ง Tweet ไปยัง Twitter ของซานต้า (@dashbuttonsanta) และส่ง Email ไปที่บัญชี dashbuttonsanta@gmail.com
Dash Button Santa จะคงอยู่ในสถานะนี้จนกว่าจะถึงวันคริสต์มาส แม้ว่าคุณจะกดปุ่มกี่ครั้งก็จะไม่เกิดอะไรขึ้น
เมื่อถึงวันที่ 25 ธันวาคม ไฟจะเริ่มกะพริบ ซึ่งหมายความว่าเราพร้อมที่จะต้อนรับซานต้าแล้ว และมีเพียงซานต้าเท่านั้นที่จะกดปุ่มอีกครั้งเพื่อเปลี่ยนเป็นสถานะถัดไป
State 3: Gifts delivered
ซานต้าจะเป็นคนกดปุ่มเพื่อยืนยันว่าของขวัญได้รับการจัดส่งเรียบร้อยแล้ว
เมื่อคุณตื่นมาในตอนเช้า คุณสามารถตรวจสอบได้ว่าของขวัญมาถึงหรือยัง โดยดูจาก Dash Button Santa ที่จะเปลี่ยนเป็นสีเขียว
สถาปัตยกรรมของระบบนั้นเรียบง่ายมาก เราใช้งานบริการต่างๆ ที่ให้บริการฟรี
แน่นอนว่าแกนกลางของโปรเจกต์นี้คือ Arduino MKR1000 โดยสามารถแบ่งออกเป็น 4 ส่วนหลักๆ คือ:
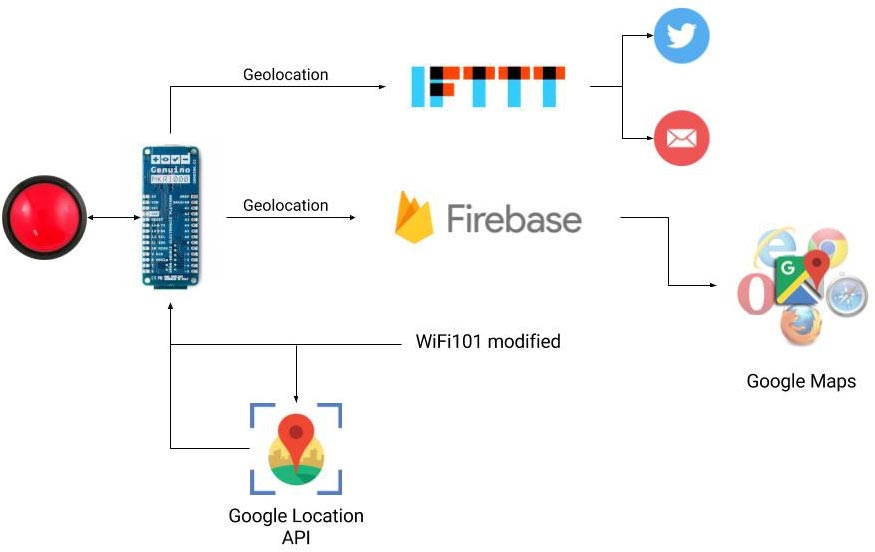
Dash Button Santa จะไปกับคุณทุกที่ เพราะคุณไม่รู้ล่วงหน้าว่าวันคริสต์มาสจะไปอยู่ที่ไหน ใช้ Dash Button Santa เพื่อบอกซานต้าว่าคุณอยู่ที่ไหน
ระบบจะคอยฟังว่ามีเครือข่าย WiFi อะไรอยู่รอบตัวบ้าง และดึงพิกัดที่แม่นยำโดยใช้ Google Maps Geolocation API.
Library WiFi101 ในเวอร์ชันปัจจุบันไม่รองรับการดึงรายการ MAC addresses (BSSID) ของ access points เราจึงจำเป็นต้องแก้ไข Library เพื่อเปิดฟีเจอร์ให้สามารถดึงรายการเครือข่าย WiFi โดยรอบอย่างละเอียดได้
หลังจากทดสอบบริการและแพลตฟอร์ม cloud สำหรับ IoT มาหลายตัว เราพบว่าตัวที่ใช้งานง่ายที่สุดสำหรับโปรเจกต์นี้คือ Firebase
บริการนี้มีฐานข้อมูลที่เรียบง่ายโดยใช้ JSON และเข้าถึงได้ผ่าน API เพียงแค่ทำ PUT request พร้อมกับ JSON คุณก็สามารถสร้างโครงสร้างข้อมูลของตัวเองได้ทันที
คุณต้องมีบัญชี Google เพื่อเข้าใช้งานบริการฟรีแบบจำกัดตามที่พวกเขากำหนด
JSON ที่เราใช้มีลักษณะดังนี้:
{
 "persons" : {
   "A9:D8:F5:05:F0:F8" : {
     "lat" : 38.3685,
     "lon" : -0.4219,
     "prec" : 100999,
     "status" : "2"
   }
 }
}
ข้อมูลทุกอย่างจะอยู่ภายใต้หัวข้อ persons โดยเราใช้ MAC address ของ Arduino MKR100 เป็นตัวระบุเอกลักษณ์ (unique identifier)
จากนั้นเราจะส่งค่าละติจูด, ลองจิจูด, ความแม่นยำ และสถานะของปุ่มไปเก็บไว้
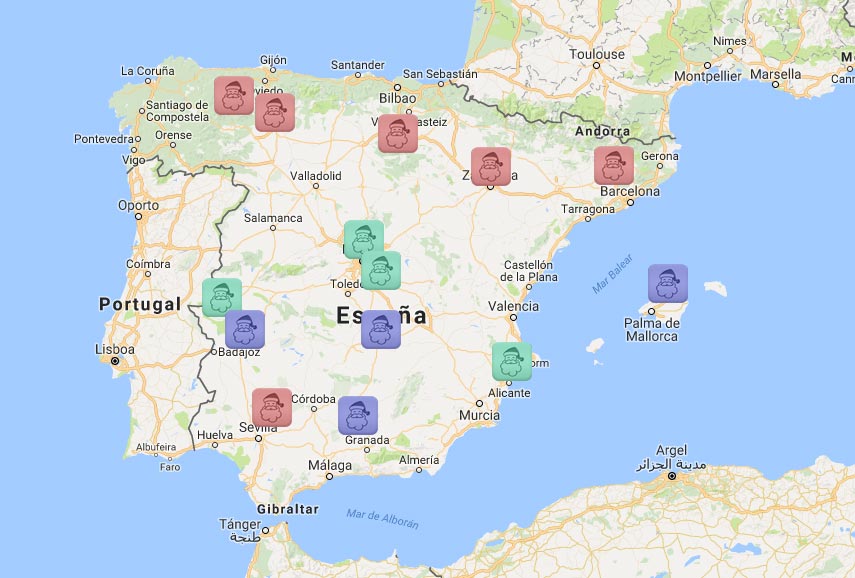
เป้าหมายของการเก็บข้อมูลตำแหน่งคือเพื่อให้สามารถติดตาม Dash Button Santa ได้ทั่วโลก
ในหน้าเว็บ เราจะสามารถมองเห็น Dash Buttons ทั้งหมดที่เชื่อมต่ออยู่ เว็บนี้สร้างด้วย jQuery ที่เข้าถึง Firebase API เพื่อดึงข้อมูลมาแสดงผล
ประกอบด้วยไฟล์สองไฟล์ คือ .html และ .js โดยคุณสามารถดูโค้ดได้ด้านล่าง
<!DOCTYPE html>
<html>
<head>
\t<title>Dash Button Tracking Santa Claus</title>
\t<style type="text/css">
     html, body { height: 100%; margin: 0; padding: 0; }
     #map { height: 100%; }
   </style>
   <meta name="robots" content="noindex">
</head>
<body>
\t<!--<ul id="costumers" class="list-group">
\t</ul>-->
\t<div id="map"></div>
\t<!-- jQuery (necessary for Bootstrap's JavaScript plugins) -->
\t<script src="https://ajax.googleapis.com/ajax/libs/jquery/1.11.2/jquery.min.js"></script>
\t<!-- Latest compiled and minified Bootstrap -->
\t<script src="https://maxcdn.bootstrapcdn.com/bootstrap/3.3.4/js/bootstrap.min.js"></script>
\t<!-- Include Firebase Library -->
\t<script src='https://cdn.firebase.com/js/client/2.2.1/firebase.js'></script>
\t<!-- Tracking Store JavaScript -->
\t<script src="script.js"></script>
\t<!-- API Google Maps -->
\t<script async defer
     src="https://maps.googleapis.com/maps/api/js?key=AIzaSyABRsKsE4ISjkikM96Hn7RIv9nW-oice8Q&callback=initMap">
   </script>
</body>
</html>
และไฟล์ JavaScript
// Create a firebase reference
var dbRef = new Firebase('https://dash-button-arduino.firebaseio.com/');
var costumersRef = dbRef.child('persons');
var markers = {}
//load persons
costumersRef.on("child_added", function(snap) {
   // Print to map
 addNewPerson(snap.val().lat,snap.val().lon,snap.val().status, snap.key());
});
//change persons
costumersRef.on("child_changed", function (snap) {
 changePerson(snap.val().lat, snap.val().lon, snap.val().status);
});
/******** GOOGLE MAPS *********/
var map;
function initMap() {
 // Center map
 var myLatLng = {lat: 38.392101, lng: -0.525467};
 map = new google.maps.Map(document.getElementById('map'), {
   center: myLatLng,
   zoom: 3
 });
}
function addNewPerson(lat, lon,status, key){
\tconsole.log("status",status);
\tvar image
\tif(status==0)
\t{
 \t\timage='images/santa-icon-1.png';
\t}
\telse if(status==1)
\t{
 \t\timage='images/santa-icon-2.png';
\t}
\telse if(status==2)
\t{
 \t\timage='images/santa-icon-3.png';
\t}
 var marker = new google.maps.Marker({
   position: new google.maps.LatLng(lat,lon),
   icon: image,
   map: map,
   title: key // Tooltip = MAC address
 });
 markers[key] = marker;
}
function changePerson(lat, lon, status, key) {
   console.log("status", status);
   var image;
   if (status == 0) {
       image = 'images/santa-icon-1.png';
   }
   else if (status == 1) {
       image = 'images/santa-icon-2.png';
   }
   else if (status == 2) {
       image = 'images/santa-icon-3.png';
   }
   marker = markers[key];
   marker = new google.maps.Marker({
       position: new google.maps.LatLng(lat, lon),
       icon: image,
       map: map,
       title: key // Tooltip = MAC address
   });
   markers[key] = marker;
}
เพื่อแสดงข้อมูลบนแผนที่ตามสถานะต่างๆ เราได้ใช้รูปภาพต่อไปนี้


คุณสามารถเข้าชมเว็บไซต์ที่เผยแพร่แล้วได้ ที่ URL นี้
ในส่วนนี้อาจจะเป็นส่วนที่ยากที่สุด แต่ต้องขอบคุณบริการจาก IFTTT ที่ทำให้งานนี้กลายเป็นเรื่องง่ายมาก :)
เมื่อเร็วๆ นี้พวกเขาได้เปิดใช้บริการที่ชื่อว่า IFTTT Maker ซึ่งช่วยให้คุณสามารถสร้างเหตุการณ์ (events) และตัวจุดชนวน (triggers) ผ่าน API ได้ ด้วยการเรียกใช้ GET แบบง่ายๆ และการตั้งค่า recipe ที่ดี ทุกอย่างก็จะสะดวกมาก
สิ่งนี้ช่วยให้การโพสต์ไปยังโซเชียลเน็ตเวิร์กและการเปิดช่องทางสื่อสารระหว่างสิ่งของหรือเครื่องจักรทำได้ง่ายขึ้นมาก ซึ่งเป็นการเปิดทางให้เทคโนโลยี IoT ได้อย่างแท้จริง
ในโปรเจกต์นี้เราจะใช้ 3 recipes:
แผนผังพื้นฐานคือการเชื่อมต่อ pushbutton เข้ากับ Arduino MKR1000 และต่อ Neopixel จำนวน 3 pixels
จากนั้นเราสามารถตกแต่งได้ตามต้องการ ในกรณีของเรา เราใช้ตุ๊กตา Rudolf ซึ่งเป็นกวางเรนเดียร์ของซานตาคลอส
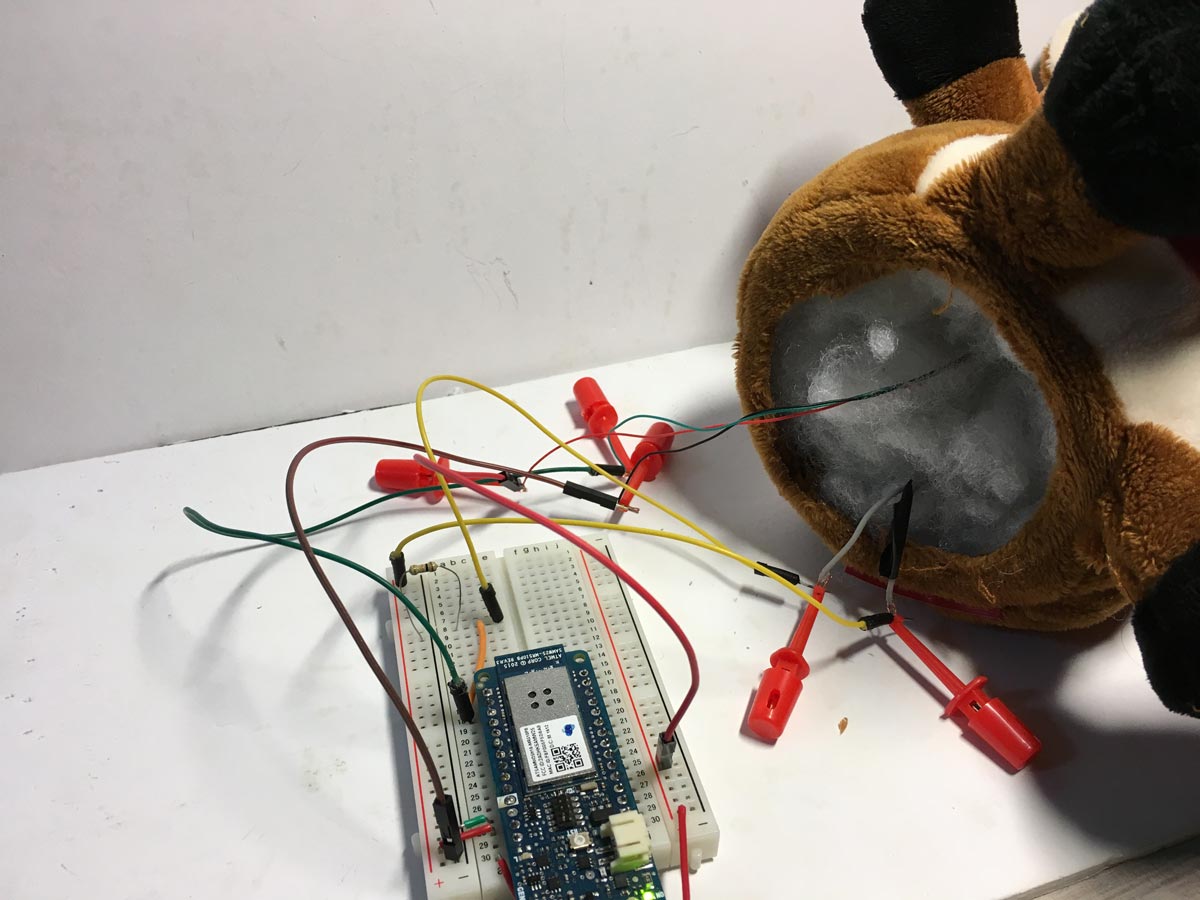
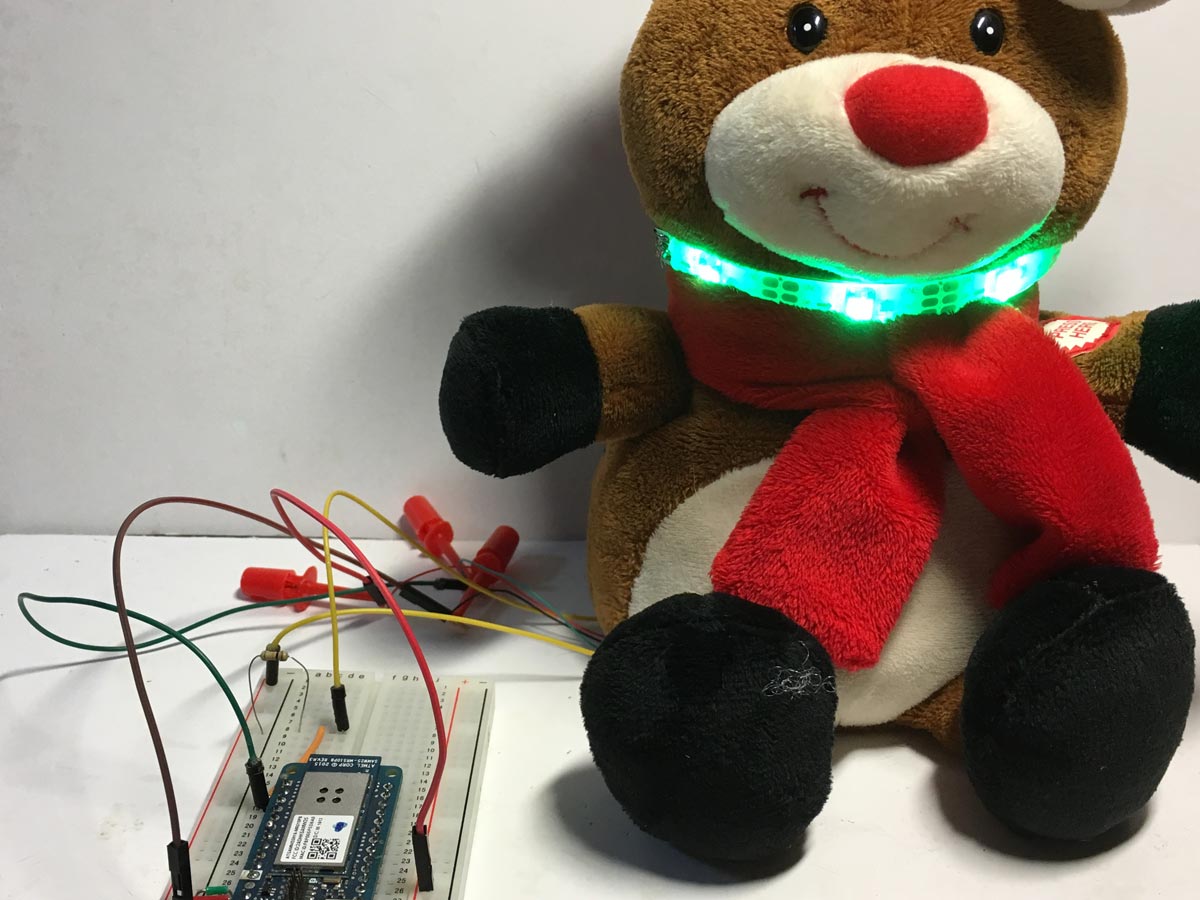
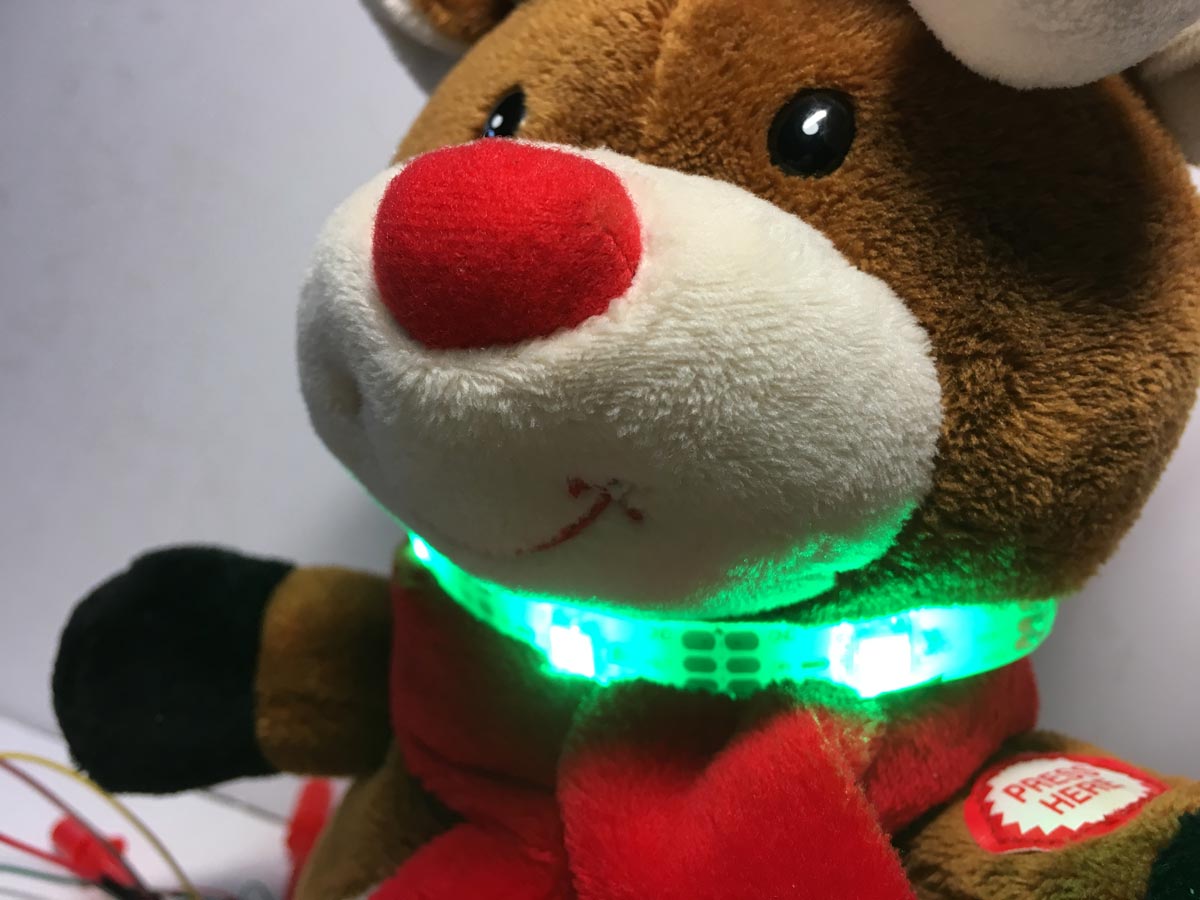

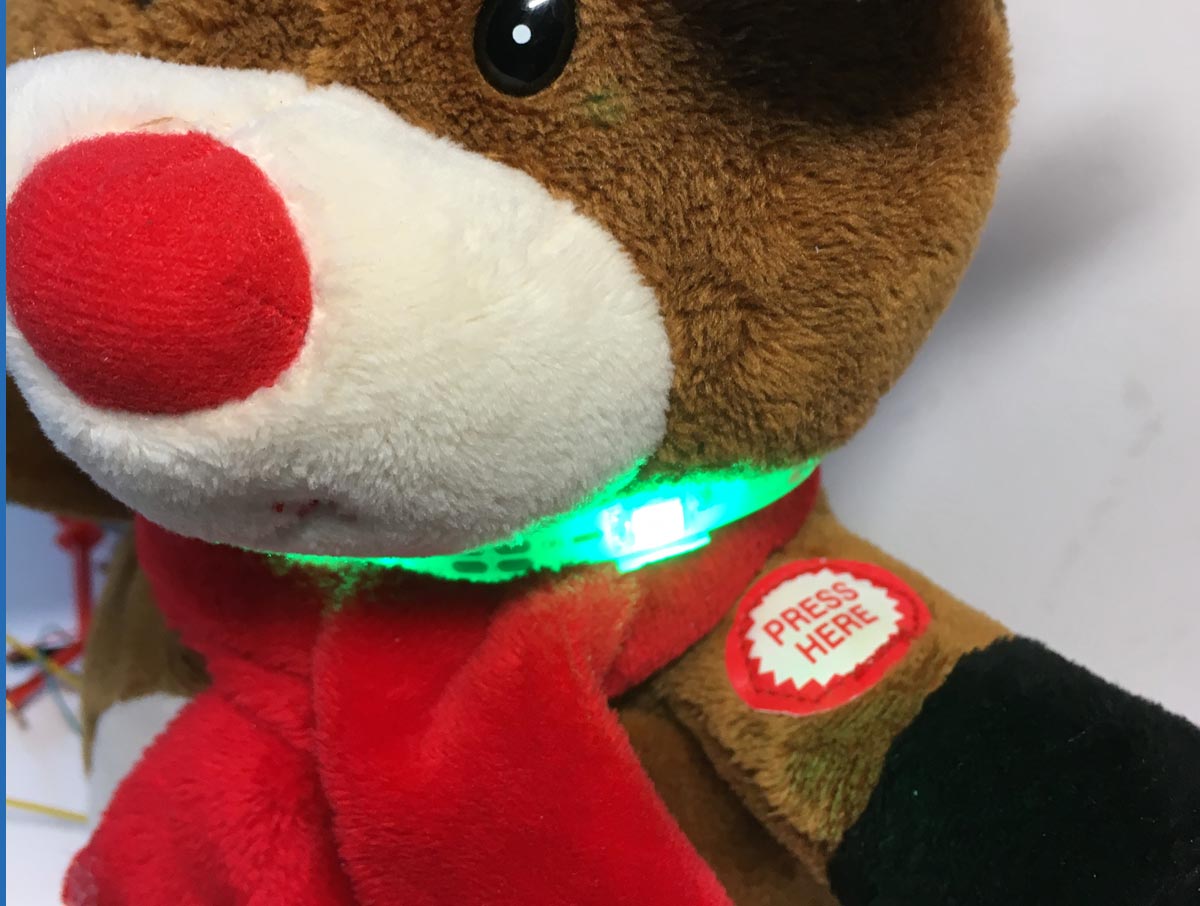
เราติดตั้งปุ่มไว้ด้านในและติดสายไฟ Neopixel ไว้ที่ผ้าพันคอ
ดวงไฟจะบอกสถานะของ Dash Button Santa ให้เราทราบ:
คุณสามารถดูรายละเอียดทั้งหมดนี้ได้ในหัวข้อถัดไปซึ่งจะพูดถึงเรื่องโค้ด
ใน Sketch มีการใช้ Library หลายตัวเพื่อช่วยจัดการเรื่องการเชื่อมต่อกับบริการต่างๆ และการควบคุมเวลาเพื่อให้ทราบว่าเป็นวันคริสต์มาส
คุณจะต้องมีบัญชีต่างๆ เพื่อใช้งานบริการเหล่านี้ เรากำลังพัฒนาปรับปรุงเพื่อไม่ให้ต้องพึ่งพาระบบภายนอกมากเกินไปในอนาคต :)
สิ่งที่คุณต้องมีเพื่อให้โค้ดทำงานได้คือ:
โค้ดทั้งหมดมีการอธิบายไว้อย่างดี หากมีคำถามใดๆ สามารถทิ้งไว้ในคอมเมนต์ของบทความนี้ได้เลย
สำหรับการเก็บสถานะไว้ในตัวเครื่องเพื่อให้ทราบว่าอยู่ในสถานะใดหากเครื่องดับไป เราได้ใช้ FlashStorage ซึ่งทำหน้าที่จำลองหน่วยความจำ EEPROM
ในการควบคุมวันและเดือน เราใช้ RTCZero
นอกจากนี้ เรายังได้เตรียมลิงก์ไว้ให้คุณดาวน์โหลด WiFi101 library ฉบับปรับปรุง และ WifiLocation library
คุณสามารถหาลิงก์ของ Library เหล่านี้ได้ใน GitHub ในส่วนของ Library ของบทความนี้
/*
 DashButtonSanta
 Send information to Santa Claus about the status of the gift request. It uses the geolocation through the WiFi,
 of the Google API, and it is sent to Firebase, along with the state and with the MAC (key value) of the Arduino MKR1000.
 It also sends the information to Twitter @ dashbuttonsanta and to the email dashbuttonsanta@gmail.com through IFTTT.
 On the web https://programarfacil.com/proyectos/dashbuttonsanta/tracking-santa.html you can follow the status of all requests.
 When at the end Santa leaves the gifts on the site sent to Twitter and the email, press the button and gives the delivery finished.
 States:
 0 => Device OFF (LED color red)
 1 => I have behaved well, I have made the bed, I have cleaned the dishes, I have helped an old lady, I pray every night, etc ...
      and I have sent the letter :) (LED color blue)
 2 => Is Christmas Day (LED blink color blue)
 3 => Santa claus left the presents and pressed the button (LED blink color green)
 Errors:
  Wifi shield not present => LED blink Color(233, 149, 16)
  NTP unreachable => LED blink Color(150, 0, 0)
 The circuit:
  Arduino MKR1000
  Pushbutton to pin 6
  pull-down resistor to pushbutton
  3 addressable LEDs
 Created 2017
 By https://programarfacil.com
 Luis del Valle @ldelvalleh
 Germán Martín @gmag12
*/
#include <Adafruit_NeoPixel.h>
#include <WiFi101.h>
#include <WiFiUdp.h>
#include <RTCZero.h>
#include <FlashStorage.h>
#include "WifiLocation.h"
// Fill these fields with your data
#define GOOGLE_API_KEY "YOURGOOGLEAPIKEY"
#define IFTTTKEY "YOURIFTTTKEY"
#define SSID "WIFISID"
#define PASS "WIFPASS"
// Constants
#define DASHBUTTON 6 // Button
#define PINNEO     7 // Pin Neopixel
#define NUMPIXELS  3 // Num pixels
#define HOST "dash-button-arduino.firebaseio.com" // Host Firebase
#define HOSTIFTTT "maker.ifttt.com" // Host IFTTT to send tweet and email
#define TWITTEREVENT "tweet_santa" // Event name IFTTT Twitter
#define EMAILEVENT "email_santa" // Event name IFTTT email
#define SANTAEVENT "santa_santa" // Event name IFTTT Twitter Santa Claus
#define D_DAY 25 // Christmas Day
#define M_MONTH 12 // Christmas Month
#define LOC_PRECISSION 4 // Accuracy of location data to control privacy
// Neopixel
Adafruit_NeoPixel pixels = Adafruit_NeoPixel(NUMPIXELS, PINNEO, NEO_GRB + NEO_KHZ800);
// Dash Button States
int dashButtonState = 0;
volatile bool makeUpdate = false;
// Reserve a portion of flash memory to store an "int" variable
// and call it "state_dashbutton".
FlashStorage(state_dashbutton, int);
// RTC with WiFi
rtc;
const int GMT = 1;
int status = WL_IDLE_STATUS;
WiFiClient client;
// Info person
byte mac[6];
location_t location;
void setup() {
 // Init Neopixel
 pixels.begin();
 // Read the content of state_dashbutton
 dashButtonState = state_dashbutton.read();
 pixels.setPixelColor(0, pixels.Color(150, 0, 0));
 pixels.show();
 pixels.setPixelColor(1, pixels.Color(0, 0, 150));
 pixels.show();
 pixels.setPixelColor(2, pixels.Color(0, 150, 0));
 pixels.show();
 // WiFi configuration
 configWiFi();
 // Get location using WiFi networks around
 getLocation();
 // Update Dash Button state
 putRequest(dashButtonState);
 // Init Dash Button
 pinMode(DASHBUTTON, INPUT);
 // Init interrupt
 attachInterrupt(digitalPinToInterrupt(DASHBUTTON), dashbuttonAction, RISING);
 // RTC configuration
 configRTC();
 // Random seed
 randomSeed(analogRead(A0));
}
void loop() {
 // Off
 if (dashButtonState == 0)
 {
   for (int i = 0; i < NUMPIXELS; i++) {
     // pixels.Color takes RGB values, from 0,0,0 up to 255,255,255
     pixels.setPixelColor(i, pixels.Color(150, 0, 0));
     pixels.show();
   }
 }
 // Location sended but not Christmas day
 else if (dashButtonState == 1 && rtc.getDay() != D_DAY && rtc.getMonth() != M_MONTH)
 {
   for (int i = 0; i < NUMPIXELS; i++) {
     pixels.setPixelColor(i, pixels.Color(0, 0, 150));
     pixels.show();
   }
 }
 // Location sended and Christmas day
 else if (dashButtonState == 1 && rtc.getDay() == D_DAY && rtc.getMonth() == M_MONTH)
 {
   blinkNeopixel(pixels.Color(0, 0, 150));
 }
 // Shipping
 else if (dashButtonState == 2)
 {
   for (int i = 0; i < NUMPIXELS; i++) {
     pixels.setPixelColor(i, pixels.Color(0, 150, 0));
     pixels.show();
   }
 }
 // If need update
 if (makeUpdate)
 {
   // Change Dash Button State
   if (dashButtonState == 0)
   {
     pixels.setPixelColor(0, pixels.Color(150, 0, 0));
     pixels.show();
     pixels.setPixelColor(1, pixels.Color(0, 0, 150));
     pixels.show();
     pixels.setPixelColor(2, pixels.Color(0, 0, 150));
     pixels.show();
     if (putRequest(1))
     {
       // Send Email
       sendEmail();
       delay(2000);
       // Send Twitter
       sendToTwitterPerson();
       dashButtonState = 1;
     }
   }
   // Only Christmas Day
   else if (dashButtonState == 1 && rtc.getDay() == D_DAY && rtc.getMonth() == M_MONTH)
   {
     pixels.setPixelColor(0, pixels.Color(0, 0, 150));
     pixels.show();
     pixels.setPixelColor(1, pixels.Color(0, 150, 0));
     pixels.show();
     pixels.setPixelColor(2, pixels.Color(0, 150, 0));
     pixels.show();
     if (putRequest(2))
     {
       sendToTwitterSanta();
       dashButtonState = 2;
     }
   }
   // Change state in FlashStorage
   state_dashbutton.write(dashButtonState);
 }
 makeUpdate = false;
}
// Callback interruption
void dashbuttonAction()
{
 noInterrupts();
 if (!makeUpdate)
   makeUpdate = true;
 interrupts();
}
void blinkNeopixel(uint32_t c)
{
 for (int i = 0; i < NUMPIXELS; i++) {
   pixels.setPixelColor(i, pixels.Color(0, 0, 0));
   pixels.show();
 }
 delay(500);
 for (int i = 0; i < NUMPIXELS; i++) {
   pixels.setPixelColor(i, c);
   pixels.show();
 }
 delay(500);
}
/**************** WiFi Connection ****************/
void configWiFi()
{
 // check for the presence of the shield:
 if (WiFi.status() == WL_NO_SHIELD) {
   // don't continue:
   while (true)
   {
     // Show error shield not present
     blinkNeopixel(pixels.Color(233, 149, 16));
   }
 }
 // attempt to connect to Wifi network:
 while (status != WL_CONNECTED) {
   // Connect to WPA/WPA2 network. Change this line if using open or WEP network:
   status = WiFi.begin(SSID, PASS);
   // wait 10 seconds for connection:
   delay(10000);
 }
 // Get mac
 WiFi.macAddress(mac);
}
/**************** RTCZero ****************/
void configRTC()
{
 // Init RTC
 rtc.begin();
 unsigned long epoch;
 int numberOfTries = 0, maxTries = 6;
 do {
   epoch = WiFi.getTime();
   numberOfTries++;
 }
 while ((epoch == 0) || (numberOfTries > maxTries));
 if (numberOfTries > maxTries) {
   while (1)
   {
     {
       // Show error RTC
       blinkNeopixel(pixels.Color(150, 0, 0));
     }
   }
 }
 else {
   rtc.setEpoch(epoch);
 }
}
/**************** HTTP PUT Request to Firebase ****************/
bool putRequest(int newDashButtonState)
{
 String keyMac = "";
 for (int i = 0; i < 6; i++)
 {
   String pos = String((uint8_t)mac[i], HEX);
   if (mac[i] <= 0xF)
     pos = "0" + pos;
   pos.toUpperCase();
   keyMac += pos;
   if (i < 5)
     keyMac += ":";
 }
 // close any connection before send a new request.
 client.stop();
 client.flush();
 // send SSL request
 if (client.connectSSL(HOST, 443)) {
   // PUT request
   String toSend = "PUT /persons/";
   toSend += keyMac;
   toSend += ".json HTTP/1.1\\r\
";
   toSend += "Host:";
   toSend += HOST;
   toSend += "\\r\
" ;
   toSend += "Content-Type: application/json\\r\
";
   String payload = "{\\"lat\\":";
   payload += String(location.lat, LOC_PRECISSION);
   payload += ",";
   payload += "\\"lon\\":";
   payload += String(location.lon, LOC_PRECISSION);
   payload += ",";
   payload += "\\"prec\\":";
   payload += String(location.accuracy);
   payload += ",";
   payload += "\\"status\\": \\"";
   payload += newDashButtonState;
   payload += "\\"}";
   payload += "\\r\
";
   toSend += "Content-Length: " + String(payload.length()) + "\\r\
";
   toSend += "\\r\
";
   toSend += payload;
   client.println(toSend);
   client.println();
   client.flush();
   client.stop();
   return true;
 } else {
   // if you couldn't make a connection:
   client.flush();
   client.stop();
   return false;
 }
}
/**************** Send to Twitter IFTTT ****************/
void sendToTwitterPerson()
{
 requestIFTTT(TWITTEREVENT);
}
void sendToTwitterSanta()
{
 requestIFTTT(SANTAEVENT);
}
/**************** Send email IFTTT ****************/
void sendEmail()
{
 requestIFTTT(EMAILEVENT);
}
/**************** Request IFTTT ****************/
void requestIFTTT(String eventName)
{
 for (int i = 0; i < 3; i++)
 {
   // close any connection before send a new request.
   if (client.connected())
   {
     client.stop();
   }
   client.flush();
   // Random request: from IFTTT Twitter publish Cannot send duplicate tweet.
   long randomRequest = random(1, 10000);
   // send SSL request
   if (client.connectSSL(HOSTIFTTT, 443)) {
     // Make a HTTP request:
     String toSend = "GET /trigger/";
     toSend += eventName;
     toSend += "/with/key/";
     toSend += IFTTTKEY;
     toSend += "?value1=";
     toSend += String(location.lat, LOC_PRECISSION);
     toSend += "&value2=";
     toSend += String(location.lon, LOC_PRECISSION);
     toSend += "&value3=";
     toSend += randomRequest;
     toSend += " HTTP/1.1\\r\
";
     toSend += "Host: maker.ifttt.com\\r\
";
     toSend += "Connection: close\\r\
\\r\
";
     client.print(toSend);
     break;
   } else {
     // if you couldn't make a connection:
   }
 }
 client.flush();
 client.stop();
}
/**************** Get Location info ****************/
bool getLocation() {
 WifiLocation gLocation(GOOGLE_API_KEY);
 location = gLocation.getGeoFromWiFi();
 return (location.accuracy < 100);
}
ในโปรเจกต์นี้เราต้องการแสดงให้เห็นว่า เพียงแค่มีไอเดียสร้างสรรค์เล็กน้อยและ Arduino MKR1000 เราก็สามารถสร้างระบบติดตามอะไรก็ได้
เราได้เลือกใช้บริการฟรีต่างๆ ที่ช่วยให้เราสามารถสร้างต้นแบบและสร้างเทคโนโลยีได้ในราคาประหยัดและไม่ยุ่งยาก
การพัฒนาที่น่าสนใจในอนาคตอาจเป็นการลองเปลี่ยนไปใช้ NodeMCU ESP8266
แม้ว่านี่จะเป็นเพียงโปรเจกต์สำหรับ The Arduino Internet of Holiday Things แต่เราหวังว่าสิ่งนี้จะสร้างแรงบันดาลใจให้คุณสร้างโปรเจกต์ของตัวเองขึ้นมาจากไอเดียของเรา
พวกเรายินดีรับทุกความเห็นและข้อเสนอแนะ ขอบคุณมากที่ให้ความสนใจ และ โฮ่ โฮ่ โฮ่ เมอร์รี่คริสต์มาส!
สนับสนุนเพื่อรับ Source Code หรือแอปพลิเคชันสำหรับโปรเจกต์นี้
ประเมิน Project
เอาฟอร์มยาวออกจากท้ายหน้า Project แล้ว เหลือเป็นปุ่มให้กดไปกรอกหน้าเดียว ตัวใหญ่ เว้นบรรทัดเยอะ อ่านง่ายกว่า
รีวิวจากคนใช้งานจริง
ถ้าเคยสั่งงาน เคยอ่านหน้านี้แล้วได้ประโยชน์ หรือมีข้อเสนอแนะ ฝากรีวิวไว้ได้เลย
ยังไม่มีรีวิวบนหน้านี้ ถ้าเคยใช้งานหรือมีข้อเสนอแนะ เขียนเป็นคนแรกได้เลย