Intermediate
โปรเจกต์ Handheld Geiger Counter ด้วย Arduino Nano
Geiger counter สำหรับวัด radioactivity โดยใช้ Arduino Nano ใน 3D-printed housing พร้อม OLED display และ Li-ion battery

Geiger counter สำหรับวัด radioactivity โดยใช้ Arduino Nano ใน 3D-printed housing พร้อม OLED display และ Li-ion battery
Project Supporter Team
โพสต์โดย
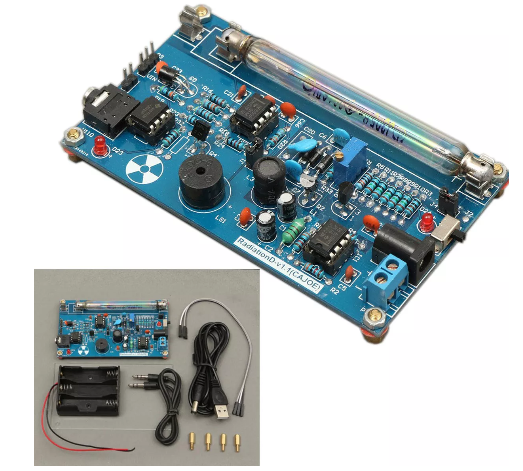
โปรเจกต์นี้เริ่มต้นขึ้นหลังจากที่ฉันได้ซื้อ Geiger counter kit จาก Banggood แบบสำเร็จรูปมา
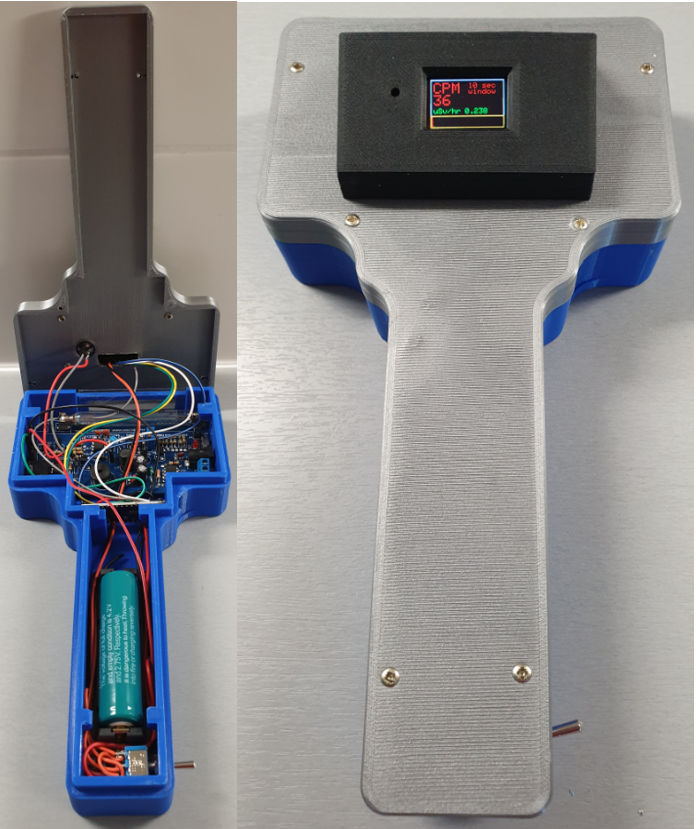
แนวคิดคือการนำชุดคิทนี้ไปใส่ในเคสที่สร้างจาก 3D-printed เพื่อให้ชุด Geiger counter ที่ทำงานได้สมบูรณ์สามารถถือพกพาได้ ผลลัพธ์สุดท้ายแสดงอยู่ด้านล่าง:
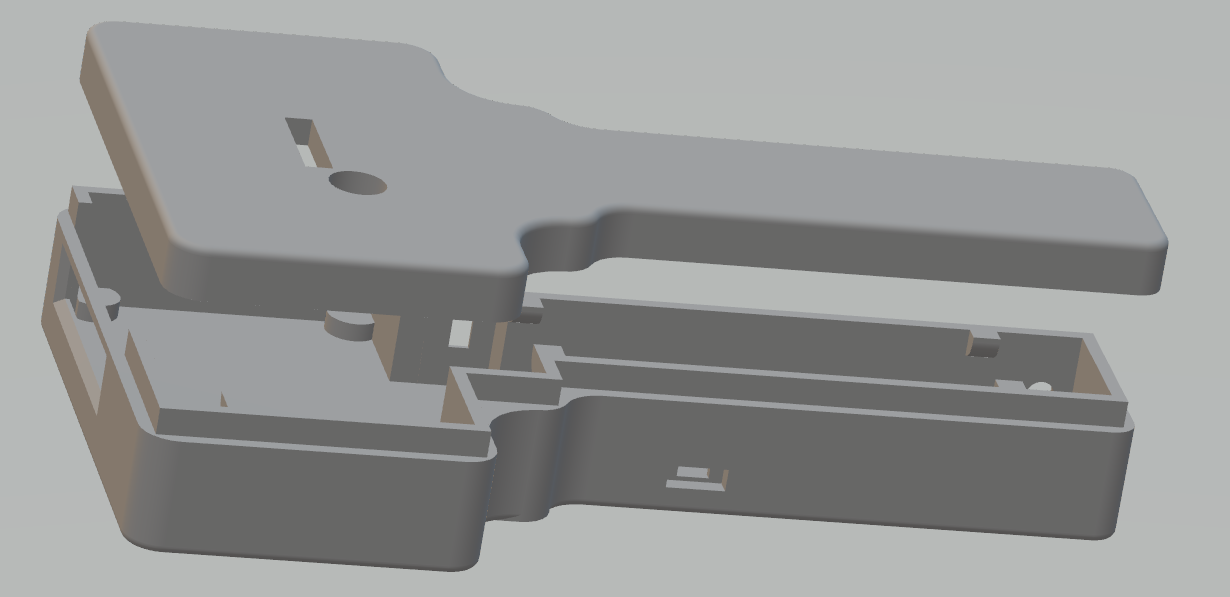
การออกแบบของ Geiger counter แบบพกพาแสดงอยู่ในไดอะแกรมด้านล่าง:

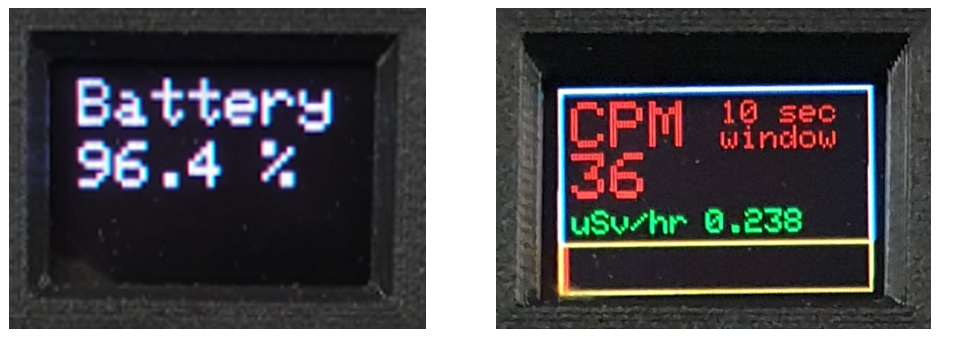
Geiger counter นี้ติดตั้งจอแสดงผล OLED display สีขนาด 0.96 นิ้ว ซึ่งจะแจ้งให้ผู้ใช้ทราบเกี่ยวกับค่า CPM ที่วัดได้ (การวัดอัตราการตรวจจับเหตุการณ์การแตกตัวเป็นไอออนต่อนาที) รวมถึงค่าปริมาณรังสีเทียบเท่า (ที่คำนวณได้) ในหน่วย µSv/hr โดยใช้ค่าตัวคูณ 151 ซึ่งพบได้ในเอกสารทางวิชาการสำหรับประเภทของ Geiger-Müller (GM) tube ที่ใช้งาน
ดูเพิ่มเติมที่ Wikipedia: https://en.wikipedia.org/wiki/Counts_per_minute
ในความเป็นจริงแล้ว ค่า CPM ที่แสดงคือผลลัพธ์ของการคำนวณจำนวนการนับต่อหนึ่งนาที โดยการวัดจำนวนการนับต่อวินาที (CPS) และเก็บค่าการวัดเหล่านี้ไว้ใน array ที่ครอบคลุมช่วงเวลาสิบวินาทีที่ผ่านมา จำนวนการนับรวมในช่วง 10 วินาทีที่ผ่านมานี้จะถูกคูณด้วย 6 เพื่อให้ได้ค่า CPM
จำนวนการนับในช่วงวินาทีที่ผ่านมาถูกใช้เพื่อแสดงจำนวนการวัดในขณะนั้นผ่าน bar graph บนจอ OLED display ซึ่งมีประโยชน์ในกรณีที่มีอัตราการนับสูง หรือเมื่อเกิดการเปลี่ยนแปลงอย่างรวดเร็วของอัตราการนับขณะที่เลื่อนเครื่องวัดพกพาไปเหนือแหล่งกำเนิดรังสี
Geiger counter ใช้พลังงานจาก Li-ion battery ประเภท 18650 ที่สามารถชาร์จผ่านปลั๊ก micro-USB ได้ พอร์ต USB ของ Arduino Nano ยังสามารถเข้าถึงได้เพื่อการเปลี่ยนแปลง software มีการต่อ buzzer เพิ่มเติมเข้ากับบอร์ด Geiger counter เพื่อขยายเสียงของการแตกตัวเป็นไอออนใน GM tube
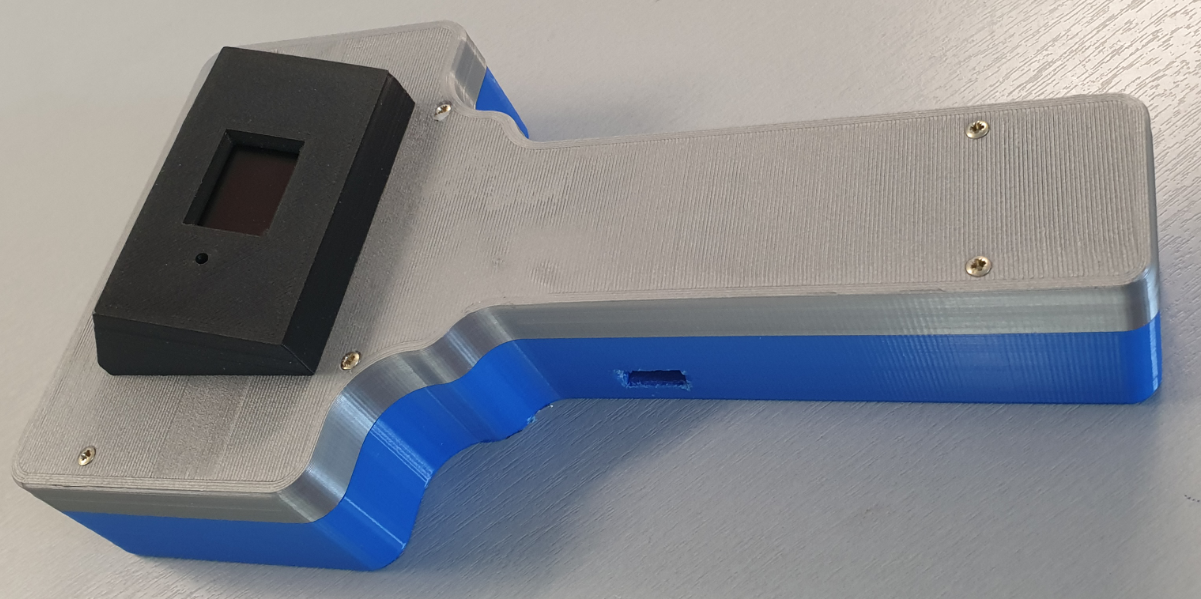
อุปกรณ์อิเล็กทรอนิกส์ทั้งหมดสำหรับ Geiger counter ถูกติดตั้งไว้ในเคส 3D-printed:
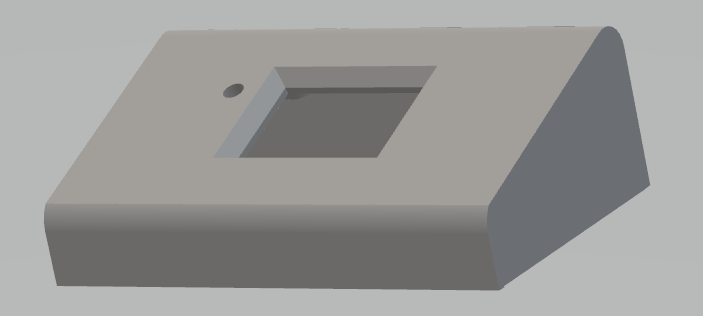
จอ OLED display ถูกวางไว้ในกล่องแยกต่างหากที่ด้านบนของ Geiger counter:
รุ่นที่ประกอบเสร็จสมบูรณ์:
วัสดุที่ใช้มีดังนี้:
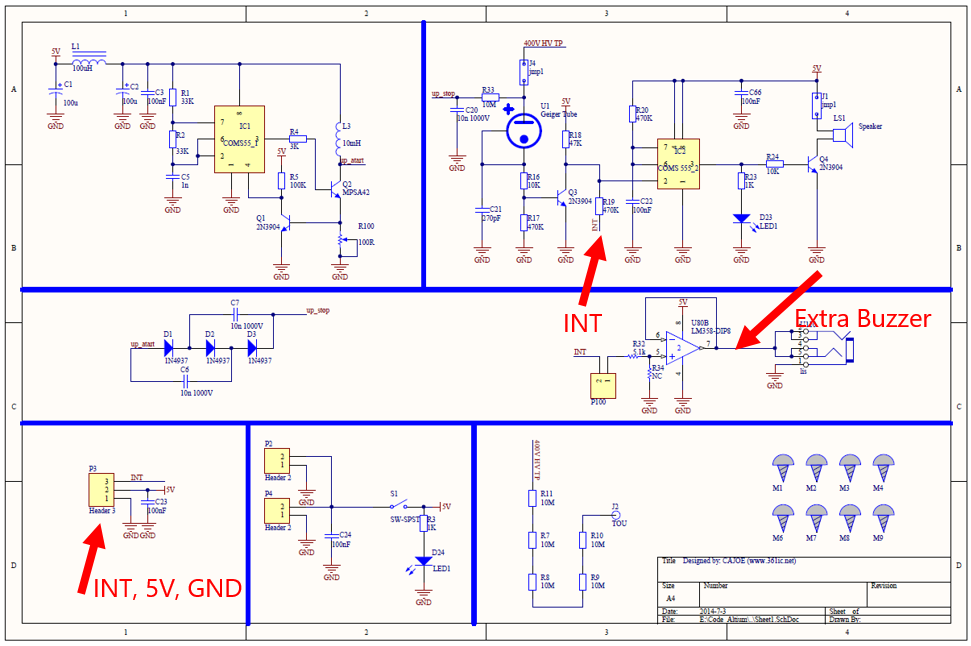
การออกแบบทางอิเล็กทรอนิกส์ของ Geiger counter kit แสดงอยู่ในแผนผังวงจรต่อไปนี้:
แผนผังวงจรของการติดตั้ง Geiger Counter ที่สมบูรณ์เป็นดังนี้:
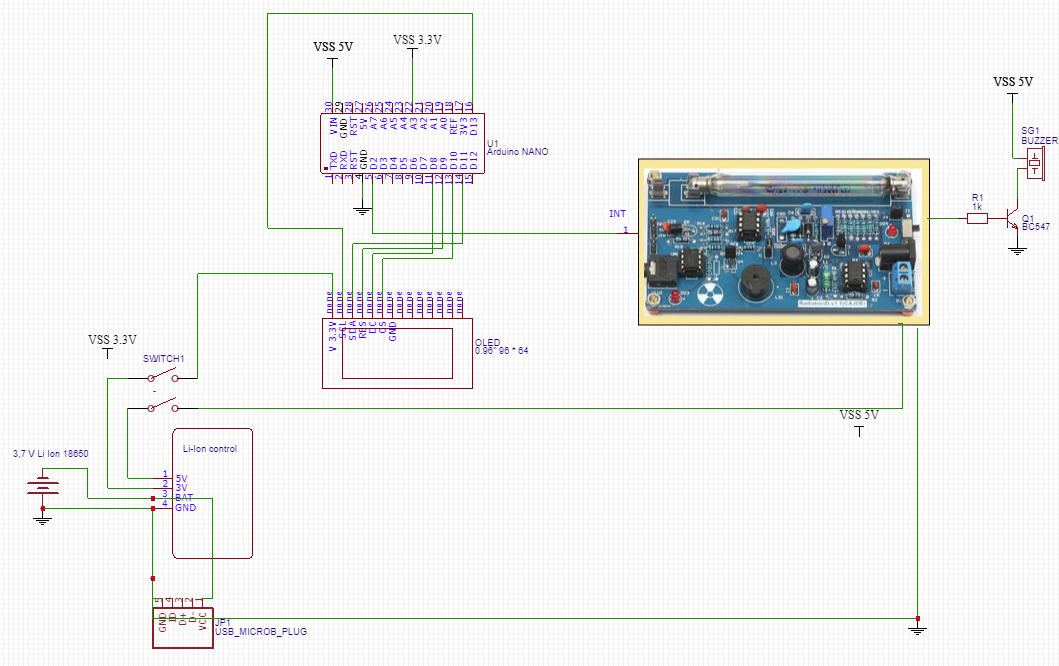
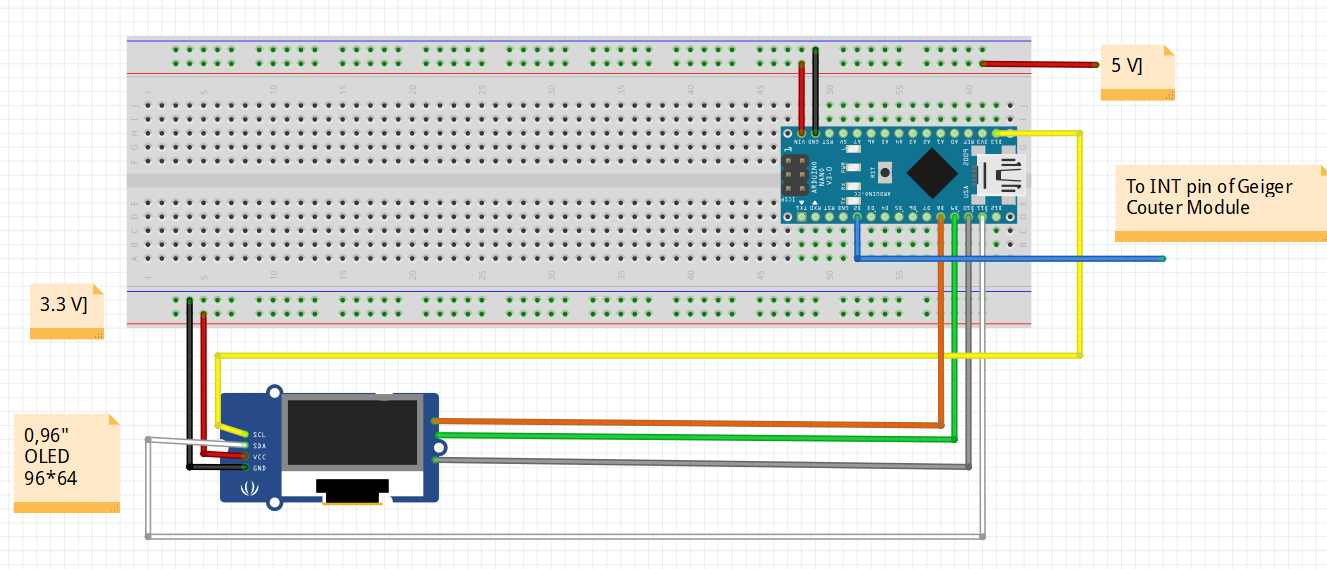
พลังงาน 5V จ่ายมาจาก Li-Ion battery แบบชาร์จซ้ำได้ซึ่งวางอยู่ใน Micro USB Charger Board ส่วนแรงดัน 3.3V สำหรับ OLED display นำมาจากบอร์ดนี้
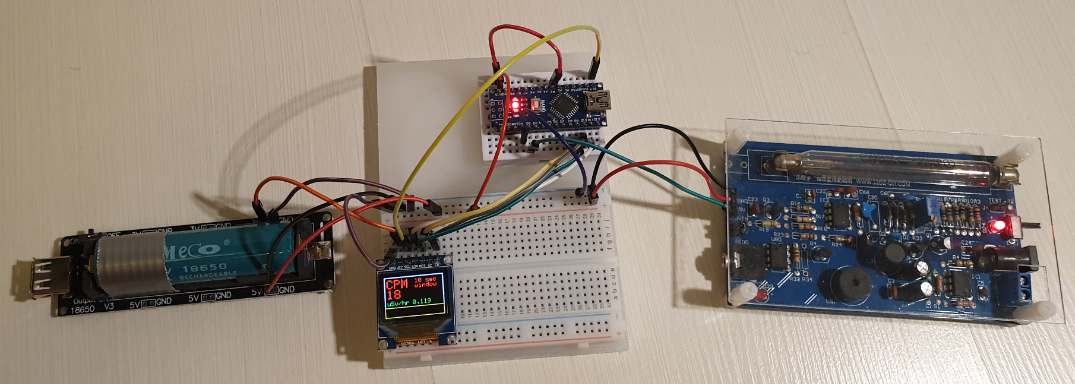
การติดตั้งบน Breadboard ที่ใช้สำหรับการทดสอบและสร้าง software ด้วย Arduino IDE แสดงอยู่ในรูปภาพต่อไปนี้:
การประกอบชิ้นส่วนเชิงกลและอิเล็กทรอนิกส์ทั้งหมดแสดงอยู่ในรูปภาพด้านล่าง:

โปรดทราบว่า Geiger counter แบบพกพานี้ไม่มีการเชื่อมต่อสายเคเบิลใดๆ ออกมาภายนอก
สำหรับการชาร์จ Li-ion battery ขนาด 3.7V จะมีช่องเปิดแยกต่างหากในเคสเพื่อเชื่อมต่อปลั๊ก micro USB (ชั่วคราว)
มีการเชื่อมต่อ mini USB เพิ่มเติมสำหรับการอัปเดต software ของ Arduino Nano
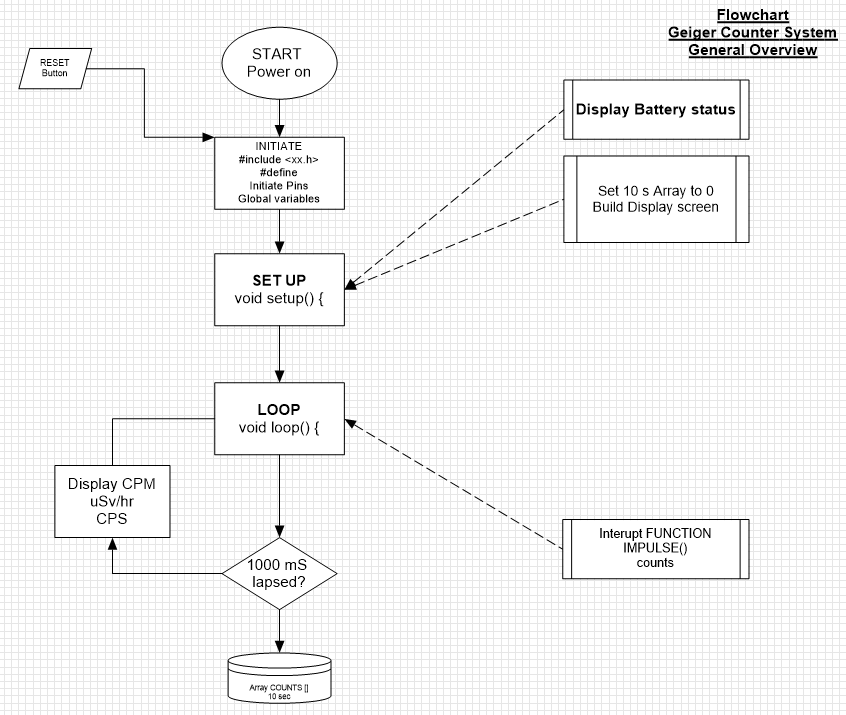
Flowchart ต่อไปนี้แสดงการออกแบบ software ทั่วไปของ Geiger Counter:
มุมมองบนจอ OLED display ขนาด 0.96 นิ้ว คือ:
Arduino sketch ที่สมบูรณ์มีรายละเอียดดังนี้:
#include <Adafruit_GFX.h>

#include <Adafruit_SSD1331.h>

#include <SPI.h>

 //Connections for the OLED display

#define sclk 13 //SCL  (blue wire)

#define mosi 11 //SDA  (white wire)

#define cs 10 //CS   (grey wire)

#define rst 9 //RES  (green wire)

#define dc 8 //DC   (yellow wire)

#define LOGtime 1000 //Logging time in milliseconds (1 second)

#define Minute 60000 //the period of 1 minute for calculating the CPM values

#define show endWrite

#define clear() fillScreen(0)

// Color definitions

#define BLACK 0x0000

#define BLUE 0x001F

#define RED 0xF800

#define GREEN 0x07E0

#define CYAN 0x07FF

#define MAGENTA 0xF81F

#define YELLOW 0xFFE0

#define WHITE 0xFFFF

Adafruit_SSD1331 display = Adafruit_SSD1331(cs, dc, rst);

int Counts = 0; //variable containing the number of GM Tube events withinthe LOGtime

unsigned long previousMillis= 0; //variablefor storing the previous time

int AVGCPM = 0; //variable containing the floating average number ofcounts over a fixed moving windo period

int TenSecCPM = 0;

int units = 0;

int tens = 0;

int hundreds = 0;

int thousands = 0;

float Sievert = 0;

int COUNTS[10]; // array for storing the measured amounts of impulses in10 consecutive 1 second periods

int t = 0;

////////////////////the setup code that follows,will run once after "Power On" or after a RESET///////////////////

void setup() {

 Serial.begin(115200);

 display.begin();

 display.fillScreen(BLACK);


 floatBattery = analogRead(A3); //(orange wire)

 floatBattPerc = 100 * (Battery/770);


 //Serial.print("battery value = "); Serial.println (Battery); Serial.print("battery percentage = "); Serial.println (BattPerc);

 display.setCursor(4,4);

 display.setTextSize(2);

 display.setTextColor(MAGENTA);

 display.println("Battery");

 display.setCursor(4,24);

 display.print (int (BattPerc)); display.print("."); display.print (int((10*BattPerc)-(10*int(BattPerc))));display.print(" %");

 delay(3000);

 display.fillScreen(BLACK);

 for(int x = 0; x < 10 ; x++) { //put all data in the Array COUNTS to 0 (Array positionsrun from 0 to 10;

 COUNTS[x] = 0; //10 positions covering a period of 10 seconds

 }


 attachInterrupt(0, IMPULSE, FALLING); //define external interrupton pin D2/INT0 to start the interupt routine IMPULSE  (green wire)


 display.drawRect(0,0,96,64,WHITE);

 display.setCursor(4,4);

 display.setTextColor(RED);

 display.setTextSize(2);

 display.print("CPM");

 display.setCursor(50,4);

 display.setTextSize(1);

 display.print("10 sec");

 display.setCursor(50,12);

 display.print("window");


 display.setCursor(4,38);

 display.setTextSize(1);

 display.setTextColor(GREEN);

 display.print("uSv/hr");


 display.drawRect(0,48, 96, 16, YELLOW);

}

////////////////////////the loop code that follows,will run repeatedly until "Power Off" or a RESET/////////

void loop()

{

 unsignedlong currentMillis= millis();

 if(currentMillis - previousMillis >LOGtime)

 {

 previousMillis = currentMillis;

 COUNTS[t] = Counts;

 for (int y = 0; y < 10 ; y++) { //add all data in the Array COUNTS together

 TenSecCPM = TenSecCPM + COUNTS[y]; //and calculate the rolling average CPM over a 10 secondperiod

 }

 AVGCPM = 6* TenSecCPM;

 TenSecCPM = 0;

 t++ ;

 if (t > 9) { t = 0 ;}


 //Serial.print ("COUNTS "); Serial.print(t);Serial.print (" = ");Serial.println (COUNTS[t]);

 display.fillRect(4,20,90,17,BLACK); // clear the CPM value field on the display

 display.setCursor(4,20);

 display.setTextColor(RED);

 display.setTextSize(2);

 display.println(AVGCPM);

 //Serial.print ("AVGCPM = "); Serial.print(AVGCPM); //Serial.print ("   CPM = "); Serial.println(CPM);

 display.fillRect(45,38,50,10,BLACK); //clear the uSv/Hr value field on the display

 display.setCursor(45,38);

 display.setTextColor(GREEN);

 display.setTextSize(1);


 Sievert = (AVGCPM /151.0) ; //Serial.print ("  Sievert = ");Serial.println (Sievert);

 units = int (Sievert); //Serial.print ("units = "); Serial.println(units);

 tens = int ((10*Sievert) - (10*units)); //Serial.print ("tens = "); Serial.println(tens);

 hundreds = int ((100*Sievert) - (100*units) - (10* tens)); //Serial.print ("hundreds = "); Serial.println(hundreds);

 thousands = int ((1000*Sievert) - (1000*units) - (100*tens) - (10*hundreds)); //Serial.print ("thousands ="); Serial.println (thousands);

 display.print (units); display.print("."); display.print (tens); display.print (hundreds);display.println (thousands);


 display.fillRect(1,49,94,14,BLACK); // clear the CPM indicator field on the display

 display.fillRect(1,49,Counts,14,RED); //fill the CPM indicator field on the display


 Counts = 0;

 }

}

//////////////////END ofLOOP////////////////////////////////////

/////////////////////////////////Hereafter follows the Function for counting the number of impulses from Geiger Counter kit

void IMPULSE()

 {

 Counts++;

 }
ส่วนที่สำคัญที่สุดของ Sketch คือฟังก์ชัน interrupt ที่จะถูกเรียกเมื่อมีการวัดสัญญาณ impulse บน GM tube ของ Geiger Counter ซึ่งจะไปกระตุ้นเอาต์พุต INT ของ Geiger counter (โดยทำให้เป็นสถานะ LOW ในช่วงเวลาสั้นๆ) สัญญาณ INT จะเชื่อมต่อกับพิน D2 (พิน external interrupt INT0 ของ Arduino Nano):
attachInterrupt(0, IMPULSE, FALLING);สัญญาณ INT จะเริ่มการทำงานของ interrupt routine ชื่อ IMPULSE () เพื่อเพิ่มค่า Counts ขึ้นทีละ 1:
void IMPULSE() {Counts++ ; }หลังจากผ่านไป 1000 milliseconds:
Arduino sketch ที่สมบูรณ์สำหรับ Geiger counter ประกอบด้วยโค้ดประมาณ 150 บรรทัด รายการโค้ดที่สมบูรณ์ถูกรวมไว้เป็นส่วนหนึ่งของบทเรียนนี้ โดยโค้ด Arduino (ดูบทที่ 9) ได้รับการจัดเตรียมพร้อมกับคำอธิบาย (comments) อย่างละเอียด
สนับสนุนเพื่อรับ Source Code หรือแอปพลิเคชันสำหรับโปรเจกต์นี้
ประเมิน Project
เอาฟอร์มยาวออกจากท้ายหน้า Project แล้ว เหลือเป็นปุ่มให้กดไปกรอกหน้าเดียว ตัวใหญ่ เว้นบรรทัดเยอะ อ่านง่ายกว่า
รีวิวจากคนใช้งานจริง
ถ้าเคยสั่งงาน เคยอ่านหน้านี้แล้วได้ประโยชน์ หรือมีข้อเสนอแนะ ฝากรีวิวไว้ได้เลย
ยังไม่มีรีวิวบนหน้านี้ ถ้าเคยใช้งานหรือมีข้อเสนอแนะ เขียนเป็นคนแรกได้เลย